Daily Ride Project.....

Scirocco Register members projects
Forum rules
Section for all vehicle and related projects. Please keep responses pertinent to thread.
User avatar
djw766
Posts: 41
Joined: Fri Nov 12, 2010 7:32 pm
fill in the right answer: 10
Location: Nr Grantham, Lincs

Daily Ride Project.....

Post by djw766 »

Been meaning to do this for ages but never got my butt into gear till now so hear goes.....

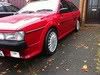
Back in October last year my circumstances changed and I found I no longer needed my Vito van.....so it went! Now I could have got myself a faceless eurobox to use but decided I'd get myself a Mk2 Scirocco. My first (and only previous one!) was way back in 88 but someone decided they liked it more than me and borrowed it, without my permission, and i never got it back - basically it was nicked - gutted was an understatement. Anyway back to the present and after afew months searching I found one which seemed to be pretty much what I was looking for. All the previous MOTs, loads of history, not full but it was 20 years old! Rolling back the years as I like to put it - mid life crisis my Mrs tells me but anyway I bought it and the love(?) affair started all over again... :hugegrin:

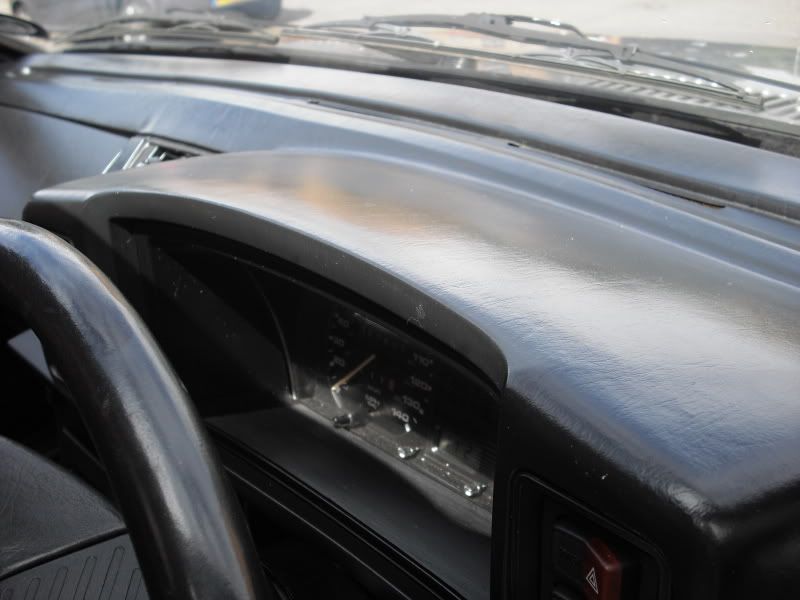
Cosmetically it looked pretty decent with the exception of the yellow calipers and drums, yellow rocker cover, a chipped/cracked windscreen and wear on the drivers seat. The dash also had cracks like the Grand Canyon but that would have to wait. A replacement interior was found & bought (ready for when i got the car) and fitted along with a replacement windscreen. Bigger problems were only around the corner however.

Now the main man in all of this and the guy who takes all the credit for the work done is a man by the name of Col. On the cars first main trip the gearbox gave out. Reaching our destination, courtesy of the RAC, Col sourced a replacement box and fitted it. Another major headache then came along by way of a pot hole from hell which completely knackered the front suspension - the wing was sitting on the tyre by a good 3/4 of an inch. The repair qoutes were silly and then someone (Col) mentioned coilovers. Ooooops!!. A phone call to Venom Motorsport near Preston saw a set purchased and once again Col was getting intimate with the Rocco.

Running problems were never far away.....the previous owners induction kit was removed and a replacement carb was fitted. That seemed to sort things short term but the problems came back...the dreaded filler neck....a good second hand one was sourced and fitted, the tank drained etc and once again the car was sweet - again cheers Col. Also huge thanks to MarkH who needs a mention here for all the advice given :beers: . He can also testify to the running problems from the one (or maybe more!) panic phone call to him on my way over to pick up an immaculate replacement dash off him one weekend. When the engine is idling close to the redline it makes for interesting approaches to roundabouts :shock:


Perhaps i should have been taking photos of all this work from the start but I never thought it would progress this way.


It wasn't long before a couple of oil leaks appeared which needed attention. A conversation with Col about them and he (honest!!) decided the best way forward was to strip and rebuild the engine so.....out came the camera along with the engine, gearbox..... :swoon:

Some 'before' piccies:

Image

Image

Image

Image

Image

Image

Image

So Col set to work and started to work his magic...

Outcame the engine and box....
Image

Image

Image

Image


Now it was at this point that while pressure washing the engine we noticed another problem...a piece had been welded on the back of the block :help:
Once again thanks to MarkH who just happened to have, as you do, an engine and box to hand and to Col for collecting them :beers:


Now when Col said he'd strip the engine he really meant strip....


Image

Image

Image

Image

and then....

Image

Image

Image

Image

and the 'after' piccies

Image

Image

Image

Image

Image


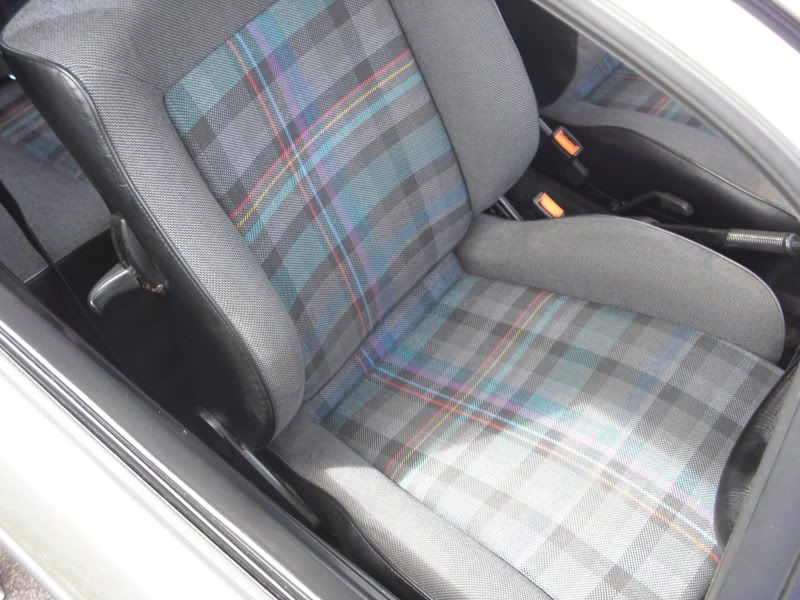
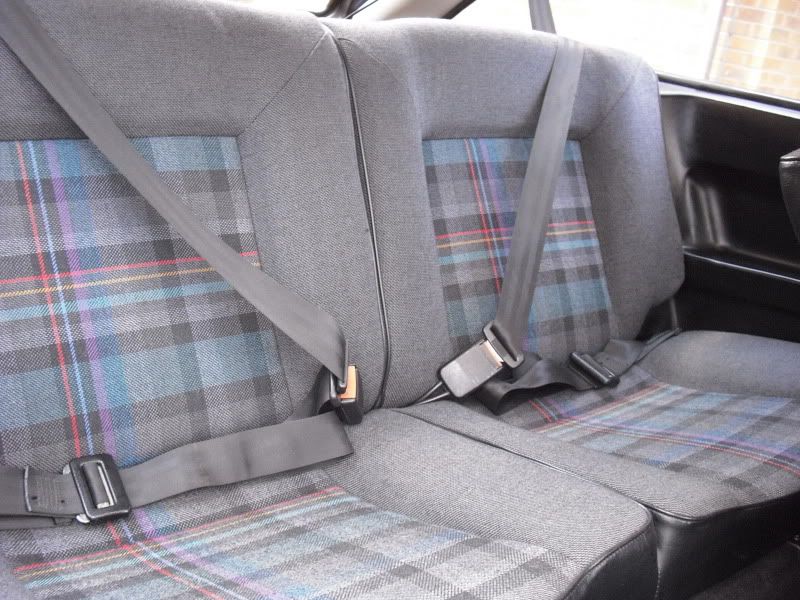
The main problem with the interior was the wear on the drivers seat. However, I managed to find a pretty much immaculate replacement before I got the car so in it went! As I said earlier the camera wasn't out at that time but this is how it looks now:
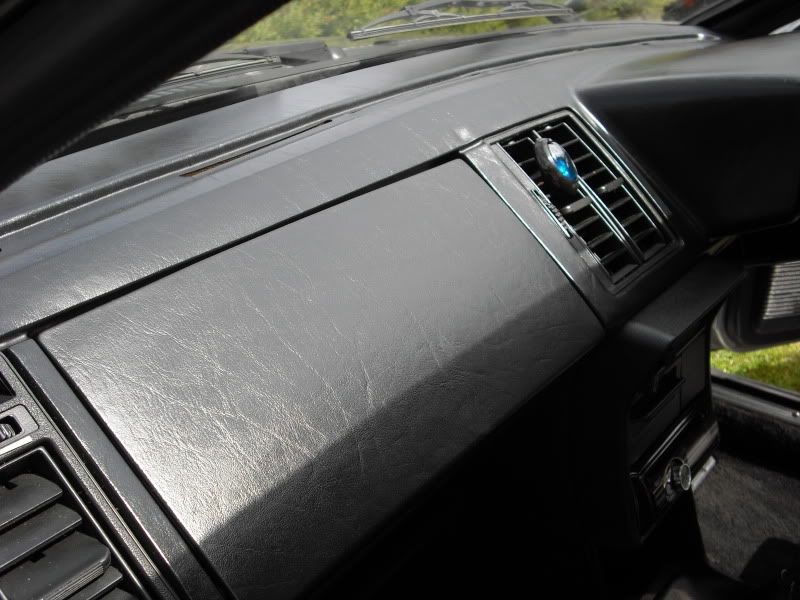
Image

Image

Image


and the dash....

Image

Image


The original parcel shelf had had the usual butchers knive taken to it for 6x9s and although they had given it the 'stealth' treatment having to look at the holes left every time the boot was opened didn't make for a pretty sight so yet another part that MarkH knew about that was for sale resulted in this.......

Image


Also felt that the boot carpet let the car down and also the card backing on the rear seat. Wandering around a local autojumble at Hemswell came across a chap selling some 'proper' carpet - not the usual 'acoustic' stuff for the sub boxes. At £10 for roughly 2m x 2m it was worth a punt to see how it looked. Some 6mm mdf and 3/4 inch foam cut to shape (cheers Bill!), using the old carpet as a rough template, forms a really solid base for the carpet while the seat back is transformed...


Image

Image


The wheel centres were looking extremely tired so had a quick word with some local signage people who made up some 57mm diameter stickers and the wheels are transformed. The yellow caliper paint has been banished and replaced with silver which I think also helps the look of the wheel.


Image


So, engine rebuilt, windscreen replaced, interior relpaced, dash replaced, boot carpet sorted along with rear seat back, wheels tidied, coilovers fitted, black mast aerial fitted, upgraded speakers (still 6x4 but 2 way front and 4 way rear) this is how HOH is looking at the mo.....The side windows have had a light smoke tint on the front and a medium smoke on the back. Still trying to find somewhere willing to take on tinting the tailgate window though!


Image

Image

Image

Image

Image

Image

Image

Image

Image

Once agin a huge thanks to Col for all his time, effort and patience...I swear I'm on his call barred list and rumour has it he has a party everytime the car turns up without orange flashing lights and the sound of a winch going... :yahoo:


Whats next? Well I don't like the way the tail lights are different shades - the nearside appears lighter than the offside. Should be on with that this weekend so will post some images as soon as... :lazy:

Long term.....well so long as things stay sound mechanically then a respray might be the order of the day early next year along with getting the wheels refurbed...oh and doing something to tidy the sunroof.......but don't tell the Mrs... :hehe:
Last edited by djw766 on Tue Sep 06, 2011 11:44 am, edited 1 time in total.


markh
Posts: 718
Joined: Wed Apr 01, 2009 2:14 pm
fill in the right answer: 15
Location: Newcastle, Staffordshire.

Re: Daily Ride Project.....

Post by markh »

Brilliant Daz, you gonna make the national next week buddy ? Theres a few folk coming over in convoy from the East Midlands. :chill:


Don't ask me....it was like that when i got here !
Image
User avatar
djw766
Posts: 41
Joined: Fri Nov 12, 2010 7:32 pm
fill in the right answer: 10
Location: Nr Grantham, Lincs

Re: Daily Ride Project.....

Post by djw766 »

Yeah we'll be there Mark. Setting off Saturday morning - working Friday, and have booked into a hotel for the Saturday night. :beers:


markh
Posts: 718
Joined: Wed Apr 01, 2009 2:14 pm
fill in the right answer: 15
Location: Newcastle, Staffordshire.

Re: Daily Ride Project.....

Post by markh »

djw766 wrote:Yeah we'll be there Mark. Setting off Saturday morning - working Friday, and have booked into a hotel for the Saturday night. :beers:

Have a look at the east midlands convoy thread bud, and hook up with matt and the others. :good:


Don't ask me....it was like that when i got here !
Image
User avatar
eefy
Posts: 999
Joined: Fri Apr 10, 2009 7:32 pm
fill in the right answer: 10
Location: Manchester

Re: Daily Ride Project.....

Post by eefy »

very jealous, very nice car mate :)


Image
GTXTRA
Posts: 3392
Joined: Mon Mar 02, 2009 9:38 pm
fill in the right answer: 10
Location: London

Re: Daily Ride Project.....

Post by GTXTRA »

what a great project thread, see you next week.


:hi:


Serial Rocco-ist.........
Dougiegreenskala
Posts: 48
Joined: Fri Jul 01, 2011 12:49 pm
fill in the right answer: 10
Location: Sandhurst, Berks.

Re: Daily Ride Project.....

Post by Dougiegreenskala »

:newbie:
Nice project, great pics too. You've got a couple of good mates there. Have same interior (driving seat seen better days). Will have to sort that one out. Keep up the good work. See you next week. :bye:


User avatar
djw766
Posts: 41
Joined: Fri Nov 12, 2010 7:32 pm
fill in the right answer: 10
Location: Nr Grantham, Lincs

Re: Daily Ride Project.....

Post by djw766 »

Well we've had some decent weather near us today so it was on with sorting the rear lights. They'd been annoying me since I got the car in that the nearside was lighter than the offside. Petty I know but..... :dunno:

Image

I had managed to get a second set a few weeks ago in the hope that I could get a matching pair but it wasn't to be. So thinking cap on, a few beers and a moment of inspiration later.....why not mask off the lower part of the 'ridges' and spray tint the upper part. SImple...

First thing to do was 'clean up' a pair. Some paint brush cleaner, water and a brillo pad removed the remaining original black finish to the ridged area of the lights nicely. I was tempted to leave them as they where at this point as the finish was pretty good but that wasn't the original plan and I do prefer the darker look. So with the easy bit done it was time to mask off the areas i didn't want to 'restore'. This is probably the fiddliest bit but some 3mm pinstripe fits the recess in the ridges almost perfectly. A word of advice.....amazingly a 10 metre roll is only good for one light....so a second trip to town... :blush:

Image

Image

I used black tint spray with the intention of building the layers up. The finish you see on the lights is only 2 coats. It did appear darker before the masking tape was removed so I could probably have got away with one or two more coats. That said the effect does change depending on the viewing angle. Honest!!

I'll let you make your own minds up but the end results are:

Image

Image

Image

Image

Image

Although I say end results I can see myself getting some more pinstripe and..... :chortle:


G Beats
Posts: 1067
Joined: Sun Jun 21, 2009 12:19 am
fill in the right answer: 10
Contact:

Re: Daily Ride Project.....

Post by G Beats »

We used to have the same model as this was told from a person from Scirocco world that it the colour was Platinum Grey this is the one we sold to geff , looks very good what you have done to the car ie engine etc, i was chating to tim the other week off here from bradley stoke bristol , iam from bristol as well i was telling him about our old mk vw scriocco 18 gt 2 we sold to geff in bristol here, well i put a webber carb on her, the old mandold rubber was broke so had to put a new 1 those on her, she was not kept in the garage Gracie like Scarlet back then and it was winter time, our Mechanic set the webber up for her before the winter but she was very bad in the winter but not as bad as the pirburg in how she was running tim said there is a cold flow running into the webber you need to make sure there is a hot flow running into it so runs much better ok bud


G Beats.Been into MK 2 V.W Sciroccos since 98.Now on my fourth MK 2 Scirocco. R.I.P two MK 2 Scala DX Engine's.Sold GT 2. No longer have a mk 2 v.w Scirocco as it was stolen back in February 2020 .Or another one know have a 1980s BMW.
User avatar
djw766
Posts: 41
Joined: Fri Nov 12, 2010 7:32 pm
fill in the right answer: 10
Location: Nr Grantham, Lincs

Re: Daily Ride Project.....

Post by djw766 »

Finally managed to get a week off work so thought I'd get on with a few jobs......weather permitting... :read: :wakey: :beers:

Anyway, as I mentioned earlier I felt the rear lights needed a couple more coats to bring them to the look I wanted. So off they came, masked them up and gave them a couple of extra coats. Stripped the masking tape off after leaving them to dry and feeling rather pleased with how they looked it was time to refit them. Before that though (and after all that hard work!) I thought it was time for a quick coffee. Mistake No1. Now it was just a little bit breezy here yesterday to say the least and this is where Mistake No2 happened along. Bit of a Darwin moment here.....as I placed the two lights on the boot of our Bora. So indoors I go and just as I'm pouring the coffee I hear a 'clatter' from outside. First thought 'What was that?'......Second thought....well I can't really put that on here... :hehe: The 'clatter' resulted in this:

Image
Image

Many expletives later and a number of mixed emotions :ire: :dash: :blush: :shocking: :swoon: I remembered the spare set of lights I had...so ding ding Round 2!

Lights are now back on the car but my Darwin moment has taken the edge off how I feel about them....not particularly happy with the finish of the replacment light but....hey ho at least its in one piece....

Image
Image
Image

For a while now I'd been searching for some of the boot wheel arch liners to pretty much finish the boot off. Happened along a set so it was time to get them in. After a bit of a clean up ....top one is after....!

Image

So stripped out the back seats along with the boot carpet and while I was at it gave the floor pan a bit of a clean and polish! (piccie was an afterthought - still slightly traumed after the episode with light!)

Image

So with the liners in it was time to start putting it all back together. As mentioned earlier in the thread I'd replaced the boot carpet so first in was the foam lining which just needed trimming slightly due to the liners. (Really need a 'loop' style grab handle. When I get one should be able to fix all these together so that they all lift up as one):

Image

then the MDF placed back in (again due to the liners just a small amount of sanding was need to get a good fit - apologies for the poor quality piccie!)

Image

so to the carpet which again required a small amount of trimming:

Image

With the nearside liner in place I was left with this which I believe (may be wrong though and probably am) was for a first aid kit. As you can see there are some rough edges to the liner where it has either been previously cut or ripped but nothing too drastic.

Image

Wasn't happy with that so, as I had some carpet left, out came the stanley knife, found a small piece of plywood and some adhesive - so glad I watched Blue Peter all them years ago!!

Just need to trim/straighten the edges of the liner now but:

Image

Which basicaly leaves the boot looking like this:

Image
Image
Image

I think that just about finishes the boot off....unless I decide to carpet the back panel......mmmmmmm.........now wheres that adhesive gone.....
Last edited by djw766 on Tue Sep 06, 2011 3:13 pm, edited 1 time in total.


User avatar
Reverend Frog
Posts: 497
Joined: Wed Apr 01, 2009 12:57 pm
fill in the right answer: 15
Location: Belfast

Re: Daily Ride Project.....

Post by Reverend Frog »

Excellent work. Satisfying job on that boot :D

Don't worry about the lights, we've all been there with the temporary brain fade!


Previously owned:
Image
1988 1.6 GT
1989 1.8 GT
1982 1.6 GTI
1993 Corrado VR6
User avatar
Risocco
Posts: 1374
Joined: Wed Apr 01, 2009 1:09 am
fill in the right answer: 10
Location: Costa-Del-Kidderminster

Re: Daily Ride Project.....

Post by Risocco »

Boot looks awesome. Very inspiring.......


1983 GL
1986 GT
1994 Corrado VR6
User avatar
Cpt Custom
Posts: 761
Joined: Mon Jul 19, 2010 1:46 pm
fill in the right answer: 15
Location: Northallerton

Re: Daily Ride Project.....

Post by Cpt Custom »

Some impressive detailing going on there with that boot tidy up! :vcool:

As for the incident with the lights, like the Rev says we all suffer from "temporary brain fade" from time to time. My last attack was about 4 months ago as I reversed Lily out the garage and down our drive. Seems some pyjama had relocated the gable wall of our house ...

Image

:hugegrin:


Image 1987 Alpine White Mk2 GT Lily
User avatar
djw766
Posts: 41
Joined: Fri Nov 12, 2010 7:32 pm
fill in the right answer: 10
Location: Nr Grantham, Lincs

Re: Daily Ride Project.....

Post by djw766 »

Ouch Cpt, why is it that the time where age can legitimately start to take the blame feels like its getting closer and closer. Now where did i put my keys.... :hugegrin:

Well I didn't get quite as much done as I wanted to on this week off. The weather round here has been pretty grim so decided to give her a good run and go visit family on the other side of the country. Also spoke with Col and worked out I could also tie this in with getting a couple of long overdue jobs done at the same time - mainly replace front wishbones, bushes and ball joints. So with a 5:30 AM start to try and avoid the traffic round Leeds & Manchester off we go. After arriving unaided which is always goodnews and something which also lets Col breathe a sigh of relief I hand the keys over to him.

And thats were it all started to go downhill! Seems the parts people only delivered one complete set of parts - and no matter which supplier was tried it would be the next day before another complete set would be available. But that was the least of it. As well as letting me know about the parts Col informed me that there were a couple of holes where there shouldn't be - mainly in the floorpan :shocking: ! Now he was as confused about this as me as nothing was mentioned at the time of MOT a few weeks ago. After much deliberation and drinking of coffee the conclusion was reached that it must have been done when I'd had the front tyres replaced for the MOT (we were pretty sure it was going to fail on one tyre but put it in for the MOT anyway - as you do - free re-test so...) as the holes where in the same place on each side - the garage had missed the jacking points. That said the points that have been damaged must have been weak and were probably on their way out anyway. Just got to grin and bear it but....... :dash:

Image
Image

So the car is still with Col and just hoping now that there are no further nasty surprises when the carpets come out but hope to pick her up again this coming weekend. Watch this space as they say.. :yup:

May be worth a mention but I got hold of a spare (or perhaps that should read emergency back up!) tailgate ready for when the glass comes out to get it tinted shortly. That should then be it for the glass. If everything goes well then there will be a spare tailgate (in black) and spoiler available soon. I'll get those up on the parts for sale thread as soon as....


User avatar
djw766
Posts: 41
Joined: Fri Nov 12, 2010 7:32 pm
fill in the right answer: 10
Location: Nr Grantham, Lincs

Re: Daily Ride Project.....

Post by djw766 »

Been wanting to change the front indicators for some clear ones for quite a while but can't justify (to myself or the mrs!) the cost of them. I know they're as rare as rocking horse etc and that they look the dogs but......

Anyway looked into a few things and it seemed the best way would be to try the 'flyeyeskit' way. Seen it mentioned on a couple of threads and for the cost thought I may as well give it a go. So ordered a 30cm x 60cm strip (of grey 4 - they've loads of colours to choose from) on Wedneday evening off their website and it arrived on Friday - very efficient - and well packaged to boot.

So with a couple of hours to spare earlier on after watching the Grand Prix the look went from this:

Image
Image

to this:

Image
Image
Image
Image
Image
Image


I knew i wasn't going to get a 'proper' clear lens look but I'm pretty pleased with the results. :yup:


Post Reply