

Thats the one Col, will put up an update once its sorted :)
thanks for the comment Ghost, i did really like the long grill (still got it) but thought I'd try something diferent for a while, no dount something else will crop up on the front at some point :)
Eefy's White Scala
Forum rules
Section for all vehicle and related projects. Please keep responses pertinent to thread.
Section for all vehicle and related projects. Please keep responses pertinent to thread.
Re: Eefy's White Scala
well finally got round to fitting that replacement door card that been in the shed since november i think!!!! well you cant rush these things lol
the reason for the replacement is this-

seems when the quater window was replaced they didnt strip the door down to do it!!!!!
after using some of this stuff to re-attached the recessed grey panel-

worked a treat by the way
fitted it to the door and B011ocks, the hole cut for the electric windoow switched was about 3-4mm to big :( and they kept falling out
so ended up fitting the original again, looks like I'll after a window winder type them so i can cut it up. The switches in my are from a Corrado and were fitted by the dealer i believe. the ones the door card came out of had a more shiny surround but the same switches!!!!!
hey o we live and learn lol
gmheaning hte plastic cover for the rear of the wing mrror wasnt fitting the best , still thats another job to be done.
the reason for the replacement is this-
seems when the quater window was replaced they didnt strip the door down to do it!!!!!
after using some of this stuff to re-attached the recessed grey panel-
worked a treat by the way
fitted it to the door and B011ocks, the hole cut for the electric windoow switched was about 3-4mm to big :( and they kept falling out
so ended up fitting the original again, looks like I'll after a window winder type them so i can cut it up. The switches in my are from a Corrado and were fitted by the dealer i believe. the ones the door card came out of had a more shiny surround but the same switches!!!!!
hey o we live and learn lol
gmheaning hte plastic cover for the rear of the wing mrror wasnt fitting the best , still thats another job to be done.

Re: Eefy's White Scala
Hmm, this just box just arrived at work, my birthday present-

Wonder what it could be ;)
Wonder what it could be ;)
-
Cpt Custom

- Posts: 761
- Joined: Mon Jul 19, 2010 1:46 pm
- fill in the right answer: 15
- Location: Northallerton

-
andyneedham2
- Posts: 219
- Joined: Wed Jul 08, 2009 8:24 pm
- fill in the right answer: 10
- Location: Manchester
Re: Eefy's White Scala
I'm pretty sure that delivery note says,
'get it fitted sharpish!'
Maybe its just my eyes.
'get it fitted sharpish!'
Maybe its just my eyes.
Re: Eefy's White Scala
will be matey, as soon as the braided brake line arrive it'll be booked in with my mae for fitting :)
cant wait
cant wait
Re: Eefy's White Scala
soon well be sounding sweet too. is it a full system eefy? 3" talepipe or what???
1991 Wide Arched Rieger Scirocco.....
Good things come to those who wait!!!!
Good things come to those who wait!!!!
Re: Eefy's White Scala
Mani back 2.5" with twin pipe end, the big boy jetex system, they'll be a pick up in the morning ;)
Re: Eefy's White Scala
hmmm cant believe how big this thing is lol


its going to wake the neighbours up when i use the car for works lol
its going to wake the neighbours up when i use the car for works lol
Re: Eefy's White Scala
Well the back of my Rocco went from this-


With this lot in the boot-

To this-


I think you’ll agree a great improvement :) just need to go back to me mate in a week or so when it settles in to adjust it as it keeps knocking every so often. As he said its tight, its very tight lol
Sounds awesome though under load
Of will have a standard Injection exhaust for sale, will get an advert sorted at lunch
With this lot in the boot-
To this-
I think you’ll agree a great improvement :) just need to go back to me mate in a week or so when it settles in to adjust it as it keeps knocking every so often. As he said its tight, its very tight lol
Sounds awesome though under load
Of will have a standard Injection exhaust for sale, will get an advert sorted at lunch
Re: Eefy's White Scala
Following the meet yesterday and me mentioning that I had a had a clutch panel repair panel to reinforce my bulkhead, and had had if for 18 months or so in the shed for fitting, it was pointed out that I really should before the engine needs coming out for welding!!!!!
So with a bank holiday and that ringing in my ears it was the job for the day :)
First thing was the stripping out of the lower drivers side tray and under steering wheel panel, then it was to the engine side to disconnect the clutch cable for pulling through, this was the first issue I had, with the car being lowered I couldn’t get both hands under to get the retaining clip off while pulling the cable down :(
So with the car now on ramps the cable was freed

So this is the eBay panel sold as one for the MK2 Rocco!!!!!

Hmmm ermm not its not lol the main problem is the lower right part that seems to round something on the bulkhead but the rocco’s bulkhead has nothing there. With mine being an injection there the accelerator cable to one side and a vacuum pipe to the other, I decided that I didn’t want to tempt fate and instead decided to cut the panel around them.

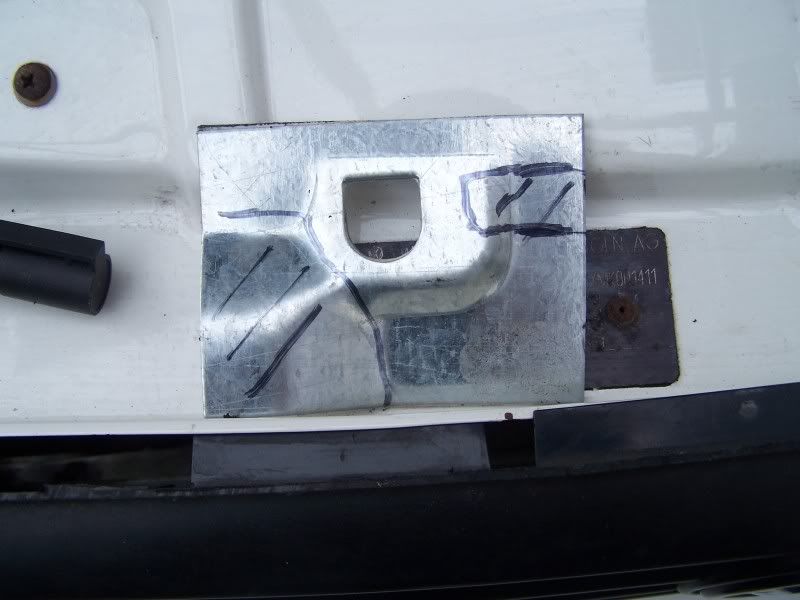
So with my newest shed toy needing trying out (my vice) I started cutting, them trimming some more, by the end I had this. It also needed some slight bending to the lower section to get a better fit against the bulkhead.


As you can see its not a bad fit-

So its been treated to a coat of undercoat and top coat

All ready for refitting tomorrow, I also decided to make a template of the final panel which I am going to scan in at work and if anyone wants it just PM me and I’ll email it over, also if the Mods want a copy to put on the forum just let me know

So with a bank holiday and that ringing in my ears it was the job for the day :)
First thing was the stripping out of the lower drivers side tray and under steering wheel panel, then it was to the engine side to disconnect the clutch cable for pulling through, this was the first issue I had, with the car being lowered I couldn’t get both hands under to get the retaining clip off while pulling the cable down :(
So with the car now on ramps the cable was freed
So this is the eBay panel sold as one for the MK2 Rocco!!!!!
Hmmm ermm not its not lol the main problem is the lower right part that seems to round something on the bulkhead but the rocco’s bulkhead has nothing there. With mine being an injection there the accelerator cable to one side and a vacuum pipe to the other, I decided that I didn’t want to tempt fate and instead decided to cut the panel around them.
So with my newest shed toy needing trying out (my vice) I started cutting, them trimming some more, by the end I had this. It also needed some slight bending to the lower section to get a better fit against the bulkhead.
As you can see its not a bad fit-
So its been treated to a coat of undercoat and top coat
All ready for refitting tomorrow, I also decided to make a template of the final panel which I am going to scan in at work and if anyone wants it just PM me and I’ll email it over, also if the Mods want a copy to put on the forum just let me know
Re: Eefy's White Scala
Hmmmm, went to refit the clutch panel and cable lastnight, panel went in without a problem,

but when I was “trying” to fit the cable to the gearbox end I found the rubber mounts were shot, well that would be an understatement, one was falling apart!!!!


So will be ordering some new ones tomorrow from VW as well as new clutch cable just for peace of mind.
So I started on the next job, the front bumper refurb following picking up this one from Cpt Custom a few weeks ago, at sometime my cars had a front end tap from the side resulting in my bumper being slightly twisted, its also very scuffed including the rubber insert. This one however seems perfect for abit of filling and painting


I was going to strip the fog light brackets off to be cleaned and painted but for a reason only known to VW to get em off you need to remover the plastic front of the bumper. I had a go but decided not to as it looked like I’d end up snapping all of the clips.
So I ended up just giving the metal rear a damn good clean then a healthy dose of Hammerite, much better I think you’ll agree. I would normally have ran some rust treatment over it first but for some reason the shed was hiding it!!!!!!


Next job will be cleaning up the scuffed edges ready for filling.
but when I was “trying” to fit the cable to the gearbox end I found the rubber mounts were shot, well that would be an understatement, one was falling apart!!!!
So will be ordering some new ones tomorrow from VW as well as new clutch cable just for peace of mind.
So I started on the next job, the front bumper refurb following picking up this one from Cpt Custom a few weeks ago, at sometime my cars had a front end tap from the side resulting in my bumper being slightly twisted, its also very scuffed including the rubber insert. This one however seems perfect for abit of filling and painting
I was going to strip the fog light brackets off to be cleaned and painted but for a reason only known to VW to get em off you need to remover the plastic front of the bumper. I had a go but decided not to as it looked like I’d end up snapping all of the clips.
So I ended up just giving the metal rear a damn good clean then a healthy dose of Hammerite, much better I think you’ll agree. I would normally have ran some rust treatment over it first but for some reason the shed was hiding it!!!!!!
Next job will be cleaning up the scuffed edges ready for filling.
-
Cpt Custom
- Posts: 761
- Joined: Mon Jul 19, 2010 1:46 pm
- fill in the right answer: 15
- Location: Northallerton
Re: Eefy's White Scala
Well its been a busy few days, firstly I got the clutch cable reattached, but also with the Alltypes VW show just round the corner it was time to get the car ready. This meant the bumper a few other jobs needed doing!!!!
The reason for the bumper needing replacing, is due to its being twisted as well as really scuffed on the corners-


So having got all the stuff I needed I set about repairing/filling the damage-


I got some of this rubber bumper filler of the bay, and its really good stuff and when it says it goes of in 5 mins it really does-


After some rubbing down and cleaning up it looked quiet good, the next phase was the use of this-


And rubbed back


After several layers of filler and rubbing I was finally ready for primer, quiet unusual was the primer was clear!!!!! Which meant I had issues seeing if the repairs were smooth or not!!!! Still it had 3 coats to make sure.
Light first coat

By the time I’d hit a decent coating I had the a few areas that didn’t take the paint properly-


After some cleaning and a few more coats all was going well

Unfortunately I wasn’t happy with one of the areas of repair, so this afternoon was spent trying to get a better finish

Decided though to leave it till tomorrow as it just wasn’t working out so in to the shed it went.

While I was waiting for the paint/filler to dry on the bumper I decided to “finish” the front grill to I was removed and cleaned up and with some satin black in the shed it had a good old coating-


The little ones scooter even had an attack of the rattle can!!!!

The reason for the bumper needing replacing, is due to its being twisted as well as really scuffed on the corners-
So having got all the stuff I needed I set about repairing/filling the damage-
I got some of this rubber bumper filler of the bay, and its really good stuff and when it says it goes of in 5 mins it really does-
After some rubbing down and cleaning up it looked quiet good, the next phase was the use of this-
And rubbed back
After several layers of filler and rubbing I was finally ready for primer, quiet unusual was the primer was clear!!!!! Which meant I had issues seeing if the repairs were smooth or not!!!! Still it had 3 coats to make sure.
Light first coat
By the time I’d hit a decent coating I had the a few areas that didn’t take the paint properly-
After some cleaning and a few more coats all was going well
Unfortunately I wasn’t happy with one of the areas of repair, so this afternoon was spent trying to get a better finish
Decided though to leave it till tomorrow as it just wasn’t working out so in to the shed it went.
While I was waiting for the paint/filler to dry on the bumper I decided to “finish” the front grill to I was removed and cleaned up and with some satin black in the shed it had a good old coating-
The little ones scooter even had an attack of the rattle can!!!!
Re: Eefy's White Scala
Well the bumpers finished and painted-

just need to flat it, t-cut and polish oh and fit it ;)
right just got to get the car clean for the Alltypes show, alloys were done lastnight, just the rest to do now!!!!!!
just need to flat it, t-cut and polish oh and fit it ;)
right just got to get the car clean for the Alltypes show, alloys were done lastnight, just the rest to do now!!!!!!