Page 4 of 12
Re: Project Sabine
Posted: Mon Sep 06, 2010 7:57 pm
by daveyg
Tonight i took another trip to the dealers to collect my brake rod bushes, rocker gasket and exhaust gaskets. Got thoroughly soaked on the bike ride to and from. Got home to see my dad had been busy mounting my fuse holder in a spare relay space on the fuseboard so keeping it fairly tidy

Put my new rocker gaskets in place and cleaned the cover out with gunk and then left in the rain so any paint flakes washed away then gave it a good drying off
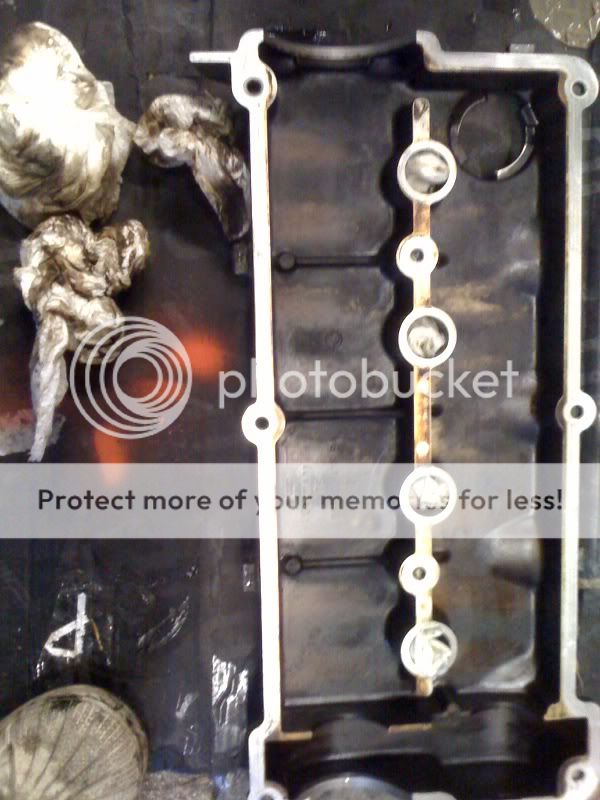
Plan was to get this fitted back on with the new rocker cover nuts i bought but could i find them? nope! Got 7/8 of the old ones but lost one when removing the cover. The annoying thing is i can see the bag full of them further up the build thread but cant track them down...Grrr
Re: Project Sabine
Posted: Mon Sep 06, 2010 8:11 pm
by DT1
daveyg wrote:This is the first time i have split a piston out a caliper and to do so involves connecting a foot pump to the brake inlet line and pumping the piston out.
It does? Last time I dismantled one to replace the seals I just emptied it, took the dustcover off then pulled it out by hand. There was some resistance but it slid out easily enough.
Was yours jammed?
Sorry about your thumb.
Re: Project Sabine
Posted: Mon Sep 06, 2010 10:43 pm
by daveyg
It does? Last time I dismantled one to replace the seals I just emptied it, took the dustcover off then pulled it out by hand. There was some resistance but it slid out easily enough.
Was yours jammed?
Sorry about your thumb.[/quote]
well it wasn't coming out by hand so I had a read in haynes and it said about pumping it out, they came out with a pop at a fair pressure! They have been waiting to be used for over a year so perhaps they were a bit seized?!
Re: Project Sabine
Posted: Mon Sep 06, 2010 11:47 pm
by DT1
Sorry, I wasn't doubting that it was a struggle, it's just that was the first time that I'd heard about using a foot pump.

Re: Project Sabine
Posted: Tue Sep 07, 2010 12:19 am
by daveyg
I must admit i was a tad confused as to how they would come out as they werent shifting, the whole foot pump thing did surprise me a bit too, and my thumb

Re: Project Sabine
Posted: Wed Sep 08, 2010 10:33 pm
by daveyg
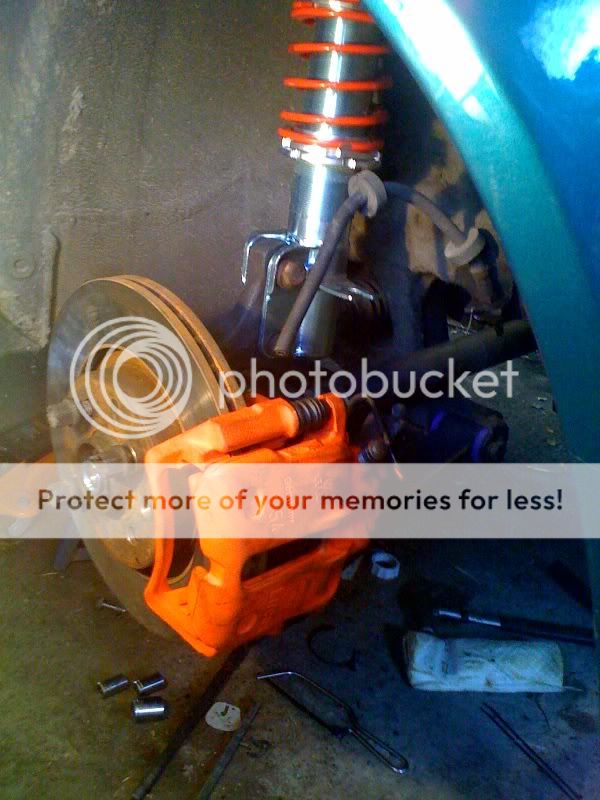
Tonight got a bit more done on the brakes, replaced the bleed nipples which was a nice easy job, we like those!!

Then put in the new piston seals and dust seals before putting the pistons back in. Was a bit of a pain to get the piston into the seal but with the use of a cable tie we got there in the end! Fiddly more than difficult

Then took out the sliders and cleaned them up and cleaned down the threadhole, again using a cable tie this time wrapped in tissue It's great to have all the proper tools!!

)

Will get these built back up tomorrow as the only outstanding bit is to replace the boots on the sliders which i have and screw them back together.
Its also been an expensive few days. Found a Zender rear spoiler on the bay which should arrive tomorrow and also finally got hold of a set of split rims. Need to source a few bits for them and may make the rears a bit wider before fitting them too.
With regards to filling in the holes that will be left when my spoiler comes off how have people filled them? The ones i have seen have vinyl over them but is there metal underneath welded into the holes?? Any pointers appreciated
Re: Project Sabine
Posted: Thu Sep 09, 2010 7:31 pm
by daveyg
Went to the dealers after work today to collect my rocker cover nuts, got home to find my spoiler had arrived
Got in the garage and carried on with my brakes. Got the new slider boots out and fitted these on to the sliders
Then fixed the brakes back together ready to be bolted on to the hubs. Bit disappointed with the paint as it hasnt stood up well at all. May get some better quality stuff and apply a coat or two before they go on the car

Then moved onto getting the rocker cover back on and guess what, the rocker cover nuts were too big. Bear in mind the dealer faxed me the ETKA drawing and they were the only nut on there they have still ordered the wrong ones. I was not going to be defeated though so i used a stainless nut and a washer to replace the missing nut.
Re: Project Sabine
Posted: Sun Sep 12, 2010 6:11 pm
by daveyg
Did a little more on getting the suspension and brakes etc built back up today. STarted off by getting the front anti roll bar back in place. Stupidly cross threaded one of the screws so spent approx half an hour sorting the thread out before attempt number two. This time got it right and central too! Also got the driveshafts into position at the same time

Next of all i trial fitted the brakes and discs on to the hubs. These fitted fine but we are a tad confused about the brake hoses. The ones i bought (G60 Corrado one's) will join up but only if you go straight into the caliper. They also seem rather long for the job too so gonna ponder what to do regarding that tonight
Need a few bolts and nuts to completely get the setup but we are nearly there in terms of the drivetrain being complete
Re: Project Sabine
Posted: Tue Sep 14, 2010 12:02 am
by Dole Boy
Londsfail! I still got that red caliper paint I used on the Alfa brakes and you used on the towing hook if needed for a touch-up? Apart from that Sabine is looking fine! Schnoogans x
Re: Project Sabine
Posted: Tue Sep 14, 2010 7:33 pm
by daveyg
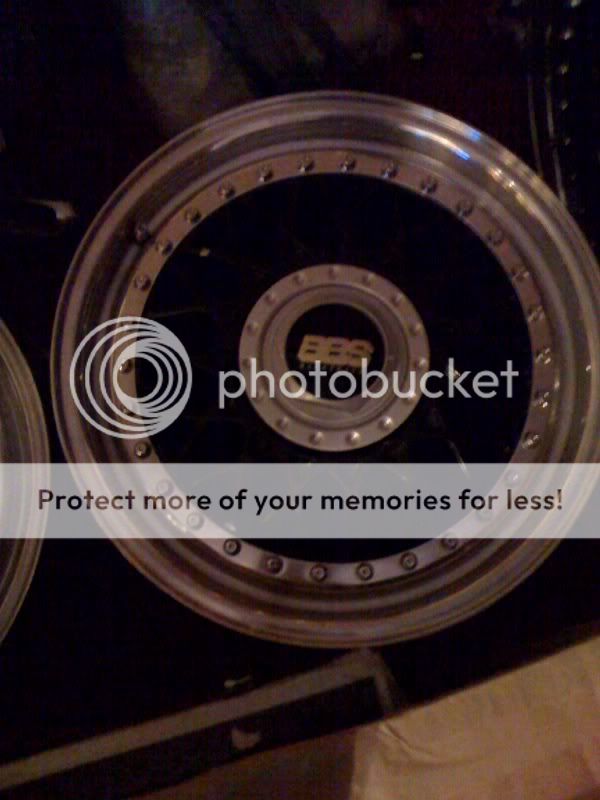
So the wheels turned up today:

Now i need to make my mind up what to do with them, ideally i want to widen the rears as they are 6.5's all round, not sure whether to keep them black or get them sprayed original silver. Need to get my hands on some centre caps too. Wont be going on the car till after all the work is done so ive got a few weeks to make my mind up. Loving the fact ive finally got some splits though, ive been hankering after some for ages and had to work bl00dy hard to get some. Working away a few days this week so wont be much progress until the weekend.
Re: Project Sabine
Posted: Thu Sep 16, 2010 7:29 pm
by daveyg
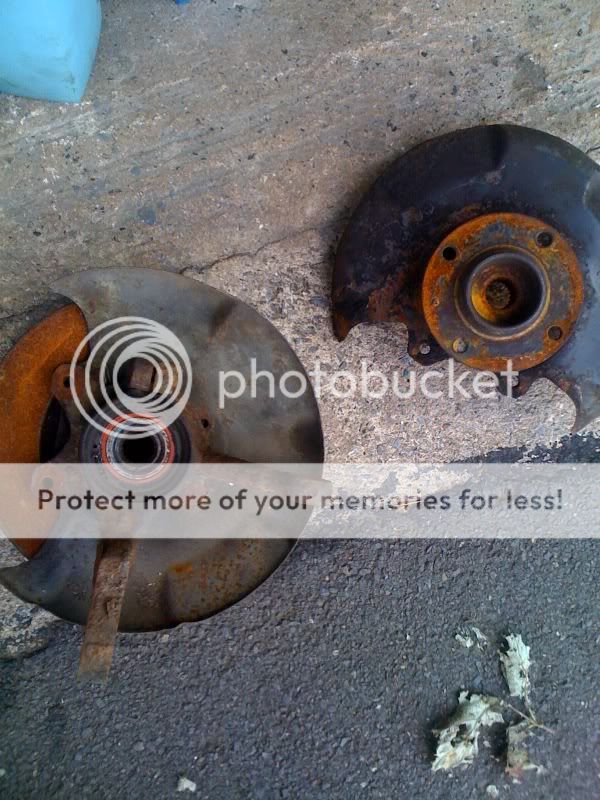
Today saw nothing but setbacks which is not what i would want to be posting up but hey its all part of the learning curve. The hubs that i had cleaned up painted and fixed to the car did not have pinch bolts in to hold the bottom ball joint in place. So i took a trip to Avery Knight Bowler to get some. They didnt have the exact length i needed but would do the job once chopped down a bit so i set to work with a hacksaw and a vice

When i put the bolts in and tightened up the nyloc the bottom ball joint fell out. This isnt good i thought. Turns out the hubs (G60) have a slightly larger bore than MK2 Rocco one's so even though everything else fits and the calipers attach straight on, they wont be any good to me!!! So up i went to the back yard where my old hubs (with wheel bolt sheared off inside) were sat corroding away. I'm gonna have to fit these and use brake adaptors which luckily i have to get around the problem but its a bit of a set back considering i will have to get the wheel bolt and grub screw out then clean them up and paint them. How they look now
This is a right royal pain and something i could have done without but i'll just have to get on with it

Re: Project Sabine
Posted: Sun Sep 19, 2010 6:59 pm
by daveyg
Today was a really good day, i found in a box some old G60 bottom ball joints. Although they are a different shape at the mounting plate i thought i would give them a go to see if they fit in the wishbones/hubs

Result!! This meant i could get on and reattach everything without needing to sort out my original hubs or mess about with brake adaptors either. So now everything is all ready to roll on the front end, need two more bolts to attach the caliper to the hub and that is the whole front built back up minus brake lines

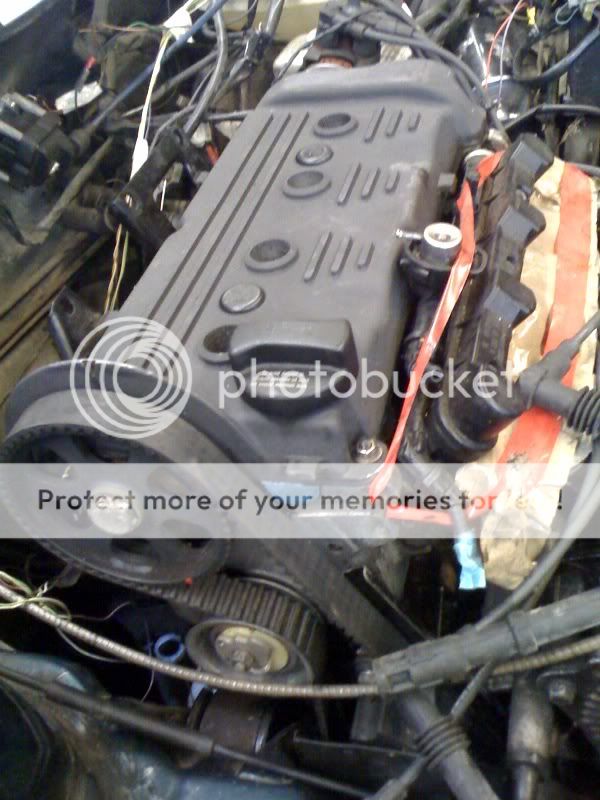
Also attached the exhaust and the inlet manifold. Now i just need to run the fuel lines and make a bracket for the fuel filter and one for the air filter.

Felt like i was actually beginning to see the end in sight today and was a boost to see things coming along. I've got a plan in my head for the week coming and am hoping to have made some good progress by next week
Re: Project Sabine
Posted: Mon Sep 20, 2010 1:59 pm
by daveyg
Quick lunchtime update, tried putting the lower strut brace back on last night as had overlooked this at the time. Got the first side on loosely and swang it up to the other side only to realise that it wont go back on due to the engine sitting lower than the 8 valve, the sump is in the way. This is a pain as the lower brace really did make a difference, now im worried that the top one might not go over the manifold too leaving me braceless!!
Bought a sheet of stainless steel today to fabricate some brackets for the air and fuel filter so will get cracking with that this evening.
Re: Project Sabine
Posted: Wed Sep 22, 2010 9:48 am
by daveyg
Waiting on parts to arrive at the moment, went to fit the new clutch cable last night to find i had lost the bottom plate for the gear selector so after a helpful reply on this forum got one ordered off the bay. Last night i made up some cardboard templates for the air and fuel filter brackets. Im hoping that my kind neighbour will have cut the stainless sheet to match by the time i get home. Apart from that not much to report. Hopefully an update to follow later
Re: Project Sabine
Posted: Wed Sep 22, 2010 8:56 pm
by daveyg
After spending a while taking measurements and making some cardboard templates for the air and fuel filter brackets i left for work this morning leaving them in the hands of my neighbour and his guillotene

Not exactly CAD i know but returned from work and sure enough they had been cut out for me.
For the fuel filter bracket i am using the actual bracket that would have been sat on the air filter housing on the DX engine and mounting a plate to it so i can attach it on the two holes where the airbox is attached next to the battery.
Here is the plate attached to the bracket once painted

and here it is once fitted into place

I'm quite pleased with how this looks as we havent had to butcher anything to make this work. The air filter on the other hand is a bit different. The car has previously had something mounted on the os inner wing as there were four existing holes there already. Therefore it seemed sensible to use these existing holes to mount the air filter to. Here is how it turned out

There is also a plate underneath the one that you can see on a diagonal coming up to meet it and form a sandwich around the air filter bracket.
Also had a delivery of bits and bobs today. Vacuum hose, stainless washers, P clips to hold the fuel lines in place, jubilee clips for the rad pipes...Oh and my centre caps!!
Plans are now to get the fuel lines installed, hoping to have these runnning under the slam panel out of sight and need to modify my breather hose to fit as well due to the size and position of the air filter.