Scirocco GT Restoration

Scirocco Register members projects
Forum rules
Section for all vehicle and related projects. Please keep responses pertinent to thread.
User avatar
wreckgar
Posts: 38
Joined: Thu Mar 04, 2010 2:21 pm
fill in the right answer: 10

Scirocco GT Restoration

Post by wreckgar »

Hi all, I recently purchased my first Scirocco, having been a fan of them for 20 years. I plumped for a non-running 1987 GT despite the fact I have no mechanical knowhow whatsoever. I was attracted to it because it had 85k on the clock and had laid dormant for the last 10 years, and had spent time garaged. The remit of this project is to keep everything as standard as possible and back to its former glory.

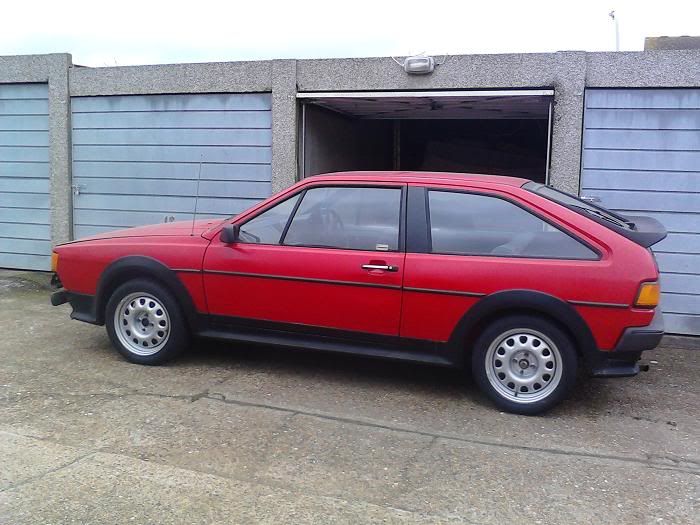
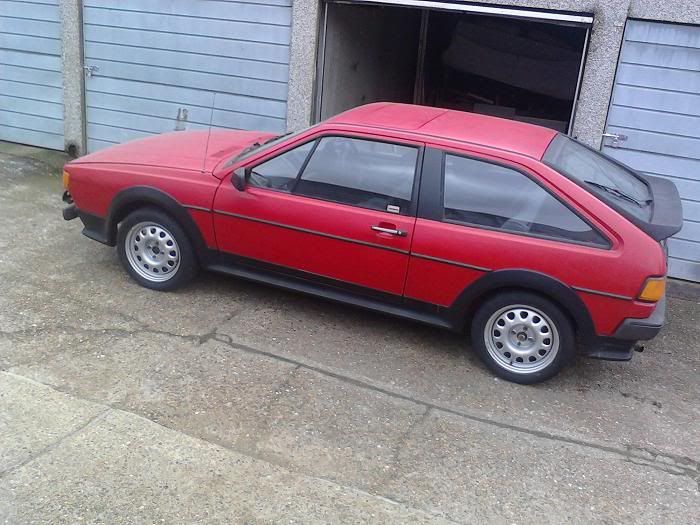
I went and met the guy and we managed to start it, not bad after being left dormant for so long. Being mad, and despite its numerous faults I exchanged money for it and got it towed home. Behold its beauty below...

Image

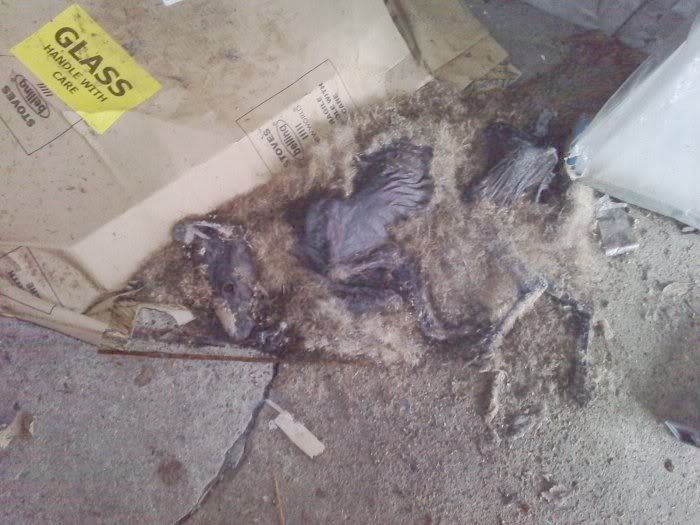
OK, that's not a Scirocco, but the unfortunate fox who somehow managed to get stuck in my garage. I mustn't have opened it for about 6 months or so.

The scirocco is here, but be warned as it is not for the squeamish either..

Image

Behold its beauty! Seriously, even on one this bad the overall shape is still great. Note the lack of bumper which I haven't bothered to put back on yet

Image

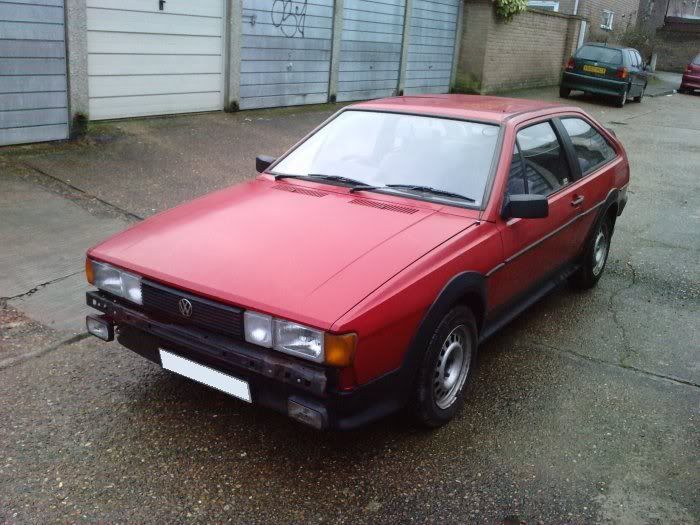
The photos are being incredibly kind to the paint, which in reality will require a full respray. Also notice how the drivers side wing has an indicator bulb, and the passenger side does not. Unique to my car, I'm told!Dilemma now is whether to get a new matching wing, or try to cut the old one to match. The latter is surely more fun. Apparently the bulb and cluster was not removed, and just taped to the inside of the wing. It has also been superbly resprayed from metallic blue, which can still be seen from certain angles.

Image

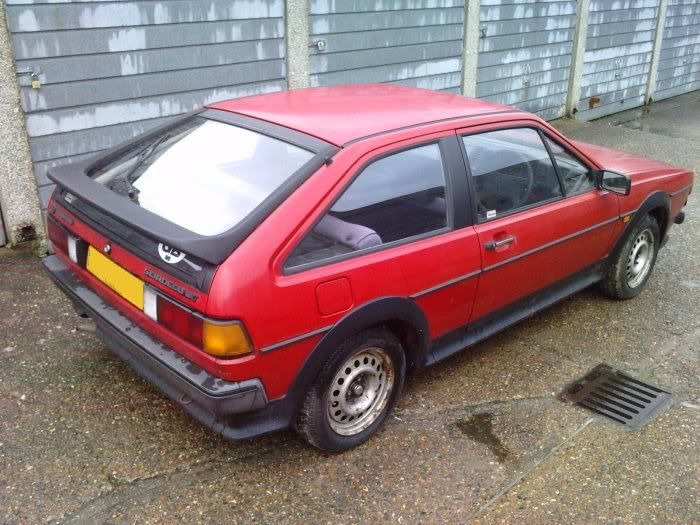
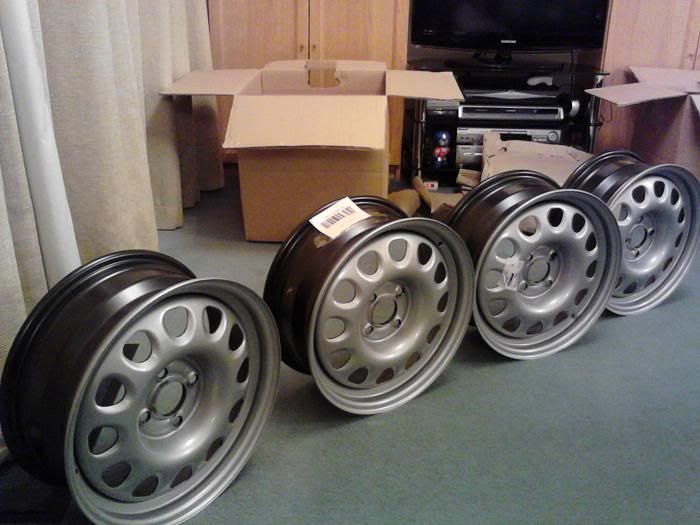
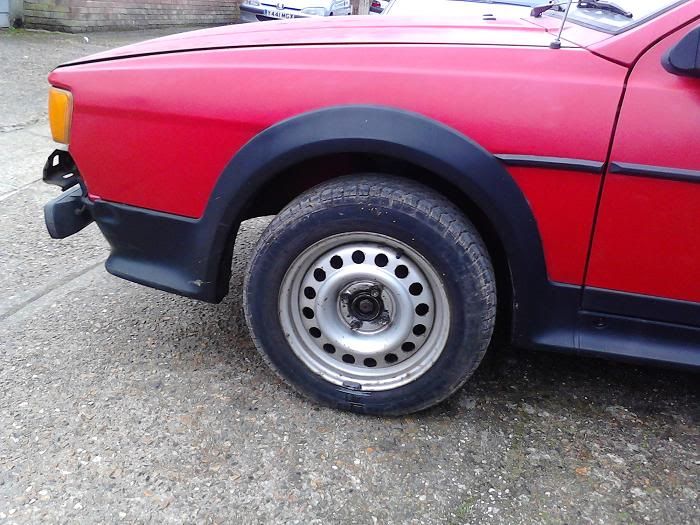
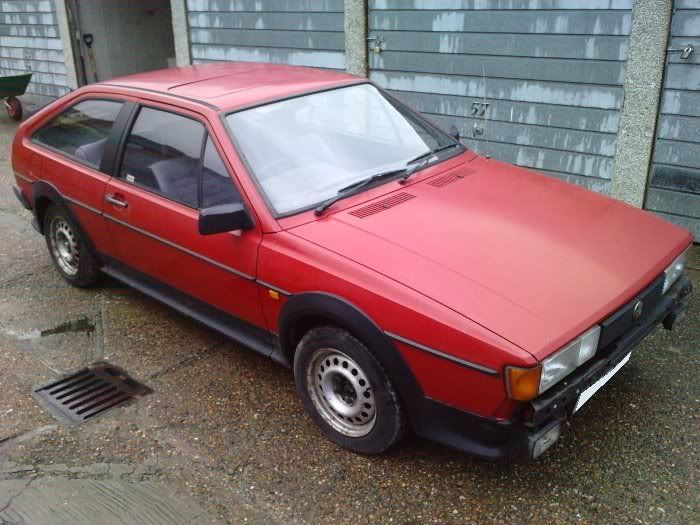
New wheels required, not sure whether to keep with steel or plump for some alloys. I quite like the look of the steels though...

Image

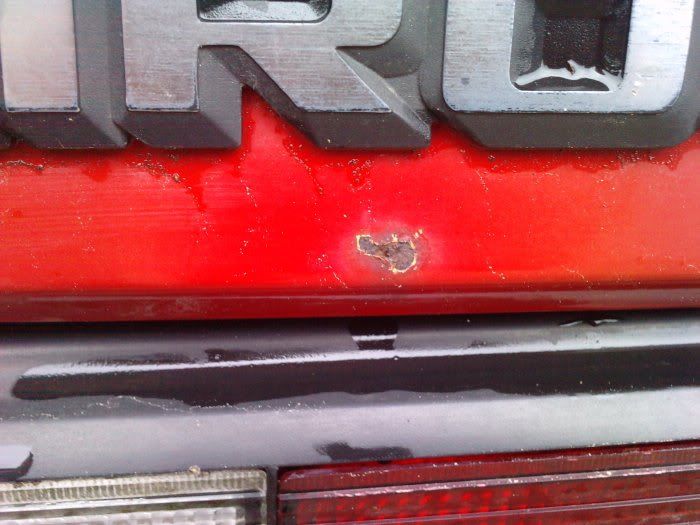
Little rust spot, but otherwise the rear looks good (matron)

Image

Unique contouring on the passsenger side door, and the obligatory rust spot. I'm presuming the dent can be pulled relatively easily, anyone disagree?

Image

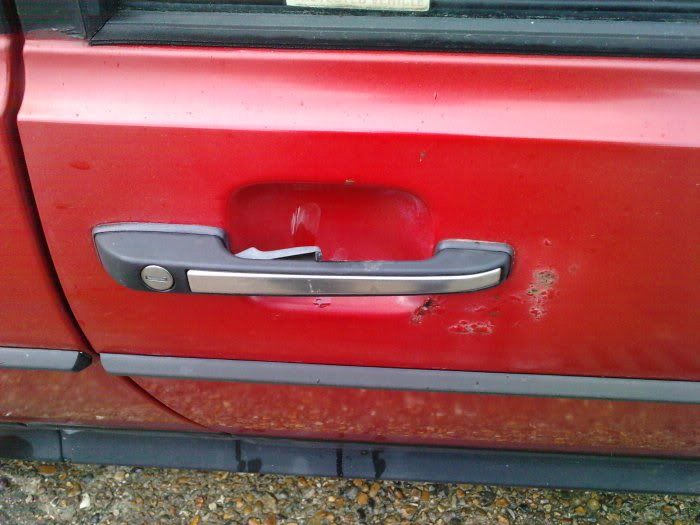
drivers side door with rather worse rust around the handle

Image

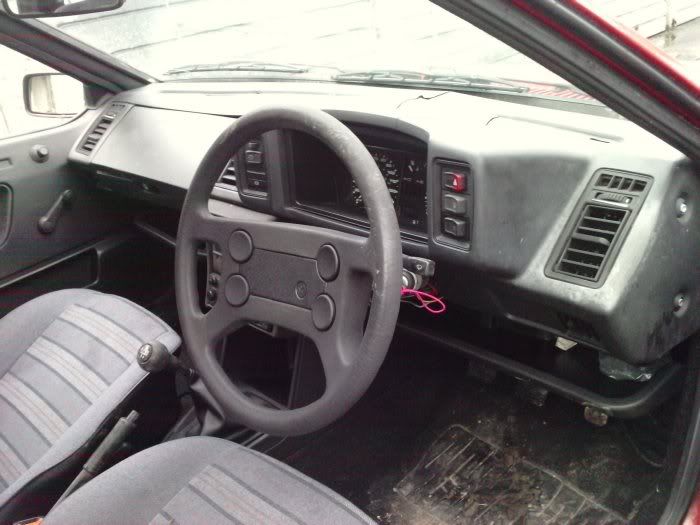
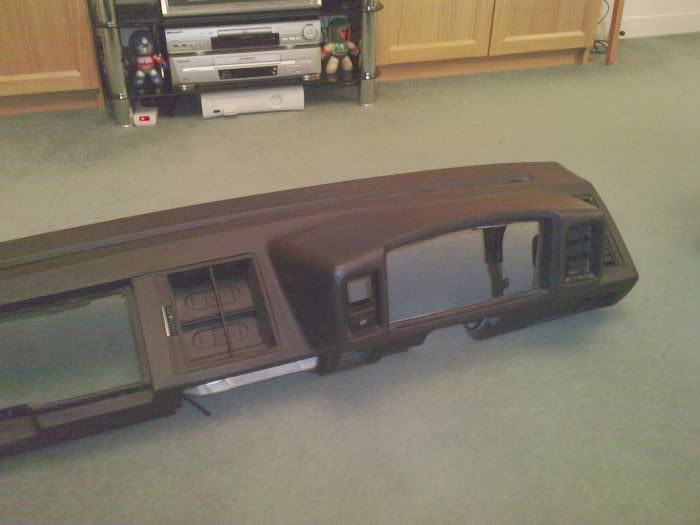
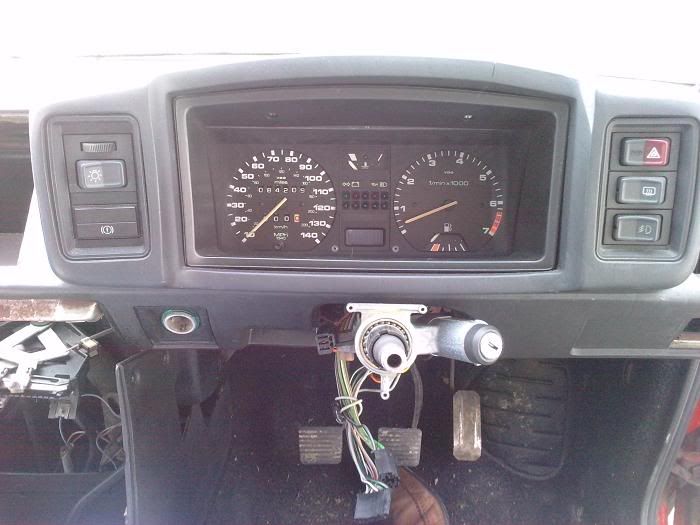
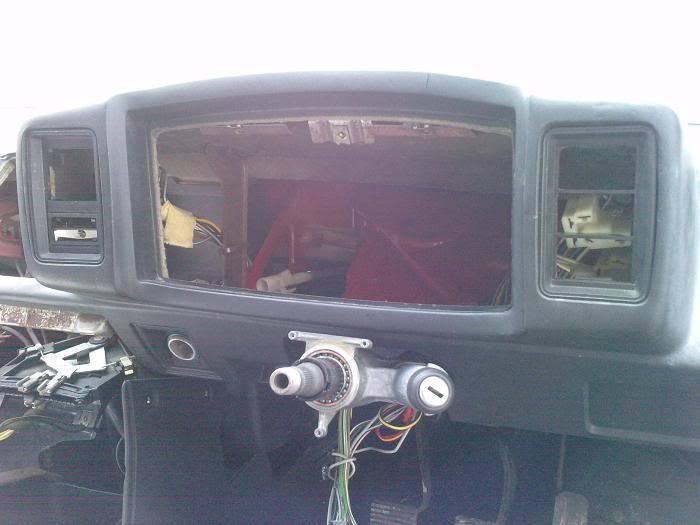
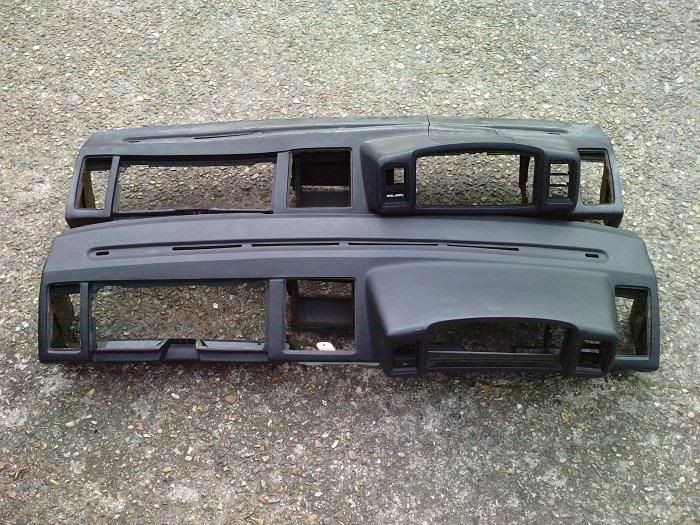
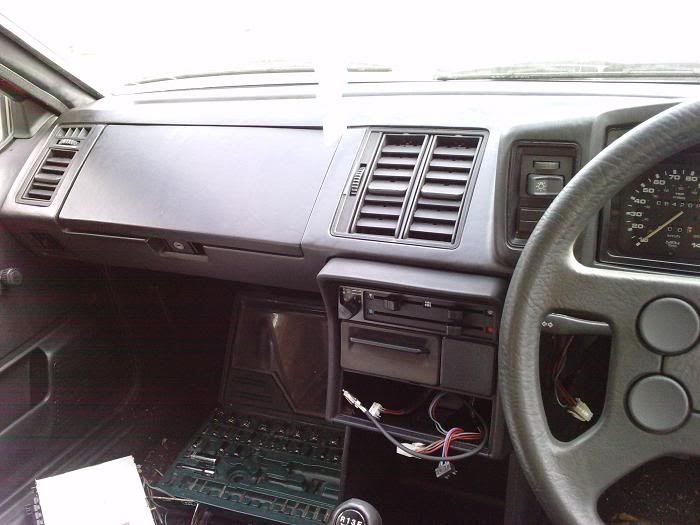
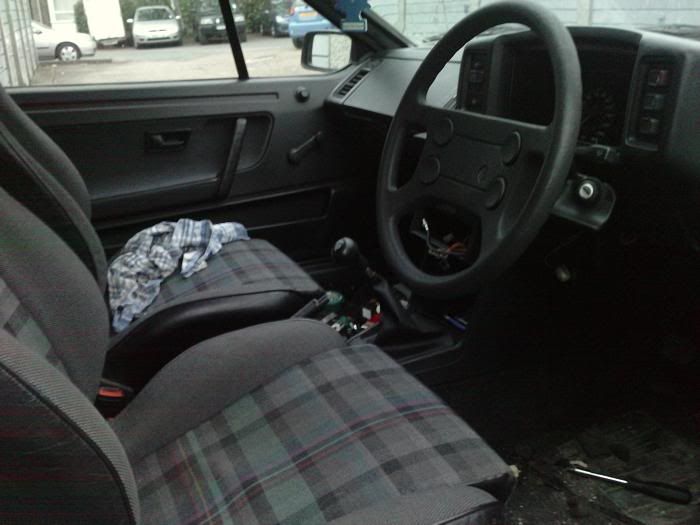
Is this the worst dash on a Mark 2 ever seen? It has canyon-like cracks all over it, has sagged badly so the glovebox lid is completely off-kilter. it is also nearly white where it meets the windscreen. Not sure but I think I may need to replace it.

Image

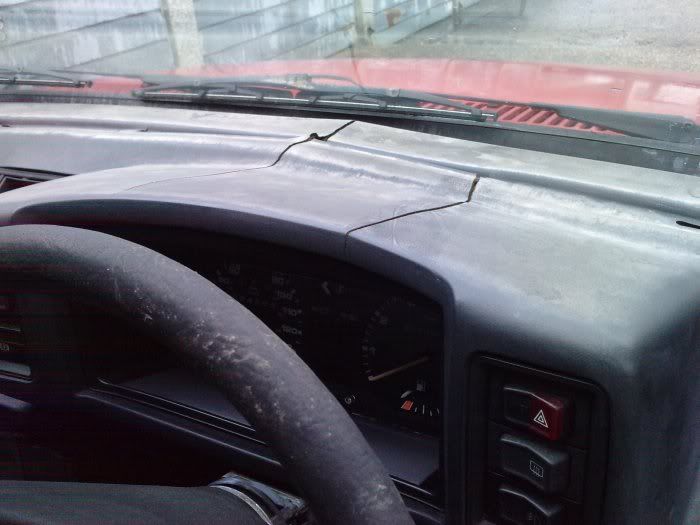
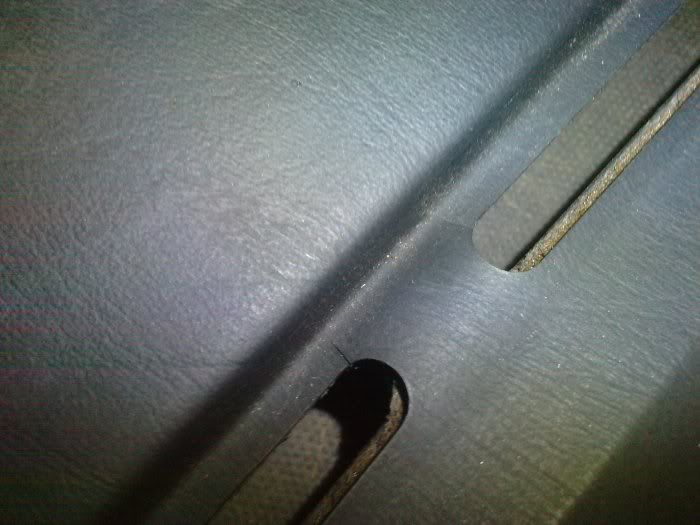
A close-up of the crevasses on the dash. Not for the feint-hearted.

Image

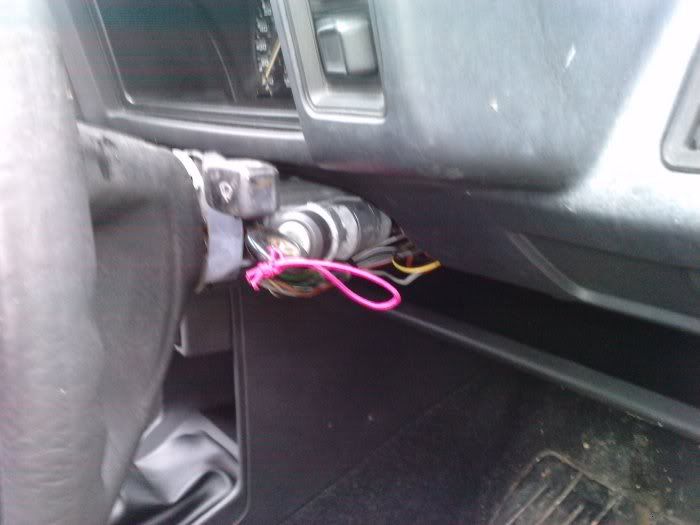
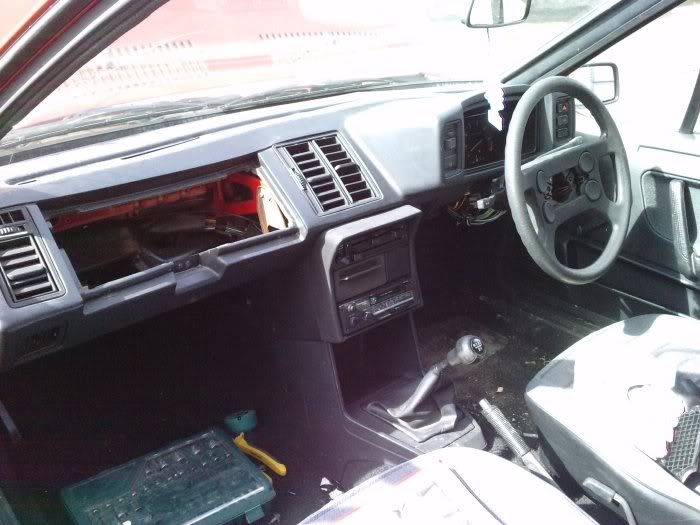
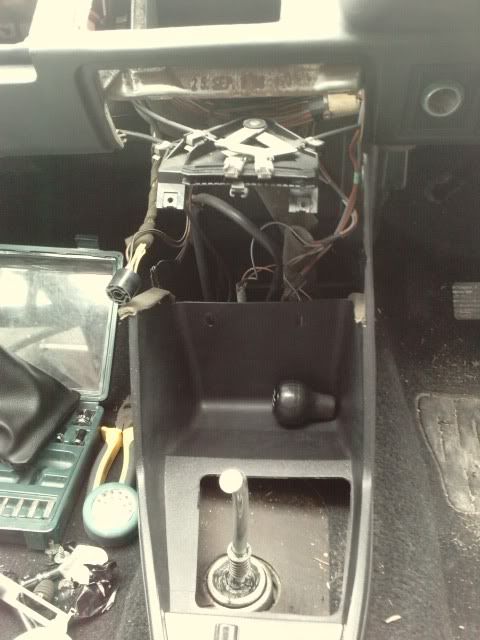
Ignition cowling is for wimps!

Image

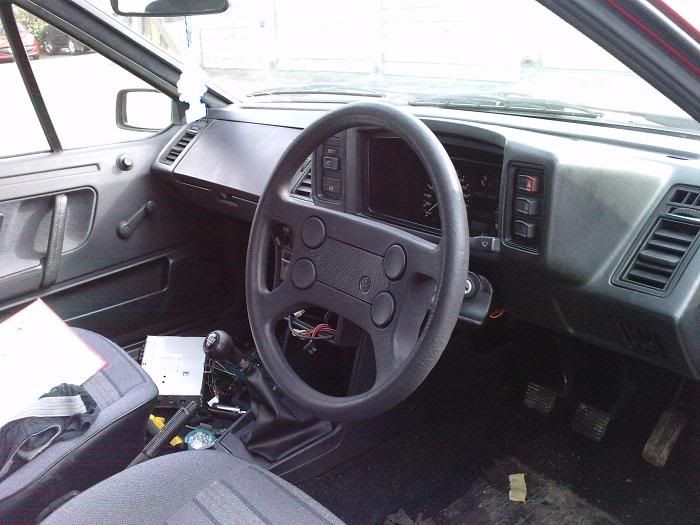
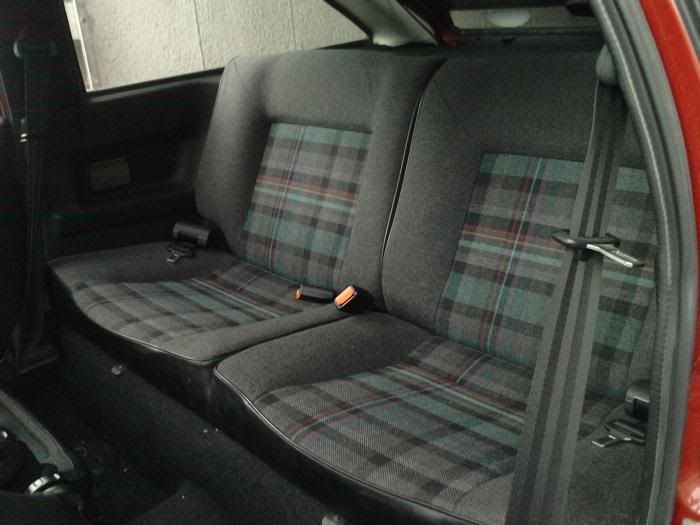
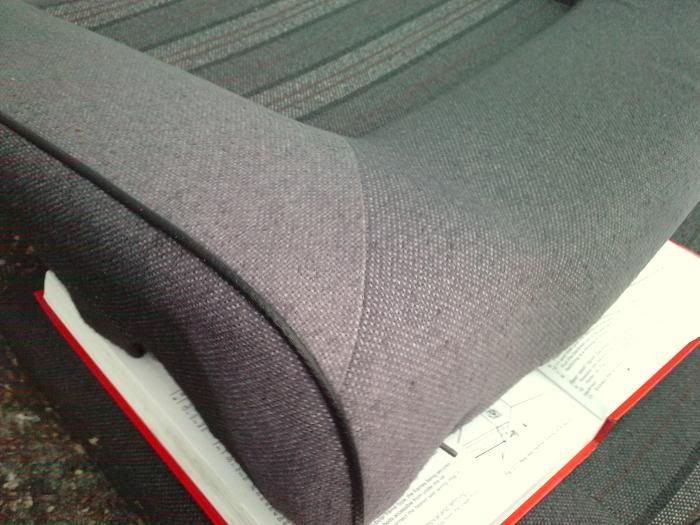
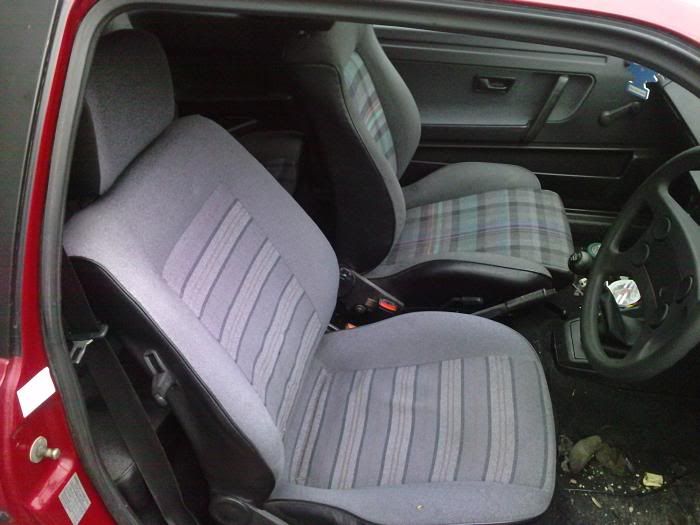
New interior required, not sure how common the pattern is. Fag burns aside, the interior has taken on a purple hue, which I'm sure is not right

Image

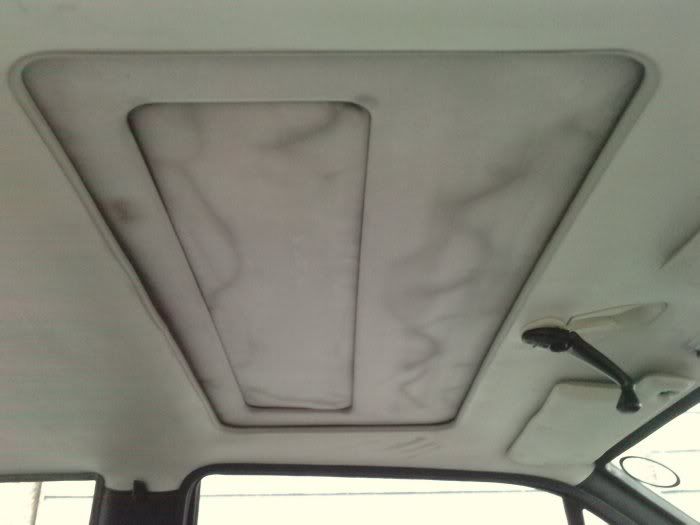
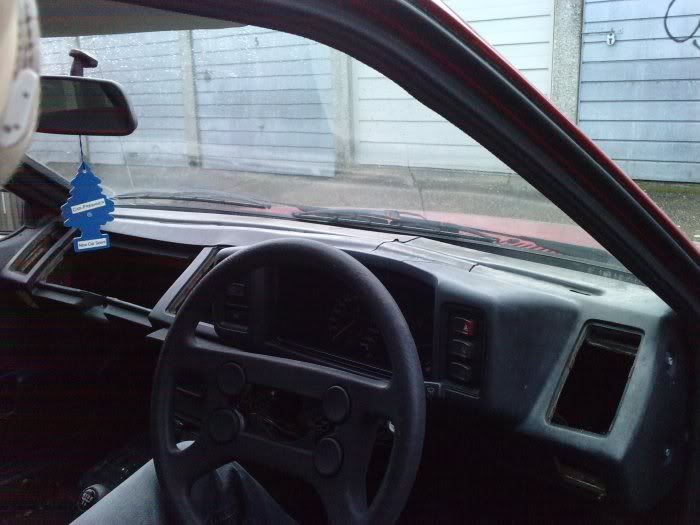
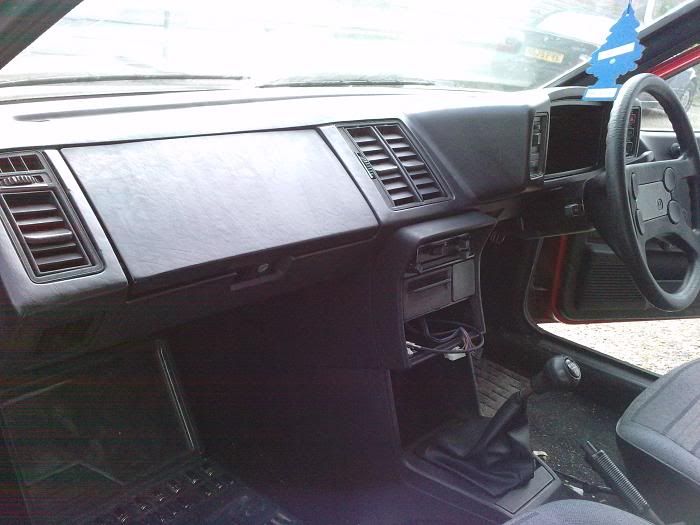
There may be a slight leak in the sunroof. The seal is very brittle and is no longer attached the sunroof. I can only tilt the roof but not slide it. will have to take the whole assembly out at some point.

So, there you have it, my lovely car :(
Last edited by wreckgar on Thu Dec 31, 2015 11:51 am, edited 5 times in total.


User avatar
Funky Diver
Posts: 1175
Joined: Fri Apr 17, 2009 10:26 pm
fill in the right answer: 10
Location: Darlington
Contact:

Re: Project Lunacy

Post by Funky Diver »

Not to bad considering it's stand...

Are you gonna reuse the fox skeleton... would be quiteeeery for anyone breaking into your garage late at night... all lit up, lol.


User avatar
wreckgar
Posts: 38
Joined: Thu Mar 04, 2010 2:21 pm
fill in the right answer: 10

Scirocco GT Restoration - Part 2

Post by wreckgar »

First things first, I got a new dash from mikeh. Also got ignition cowling, rubber for the wing and seatbelts(!) from markh (confusing I know) I need seatbelts because with mine there is about a 1-in-5 chance that you won't go through the windscreen.

Image

Look, no cracks! mikeh did say that the dash was cracked around the vents, but they pale into insignificance compared to mine!

Image

Those offending cracks. really nothing to worry about. mikeh gave me some good advice about fitting it, a thoroughly nice fella

I went to GSF and got a fair amount of bits, sparkplugs, dizzy cap/rotor arm, timing belt (will not do this myself) fanbelt, new filters

Now to fit the dash. Or not. The car ran out of petrol and subsequently wouldn't start. It spent a week or so in this state until I finally got one of my pals to have a look. I was advised to remove the air filter and put summat flammable into the carb, and turn it over lots. Unfortunately I couldn't really do both alone but he soon sorted it and all was well again.

I deciced job #1 was to remove the dash as the one in there is depressing. Did some other bits too

Jobs done:

- Replaced dizzy cap and rotor arm (even got the leads in the right order) took about 30 minutes to get the old cap out of the rusty cover, and then get the new one back into it
- Replaced Fuel and air filter
- removed under dash shelves, noticed passenger side one was broken :( Might glue the 2 halves together if they can be successfully removed like this - anyone know?
- started to remove the covers under the dashboard, stymied by the remaing splitrivets (2 out of 6, all the rest weren't even there when I got the car)
- ran out of time :(

LOLFunky Diver! No afraid the skeleton is gone, I had to scrape him off the floor with a spade, luckily he didn't burst or anything when I did this. I still have a small area of the garage with is now carpeted with fox fur though!
Last edited by wreckgar on Thu Dec 31, 2015 11:51 am, edited 3 times in total.


User avatar
wreckgar
Posts: 38
Joined: Thu Mar 04, 2010 2:21 pm
fill in the right answer: 10

Project Lunacy - Update 2

Post by wreckgar »

Hooray, it is the easter bank holiday! Weather has been pretty awful but Saturday wasn't too bad, I decided to do some more regarding getting this dash out. Using only my trust Haynes manual, I started again. Afraid I destroyed the 2 remining splitrivits removing them. I think I may just use rawlplugs and screws with washers when putting the covers back, at least then I know they can be removed easily. Apparently the splitrivits can no longer be ordered, so no choice really

Image

Got the glovebox out, you can see how warped the dash is by the odd shape left now it is gone.

Image

Removed the vents, plus the heating control. Looks like the central console will have to come out as well to get the dash out. All going well until:

Setback 1) The socket I bought for the steering wheel removal requires a much larger adaptor than I have in my meagre socket set. So a trip to Halfords beckons. Just need to put the car back in the garage, which leads us nicely along to:

Setback 2) Car will not start, again. All I did was remove the batery terminal, how could this have done any damage? I attempted to jump it, for a long time, nothing. I believe the trick my mate showed me would work, but just not practical for me alone. But is this masking something more serious? should fuel pressure be lost if the battery is disconnected? wish I knew.

I managed the push the car back into the garage with my wife, we both have bad backs now :( Hopefully I will get some more done before it is back to work. Particulary if anyone can help me with the issue above.

Jobs done:

- removed vents and covers under dash
- removed heating control
- pulled remaining hair out
Last edited by wreckgar on Thu Dec 31, 2015 11:51 am, edited 1 time in total.


User avatar
wreckgar
Posts: 38
Joined: Thu Mar 04, 2010 2:21 pm
fill in the right answer: 10

Scirocco GT Restoration - Part 3

Post by wreckgar »

Right, first day since that I have been free to do some more work, I finally had a decent stretch of several hours to work on the old girl. I inflated the tyres last week to enable me to pull/push it out (car doesn't run - again) Put them all up to 30 psi, worked a treat, however, the OS/Rear tyre is now flatter than Kate Hudson, no small puncture either, air whistles out of it as soon as I try to re-inflate. But I still got a lot done, so can't complain

Image

Removing the center console was a pain, because the upper part will not come free without the lower part being moved. Got there in the end though. The gear lever is a bit rusty so will probably wrap some heatshrink around the exposed area to make it look neat again. Gave the gear knob and gaitor a going-over with WD40, came out nice. The rusty radio didn't survive my subtle removal techniques, it is now in several hundred pieces on the floor. I will fit the new stereo when I figure out what the hell is happening with the cables?

Image

got the wheel off without too much hassle, the switches for the indicator etc took a bit of welly, because the cables connected to them are very tight

Image

next came the switches around the speedo, they were also tight, and I managed to pull the hazard one apart accidentally. Springs and bits of metal everywhere. I managed to deduce what went there by the bits that had grease on them, thankfully it works so I must have done it right! Then the speedo thingy took a bit of manouvering to get it out, main issue was the speedo cable which is very hard to get hold of, several scaped knuckles later I finally removed it.

Image

Hey presto! A couple of bolts later and the dash is out. Getting the lighter housing from the old dash was a nightmare, and I don't see how it could be removed without having the dash out. I will be attaching it some other way so I can remove it if I need to. I have a replacement halfords lighter, as the old one didnt work, I just have to figure out the wiring

Image

Out with the old, in with the, er, less old. I love this pic as it illustrates just how bad the old dash was, so glad it is no longer in the car.

Image

And here it is, all put back together (well, not the shelves or under dash covers, the rivets i bought from halfords are a bit too small, I will wrap some electrical tape around them to see if that will help, but that's for another day. note the peculiar radio wires

Image

I now have ignition! (cowling) does anyone know which screws are suitable for it? It clips together but I'd rather have it screwed in too

Image

Think it's come together really well. This is the original glovebox with the new dash, lines up pretty nicely, and the colour match is bang on. Just need to get the shelves etc. back in, then it's out with the seats for a thorough carpet clean...
Last edited by wreckgar on Thu Dec 31, 2015 11:52 am, edited 1 time in total.


User avatar
M-Powerrr
Posts: 4
Joined: Wed Apr 28, 2010 2:09 pm

Re: Scirocco GT Restoration

Post by M-Powerrr »

looking good matey, new dash looks 100x better than the old one.
now for the fun of chopping and changing stereo wires around eh!


HotSoutheastWind

Re: Scirocco GT Restoration

Post by HotSoutheastWind »

Absolutely love this car mate your doping a great job by the look of it - hats off to you mate.


User avatar
wreckgar
Posts: 38
Joined: Thu Mar 04, 2010 2:21 pm
fill in the right answer: 10

Scirocco GT Restoration - Part 4

Post by wreckgar »

A quick Update this one.. Got some nice new seats from Jay44 on Tuesday evening, I do plan to clean them up and sort the carpet etc but I was told by the missus that the priority was to get them out of the living room sharpish! Had a slight setback in that I left the fogs on so the battery was totally dead. Jumped it again (getting used to it now!) and let it run for about 30 minutes, seems to have done the trick, for now...

Image

Back seats in! very easy job, even for me. I need to get a replacement for one of the stalks that are used to push the seats forward

Image

The old back seats. Note that the light purple corner is not a trick of the light, it really has faded like that. the bottom of the seat is still a deep grey.

Image

A nice comparison of two seats side by side. Love the look and the profile of the new seats :ok: I had a nightmare getting the seats out, as the Haynes manual offer no help at all. Worked out to do the following

Slide seats all the way forward
remove the plastic inserts that sit over the rails next to the handbrake, by sliding them back away from the seats
Slide seats until just before all the way back
remove the copper-coloured bolt from the mount under the front of the seat
Slide seat all the way off the rails

Then just reverse to put back in, not forgetting to pull out the locking nut at the front of the middle rail, so the seat can go back in again!

Image

all done, light fading fast! I also replaced the spring on the passenger front seat for the length adjustor as it had been replaced with a spring that was too long, meaning that you had to push the handle to lock the seat into position, works better now. Now need a nice sunny day for a proper interior clean :) Thanks for the nice comments guys :good:
Last edited by wreckgar on Thu Dec 31, 2015 11:52 am, edited 2 times in total.


GTXTRA
Posts: 3392
Joined: Mon Mar 02, 2009 9:38 pm
fill in the right answer: 10
Location: London

Re: Scirocco GT Restoration

Post by GTXTRA »

good effort - what i like about this car is that not that long ago it would have probably ended being broken/scrapped. Interest is rising and threads like this prove that these old cars ARE worth resurrecting even when neglected as this one was.


Serial Rocco-ist.........
User avatar
wreckgar
Posts: 38
Joined: Thu Mar 04, 2010 2:21 pm
fill in the right answer: 10

Re: Scirocco GT Restoration

Post by wreckgar »

Hello everyone, I'm not dead! As they say, life has a tendency to get in the way. Money and time both in short supply following a calamitous 6 months. Even my trusty laptop got in a spot of bother, courtesy of my wife and a pint of water. After taking the whole thing apart and copious application of a hair dryer it stirred back to life, which went some way to convince me that I can fix things if I put my mind to it...

Image

Well I've managed to put some money aside and have vowed to get this car sorted by April. I have decided to use the car as a daily driver now, as I think this will be better than leaving it standing and using it occasionally. My journey to work is about 12 miles each way so not too much to ask for (I hope!) After much procrastination I finally managed to get hold of some new G60 steelies which you can see below. I also have a new phone with a camera on it even crapper than my old phone as you can see by the terrible shot below - the wheels are actually all finished the same colour

Image

Got some tyres from http://camskill.co.uk/products.php?plid=m53b0s99p1667 at a good price and took the whole lot to a shop. My wife has the dining room table back now, which is better all round. Old wheel below:

Image

New wheel! The suspension has settled back down now, so it no longer looks like an inspector gadget car...

Image

And finally, the whole car. The whole process took too long really, because I kept having to jump the Scirocco with my Astra, reposition it, stall it, jump it again, etc, but never mind. I used my friends trolley jack for the front wheels, as the 'boob' jacking points fitted just fine. But I had trouble with the rear - I couldn't find anything suitable for the trolley jack, so I had to use the 25-year old VW one...

Image

The combination of high winds, a sloping uneven surface and a tiny half-scissor jack leaning with each subsequent lift gave me visions of the whole rear quarter crashing into the floor, so I did some F1-style wheel changes on the rears, and thankfully the car didn't fall over. I drove around the garages a few times after this, woo-hoo! Reached 10 mph! Tested the brakes by narrowly avoiding hitting a jeep; 10-0 only took about 15 seconds! So I think brakes will be the next job. Onwards and sideways.

Image

Hopefully it won't be another 6 months before the next update.
Last edited by wreckgar on Thu Dec 31, 2015 11:54 am, edited 2 times in total.


GTXTRA
Posts: 3392
Joined: Mon Mar 02, 2009 9:38 pm
fill in the right answer: 10
Location: London

Re: Scirocco GT Restoration

Post by GTXTRA »

onwards and sideways - classic.

you can't beat a set of g60's on a mk2.................


Serial Rocco-ist.........
User avatar
wreckgar
Posts: 38
Joined: Thu Mar 04, 2010 2:21 pm
fill in the right answer: 10

Re: Scirocco GT Restoration

Post by wreckgar »

cheers gtxtra :) for some reason I think the red with the black bodykit goes very well with G60s. My mate has a super souped-up mars red mk1 g*lf driver which he has G60s on sometimes, I probably got the inspiration from there! I still need to put the centre caps on, I plumped for the silver ones.


User avatar
Funky Diver
Posts: 1175
Joined: Fri Apr 17, 2009 10:26 pm
fill in the right answer: 10
Location: Darlington
Contact:

Re: Scirocco GT Restoration

Post by Funky Diver »

Gotta admit the G60 wheels are my slinky favourites of all time... might have to sort some out as winter wheels... *checks disk fitment*


MacColl
Posts: 578
Joined: Sun Dec 05, 2010 11:47 am
fill in the right answer: 10
Location: East Ayrshire, Scotland

Re: Scirocco GT Restoration

Post by MacColl »

Nice very like mine but I believe a bit earlier. Those cracks on the dash are mad, mine has none and I think I'm lucky not to have a sun roof. It's all fixable though.

I've got the poor mans 14" steels that have a G60 look but I do have trim rings.


User avatar
wreckgar
Posts: 38
Joined: Thu Mar 04, 2010 2:21 pm
fill in the right answer: 10

Re: Scirocco GT Restoration

Post by wreckgar »

Ahh yes, I saw yours in the other thread. I'm very envious of your workshop :good: . I have a garage with no power, but never mind! I didn't know that they made GT's so late - yours must have been one of the last.
MacColl wrote:Nice very like mine but I believe a bit earlier. Those cracks on the dash are mad, mine has none and I think I'm lucky not to have a sun roof. It's all fixable though.

I've got the poor mans 14" steels that have a G60 look but I do have trim rings.


Post Reply