GTX 16v Reshell v2.0

Scirocco Register members projects
Forum rules
Section for all vehicle and related projects. Please keep responses pertinent to thread.
User avatar
jbo
Posts: 689
Joined: Wed Oct 14, 2009 8:07 pm
fill in the right answer: 10
Location: Bournemouth

Re: GTX 16v Reshell v2.0

Post by jbo »

Apologies for the massive delay everyone. I had a week of getting nothing done due to a stuck 30mm bolt on the hub. I couldn’t get it off so beat the old shell a few times and started listing the parts to sell. …fortunately I’ve calmed down since then and have carried on. ?

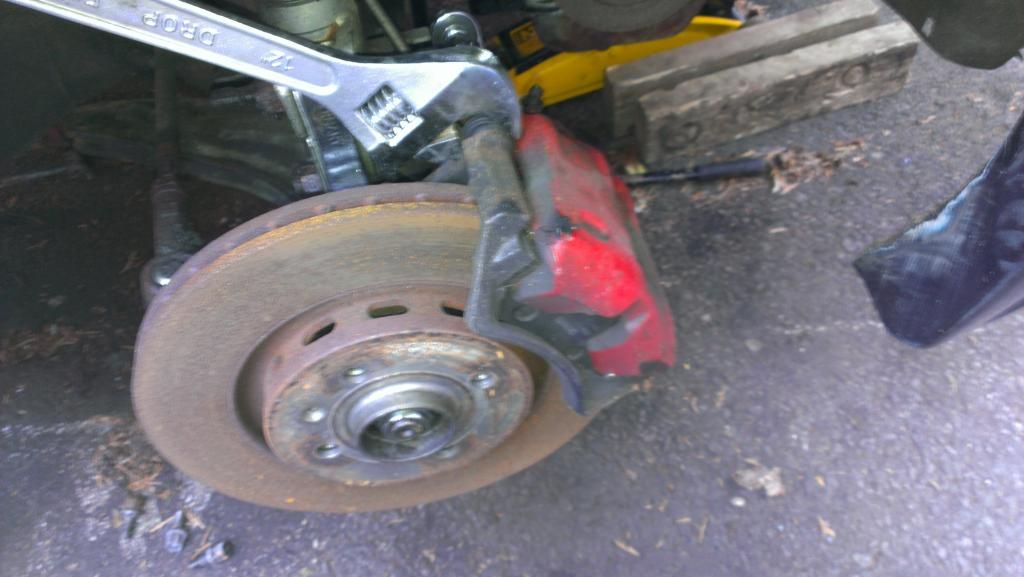
While I was waiting for a few parts and tools to arrive I made a start on getting the brake setup off. This took quite a while as the bolts were on pretty tight and I had two cars to do. The driver side cv boot had split on the old car so everything got soaked in grease…nice! I was worried about the wishbones from the old car as it was a front end crash but it looks ok. Worst cast I can whack another one in later. I need the new shell rolling again!

Image

Image

Image

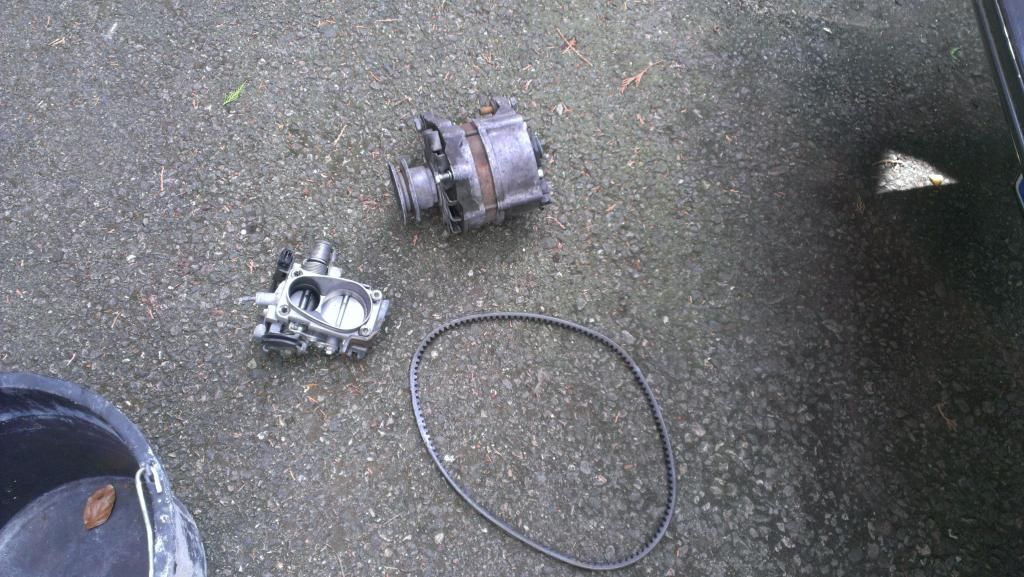
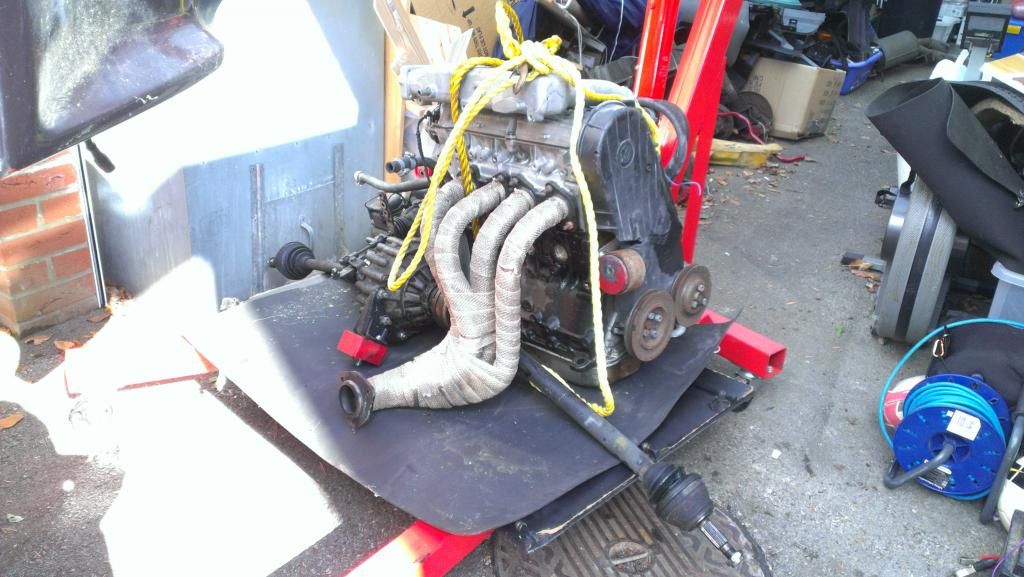
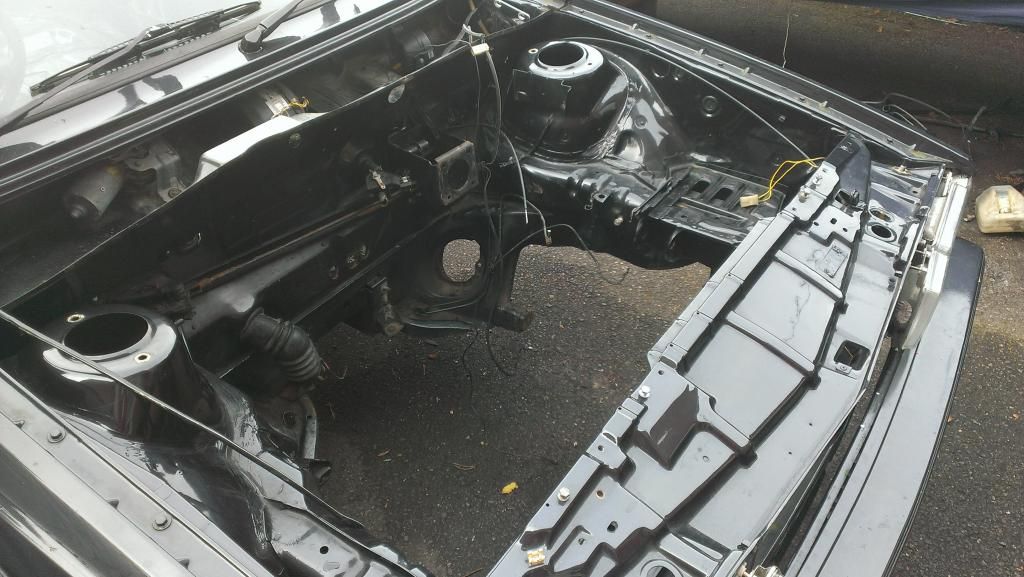
The next step was getting the damn engine out! Nobody was around to help so I had to do this myself! I forgot about the damn driver side mount so was a bit confused why it wasn’t dropping down. Took it off and all was well until the alternator and throttle body kept clipping the servo and cross member. Off they also came.

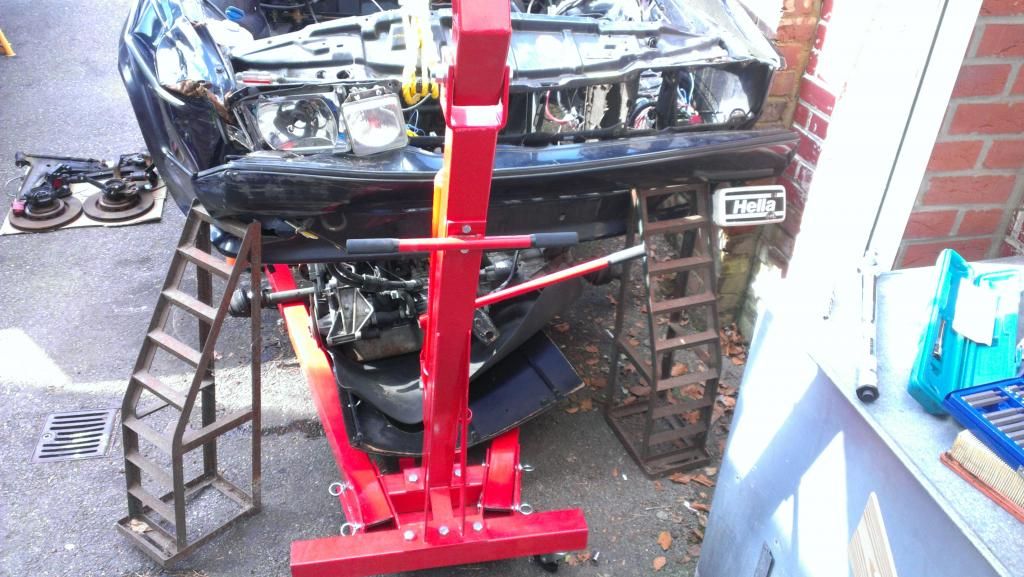
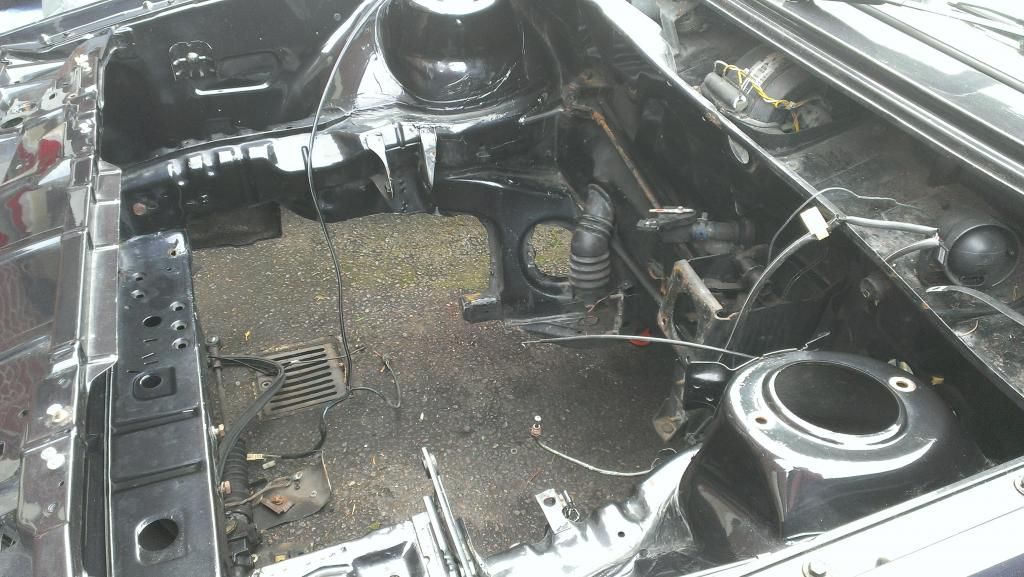
Due to the lack of spare axle stands and I had to use an old set of ramps to balance the front of the car. I also gave the new cars bay a nice clean. Zero rust anywhere including the battery tray! ?

Image

Image

Image

Image

Image

Image

Image

Image

Image

Image

Image

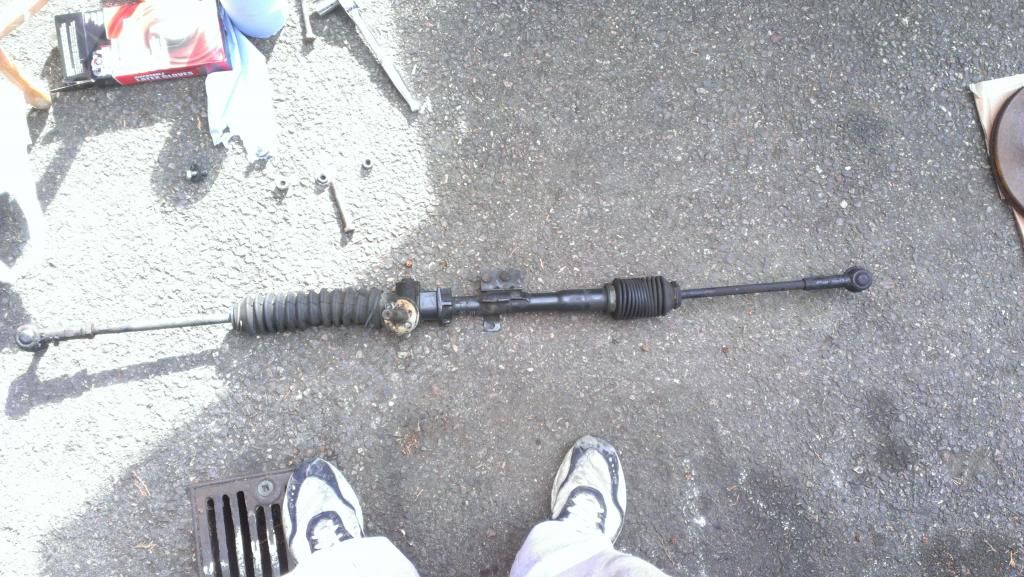
The steering rack on the old car was in a better state then the new one so that was also swapped. I put it back in and then forgot that I hadn’t moved the brake and fuel lines over! Off it came again!

Image

Image

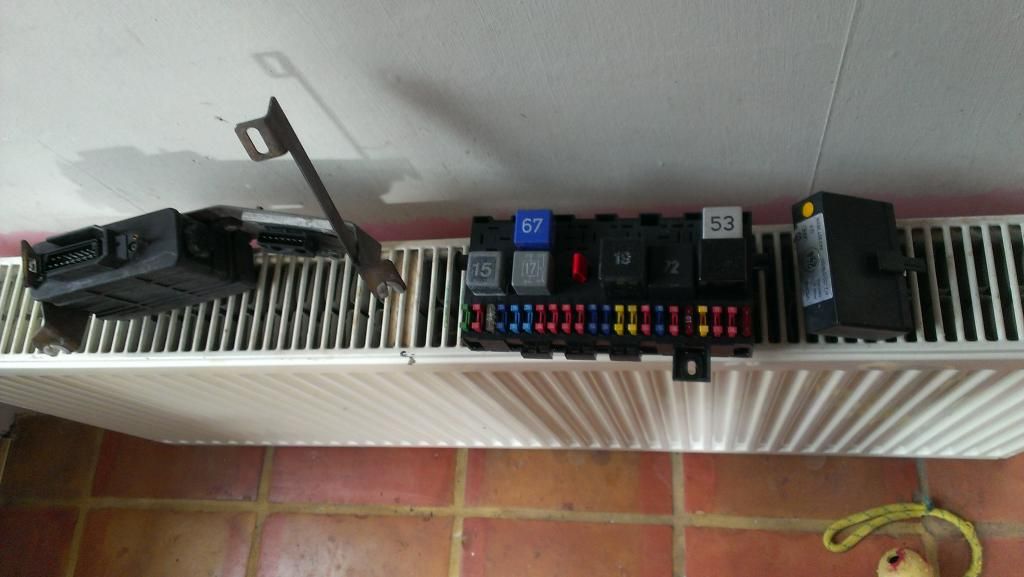
I needed to move the wiring form the old car to the new also as it is a 16v rocco spec….and the new car doesn’t come with one. It was covered in road tar and oil so I spent ages cleaning it all up and hung it up to dry. The ecu, fusebox and isv moduel also needed a drying out. When I get a new crimper ill repair the split looms with the new connectors I found online.

Image

Image

Image

Image

I’ve just bought a new 4 port 22mm cylinder as the one I bought of the mk2 golf forum was rusted around the servo grommets. I don’t really want rust floating around my braking system. Unlike the old one this is a four ports so it should just be a case of bending and reflaring the existing lines instead of the using the three way adapter setup I was planning.


User avatar
jbo
Posts: 689
Joined: Wed Oct 14, 2009 8:07 pm
fill in the right answer: 10
Location: Bournemouth

Re: GTX 16v Reshell v2.0

Post by jbo »

Lots has been done on the car but nothing has been posted as usual lol.

As the existing loom had so many frays around the connectors I bought some new ones and a crimper. They look brand new!

Image

Image

Image

The second hand Golf 16v brake setup arrived but the servo had some surface rust around the reservoir holes. Not wanting to take any chances with debris in the brake lines I bought a new one. I also plumbed in the brake lines in the correct diagonal setup. Much ease than I thought it would be and I didn’t need to use the bending tool I bought. The damn clevis pin was annoying as I forgot to attach it after installing the cylinder! I have installed the reservoir in reverse so I can finally run a standard straight dizzy cap without the 90 degree bend.

Image

Image

Image

Image

Image

I got the looms back in the car. I forgot how annoying it was to get everything routed in the correct place. The 16v ecu on the correct scirocco plate is back in too. I think I have a weak/missing ground as some of the electrics don’t work. Not my main issue at the moment so Ill come back to it later on.

Image

Image

Image

Image

Image

Image


User avatar
jbo
Posts: 689
Joined: Wed Oct 14, 2009 8:07 pm
fill in the right answer: 10
Location: Bournemouth

Re: GTX 16v Reshell v2.0

Post by jbo »

I’ve spent the last three days neatly wiring in a new loom for the lights and fogs. It took so long routing and measuring the cable and wire sheath. There’s also a nice new fuse box and relay plate. I don’t fancy doing this again anytime soon! It all worked first time too!

Image

Image

Image

Image

Image

Image

Image

Image

Image

Image

Image

Image

Image

Image

Image

Image

Image

Image


User avatar
jbo
Posts: 689
Joined: Wed Oct 14, 2009 8:07 pm
fill in the right answer: 10
Location: Bournemouth

Re: GTX 16v Reshell v2.0

Post by jbo »

I got a nice new shiny set of braided fuel lines arrive yesterday so fitted them today. I had to put the fuel dizzy back in to work out where to mount them etc. They look pretty nice.

The old car had a huuuge swirl pot in the boot as the guy who built it said there was issues delivering enough fuel as the engine was beign starved on corners and braking etc when the tank was below a certain level. I'm hoping this was just something wrong with part of the old setup and I don't suffer the same issue again. If old turbo volvos and porshes can run the same kjet setup them im sure ill be ok with the rocco! :-) I'm still waiting for the other parts to come from the US and Germany. Once fitted the only old part in the fuel system will be the accumulator! I refuse to pay £150 for a new one lol.

I also got a few other bits done like the bonnet release cable, coolant switch and electric window wiring.

Image

Image

Image

Image


woodyone
Posts: 11
Joined: Sat Feb 23, 2013 2:24 pm
fill in the right answer: 15
Location: East Sussex

Re: GTX 16v Reshell v2.0

Post by woodyone »

The braided fuels lines look good, where did you buy them from?


User avatar
jbo
Posts: 689
Joined: Wed Oct 14, 2009 8:07 pm
fill in the right answer: 10
Location: Bournemouth

Re: GTX 16v Reshell v2.0

Post by jbo »

woodyone wrote:The braided fuels lines look good, where did you buy them from?
I got them from Crazy Quiffs who mainly do Mk1 Golf parts. Check them out.

Jason


User avatar
jbo
Posts: 689
Joined: Wed Oct 14, 2009 8:07 pm
fill in the right answer: 10
Location: Bournemouth

Re: GTX 16v Reshell v2.0

Post by jbo »

Sorry for the lack of update, it’s been on and off work for a few weeks and I haven’t found the time to update the thread. I’m missing a few pics as I either forgot to take them or I didn’t have my phone on me. The updates below aren’t in any particular order but cover most of what I’ve done.

One of the outer cv boots has split and exploded all over the wheel and brakes etc. The other side wasn’t split but it didn’t look like it had long left so I thought I might as well change both. I bought a oem equivalent kit and then realised that I had to take the cv joint apart. I didn’t fancy splitting them so I bought two of the stretch boot kits. The mess this made was ridiculous! Four days later and I still have grease under my nails lol. These eventually went on and everything was cleaned up nicely. I haven’t put the hubs on yet as I need to move the disc back plates from another car. These will be sanded down and painted. I’ve bought new bearings and bolts etc for the hubs.

Image

Image

Image

Getting the engine back in was one of the bits I was dreading. In the end it wasn’t as painful as I thought it would be. Where I had parked the car too close to the wall (now with no front wheels) it made it a bit more difficult. It took four of us to lift the car and then position the engine on the hoist under it. It was only attached to the hoist with a single piece of rope so we had to keep dropping it down and adjusting it to get the tilt right. Eventually we got the mounts lined up and it was bolted in. The gear linkages were cleaned and rebuilt with new bushes etc. This should give a much nicer feel as it was like shifting jam before! While looking at the diagram I noticed that one of my brackets had three holes in it. Turns out I had a Tectonics shift reducer installed so I can lower the throw by 25% of 50%. Once I have the adjustments set I’ll have a play around with this.

Image

Image

Image

As I’ve replaced pretty much everything on this car I thought I might as well do the heater matrix also while the interior is out and there’s nothing in the cooling system. When trying to attach it to the cooling system I realised I forgotten to take a couple of hoses off the old car!? The one from the cylinder head to the matrix appears to be a common part across lots of VWs which should hopefully arrive today/tomorrow. The hose from the hard line to valve is way too short. Instead of burning more time and cash on mail order parts from Germany I just bought some 16mm hose and adapters etc. Hopefully this will be here this week also.

I thought I would give the blower motor a test too as the car spent a long time sitting outside with windscreen. It’s dead which is no surprise. Alib on the forum has sent me a spare which should be here today. I also cleaned out the glass from the broken windscreen.

Image

Image

Image

The damn fuel system! This has cost me more than the actual car and all the other new bits in total! As I bought brand new lines it made sense to get everything else replaced also. The previous car was built with a massive swirl pot as the original system could not deliver the fuel on corners etc. I’m not convinced that it was plumbed in correctly or if they had even attached the original reservoir. The old car was a carb so I didn’t see how or why their conversion had failed. The swirl pot worked but I had hot start problems all the time which I imagine was due to the lack of accumulator. After looking through vagcat and I had found the parts needed from the US and Germany. Every little screw, bracket, pipe and clip etc has been replaced. I am still missing the hard S line between the reservoir and pump. I need to get a few more bits from the US so I’ll wait until then. In the mean time I have used a piece of hose from the old massive swirl pot setup from the old car. This doesn’t hit any other components and looks like it will do the job! The only parts that haven’t been replaced are both pumps and the injectors. I bought Bosch replacements a few years ago and haven’t even hit 10k miles on them so they can stay for the moment. I’ve got a new filter to fit once the fuel dizzy etc is back in. I’m hoping that I won’t have any issues. If these same components can power turbo Volvos and old Porsche’s and Ferraris etc I should be ok lol.

Image

Image

Image

Image

Image

Image

I don’t know how many times ive take the damn steering rack out; mostly for routing and rerouting the fuel and brake lines. Although the setup from the old car was in a much better state I thought I should replace the bushes and boot with new or poly parts. This looks much better and makes sense if the rest of the car is poly bused.

Image

Image

The rear axle is finally on but I don’t have any pics to hand. This too was poly bushed and has been fitted with an uprated antiroll bar. I bought two of the three last remaining hand brake cables from gsf. The old ones were a bit worn although they still served the purpose. The MK4 Golf GTi callipers fitted meant I had to route the cables slightly differently than standard. They work just as well and use a zippy tie to stop them from hanging low.

Image

The most annoying part of the rebuild has to be the braking system! The reason the car crashed was partly due to the rear brakes locking up under hard braking. The other part was due to me driving like a dick head! The guy who built the car assured me that I didn’t need any sort of bias to the rear…hmmmm….. Instead of fitting one of the old load compensators to the rear axle I decided to fit manual adjusters just under the brake servo. This allows me to dial in the exact amount of bias to the rear lines. These are usually fitted in the car but I am going for a standard interior. Once set I doubt I will be adjusting too often! I bought two so I could keep the standard four outputs with the opposite circuit safety setup. I toyed with scrapping the setup and going for dual servos that sat on the steering column. It would be about £300 to do so and I haven’t gotten any use out of these new parts yet lol.

The brake lines on the car are steel so I couldn’t flare then without splitting the ends. These were dropped off at a local garage and came back looking ok. Hopefully these will work! If not then removing the rear lines and making up a new copper set doesn’t look too painful with the car assembled.


User avatar
Risocco
Posts: 1374
Joined: Wed Apr 01, 2009 1:09 am
fill in the right answer: 10
Location: Costa-Del-Kidderminster

Re: GTX 16v Reshell v2.0

Post by Risocco »

Great progress Jason :good:


1983 GL
1986 GT
1994 Corrado VR6
User avatar
jbo
Posts: 689
Joined: Wed Oct 14, 2009 8:07 pm
fill in the right answer: 10
Location: Bournemouth

Re: GTX 16v Reshell v2.0

Post by jbo »

I forgot that my dad had taken pics while we were putting the engine back in the car. This was the super safe method! :hugegrin:

Image

Image

Image

Image

Image

Image

Image

Image

Image

Image

Image

Image

Image


mark1gls
Posts: 3957
Joined: Thu Apr 02, 2009 9:28 pm
fill in the right answer: 10
Location: Somerset

Re: GTX 16v Reshell v2.0

Post by mark1gls »

How did you you get the car that high to fit the ramps under?
My trolly jack does not go that high.


Mk1 78 Scirocco GLS 1.6 FR, weekend toy.
Mk1 88 Golf GTi cabriolet 1.8 DX. Daily drive.
Membership No. 323
User avatar
jbo
Posts: 689
Joined: Wed Oct 14, 2009 8:07 pm
fill in the right answer: 10
Location: Bournemouth

Re: GTX 16v Reshell v2.0

Post by jbo »

With a massive amount of hassle! lol. The front end of the car was so light with no engine or interior three of us lifted the front end by hand and slotted a couple of axle stands underneath. The engine sitting on the hoist could then be slotted under neath. We then pulled the ramps out and lowered it back down. The rest was just trial and error of getting the engine at the right angle to get the mounts lined up. I wouldn't want to do it again anytime soon lol.


User avatar
jbo
Posts: 689
Joined: Wed Oct 14, 2009 8:07 pm
fill in the right answer: 10
Location: Bournemouth

Re: GTX 16v Reshell v2.0

Post by jbo »

Surprise, no update for a while! Lots more done so here’s an update –

I bought a new set of 280mm adapters as the ones I was running before had worn bolts. I didn’t want to burn more time trying to source new ones so just bought a new set. The top bolt son each is verrrry tight and won’t turn anymore. It is clamped to enough of the hub so I will trim this down tomorrow. Nice and shiny! I also rebuilt the caliper carriers and gave them a good coating of copper grease. I’m still running standard brakes and pads so may upgrade at some point in the future. The uprated servo, cylinder and rear setup should still be ok for the moment.

Image

Image

Image

On my mission to replace every single consumable part I eventually got to the drive shafts…. The boots I bought were decent quality but I needed to take the ends of the shafts off to fit them. I looked for the release clip but couldn’t find it. I just bought a decent set of stretchy boots instead. ….never in any of my car projects have I made a mess like this! The amount of grease needed was ridiculous!! The below picks are after the clean up. I gave the rest of the wishbones and steering parts a good clean. The new boots included all the usual new hub nuts etc so they too were replaced.

Image

Image


The exhaust was easier than I thought it would be. I just sanded the ends down and clamped it all back up. I hate working on them so I will get the garage to seal it up. The system still doesn’t have a flexi joint so that will need to be done at some point also. The engine barely moves with the polybushed mounts so the exhaust hangers will take the movement.

I finished the underside of the car and noticed I had a few bolts left over. I forgot the antiroll bar lol. This was a bit awkward with the car on stands as the chassis was flexing under its own weight.

Image

Image

Another bit I’ve been dreading is the engine fuel hoses. Every time I’ve worked on them I’ve sprung a leak. After a bit of reading I discovered this was because they used crush washers. A set of these new was crazy squids from vw or had to be imported. Instead I bought a set from Halfords for a few quid. The set covered every sized hose under the bonnet! The washers aren’t very smooth so I had to sand down each one but it only took 20 mins max. I tried starting the car for the first time in a year….lots of noise but it wouldn’t catch at all. I pulled an injector….no fuel. After a couple of hours I realised that I had plumbed the lift pump in reverse lol. I managed to reverse this my only dropping the tank slightly. Turned it over again and she fires up straight away. Good ol vw engines! Not a single leak from the new crush washers either! Wooo!

Image

Image

Image

Image


The new 16mm coolant hose I bought was the correct size but there wasn’t enough space for the hose to bend without kinking. Instead I bought a couple of metal joining pipes to extend the existing hoses after cutting each in half. The new heater work fine and the pipes don’t leak.

Image

The oil cooler was originally mounted pretty poorly so this was moved further to the left. It looks better here and will hopefully improve cooling.

Image

Image

It seems that my original 16v rocco throttle body went missing when the car was built. Hmmm…… So I had to buy another from the US. This has a wide open throttle switch on it and also includes the bracket needed to run the correct throttle cable. I bought a new 16v rocco throttle cable too so no need to mod anything.

Image

Image

Image


User avatar
jbo
Posts: 689
Joined: Wed Oct 14, 2009 8:07 pm
fill in the right answer: 10
Location: Bournemouth

Re: GTX 16v Reshell v2.0

Post by jbo »

Forgot to addd.

The car was in the garage on Monday to have the brakes bled, exhaust sealed bolts checked. I took if for a quick spin around the block.......my god it's quick?!?! I've been contemplating for ages about going turbo or supercharger...and I forgot how quick this is. It's relentless!

Then new brakes are fantastic too. There is some sponge about a quarter of the way down but after that it stops on a penny. Apparently this will go once the new cylinder is broken in. ....we'll see.

The plan for this weekend is to fit the interior and give the leather a good feeding as its been under the porch for a year! It's booked for an mot on Tuesday too so fingers crossed it'll pass!

Here are a few pics of how it looks at the moment -

Image

Image

Image


Tim_R
Posts: 596
Joined: Wed Apr 01, 2009 11:03 am
fill in the right answer: 10
Location: Northamptonshire

Re: GTX 16v Reshell v2.0

Post by Tim_R »

Really good effort on the rebuild, I know just how much work is involved and how long some of the jobs take. It's really satisfying being able to start it for the first time.

Something I've just noticed from you photos is your ARB, it's upside down if it's an Eibach one and should mount on top of the wishbones and the V in the crosspiece pointing down to clear the exhaust.


Scirocco GTII 2L 16V
Mk2 Golf Gti 8v
T4 Transporter 2.4D LWB
mark1gls
Posts: 3957
Joined: Thu Apr 02, 2009 9:28 pm
fill in the right answer: 10
Location: Somerset

Re: GTX 16v Reshell v2.0

Post by mark1gls »

I do think the front arb is upside down as if you look near the exhaust there is a bend in the arb and its going up not down away from the exhaust?
But I could be wrong.


Mk1 78 Scirocco GLS 1.6 FR, weekend toy.
Mk1 88 Golf GTi cabriolet 1.8 DX. Daily drive.
Membership No. 323
Post Reply