
HERMAN THE GERMAN! '91 Scala 20vt
Forum rules
Section for all vehicle and related projects. Please keep responses pertinent to thread.
Section for all vehicle and related projects. Please keep responses pertinent to thread.
-
mr.brown
- Posts: 1489
- Joined: Thu Apr 02, 2009 10:13 pm
- fill in the right answer: 15
- Location: Surrey
Re: HERMAN THE GERMAN! '91 Scala 20vt
Looks superb, I can't wait to see this in the flesh someday.
Regarding the washer bottle issue you can use the rear one - just run a water pipe (with non-return valve) to the front. All you need to do then is to swap the wires for front and rear washer at the back of the fusebox.
Regarding the washer bottle issue you can use the rear one - just run a water pipe (with non-return valve) to the front. All you need to do then is to swap the wires for front and rear washer at the back of the fusebox.
-
treefingers
- Posts: 400
- Joined: Wed Aug 14, 2013 1:04 pm
- fill in the right answer: 15
Re: HERMAN THE GERMAN! '91 Scala 20vt
Thanks, great idea.. If I have to move the wires at the pipes anyway this is a good option! Will have to check that I still have the rear reservoir on the shelfmr.brown wrote:Looks superb, I can't wait to see this in the flesh someday.
Regarding the washer bottle issue you can use the rear one - just run a water pipe (with non-return valve) to the front. All you need to do then is to swap the wires for front and rear washer at the back of the fusebox.
-
treefingers
- Posts: 400
- Joined: Wed Aug 14, 2013 1:04 pm
- fill in the right answer: 15
Re: HERMAN THE GERMAN! '91 Scala 20vt
Spent another 12+ hours yesterday welding up the chassis. This consisted of building up bits of wheel arch and sill, and then some seam sealing.
I've removed both the front jack mounting cups to cut out the rust underneath. I added strength with some 3mm plate before putting the cups back on. Then gave it a good hard sealing.

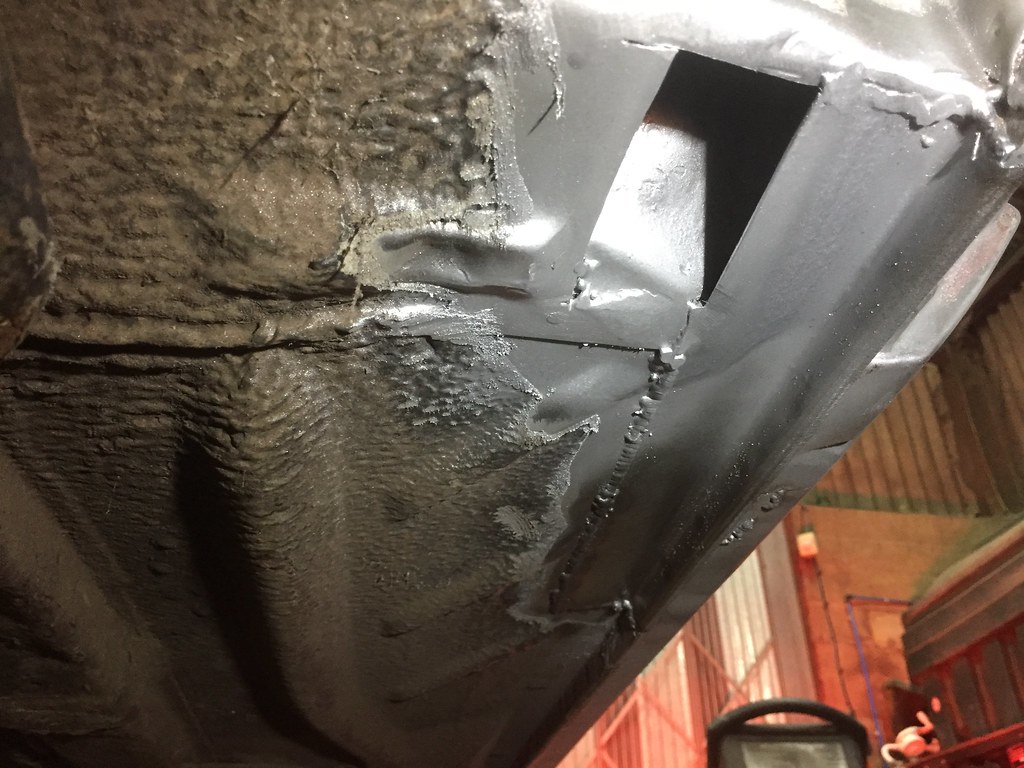

I'm happy to say that welding is now completed on the chassis!

I've removed both the front jack mounting cups to cut out the rust underneath. I added strength with some 3mm plate before putting the cups back on. Then gave it a good hard sealing.
I'm happy to say that welding is now completed on the chassis!
-
treefingers
- Posts: 400
- Joined: Wed Aug 14, 2013 1:04 pm
- fill in the right answer: 15
Re: HERMAN THE GERMAN! '91 Scala 20vt
Yesterday I wire wheeled the sills to bare metal. I had to replace more metal when I found an extra hole, so the welding wasn't as finished as I thought!
I was mainly doing filler work. As time the boot is off this time, I've been able to remove the hinges and get in there properly with the wire wheel, likewise around the door hinges. I don't want paint flaking off in a few year's time! I exposed so much bare metal on one side of the car, it made sense to get it in primer.

Wheel arch is getting there, some more filling and sanding needed but I'm happy so far.

I was mainly doing filler work. As time the boot is off this time, I've been able to remove the hinges and get in there properly with the wire wheel, likewise around the door hinges. I don't want paint flaking off in a few year's time! I exposed so much bare metal on one side of the car, it made sense to get it in primer.
Wheel arch is getting there, some more filling and sanding needed but I'm happy so far.
-
treefingers
- Posts: 400
- Joined: Wed Aug 14, 2013 1:04 pm
- fill in the right answer: 15
Re: HERMAN THE GERMAN! '91 Scala 20vt
Must be nearly 100 hours in now. Prep is epic. It's just as well I enjoy thinking as I've been having to do lots. Decided to redo the primer I had done as I should have been using 2K primer instead of QD phosphate, and mainly I can't be sure I didn't get damp and dust into the work. Anyway my friend is letting me use his workshop space and he has a lift, never used one before and it has been amazing. Being able to have the car at the right height while using a sanding block/da etc. has been awesome! Even having the car half a foot higher/lower makes a massive difference for all that repetitive wrist action. No, not that kind of action.

I've been doing loads of reading on the internet about prep work for paint; dealing with dust, grease, moisture, using the right grits.. also using the right products, and in the right order. There is so much to it, I've realised I can't just guess and hope I'm doing the right thing as I'll pay for it later!!
With that said I stripped all that primer back and keyed it up properly using 180 grit on the paint and 80 grit on bare metal.

It took me so long to get those stupid insignificant looking bits of filler how I want them. It's ridiculous.

Fully prepped for primer now, much more than before!

Used etch primer on the biggest areas of bare metal. Could/should have used epoxy primer here, but I had etch in the cupboard and it is fit for purpose here. Block sanded with 400 grit and went over with a scotch and degreaser afterwards, ready for 2k primer.

In 2k hi build primer now. Hurrah.


Still LOADS to do... front valance, bonnet, doors, boot, wings.. I've found the way to get through the daunting work load is to constantly break it down into small tasks, and not to deviate, i.e. to work on a single panel at a time, and not to move on until the task has been completed. As with life if you don't create order, you get smashed to pieces by all the chaos.
I've been doing loads of reading on the internet about prep work for paint; dealing with dust, grease, moisture, using the right grits.. also using the right products, and in the right order. There is so much to it, I've realised I can't just guess and hope I'm doing the right thing as I'll pay for it later!!
With that said I stripped all that primer back and keyed it up properly using 180 grit on the paint and 80 grit on bare metal.
It took me so long to get those stupid insignificant looking bits of filler how I want them. It's ridiculous.
Fully prepped for primer now, much more than before!
Used etch primer on the biggest areas of bare metal. Could/should have used epoxy primer here, but I had etch in the cupboard and it is fit for purpose here. Block sanded with 400 grit and went over with a scotch and degreaser afterwards, ready for 2k primer.
In 2k hi build primer now. Hurrah.
Still LOADS to do... front valance, bonnet, doors, boot, wings.. I've found the way to get through the daunting work load is to constantly break it down into small tasks, and not to deviate, i.e. to work on a single panel at a time, and not to move on until the task has been completed. As with life if you don't create order, you get smashed to pieces by all the chaos.

-
treefingers
- Posts: 400
- Joined: Wed Aug 14, 2013 1:04 pm
- fill in the right answer: 15
Re: HERMAN THE GERMAN! '91 Scala 20vt
Cheers Bill :)
Much progress has been made.. I've been doing silly silly hours whilst still working my job in the hope it'll be done before Retrorides at Goodwood in 9 days. Perhaps I'm a bit mad, but I'm definitely motivated.
Guide coat and loads of sanding. Then I did a second coat of primer, then more sanding. Then you get to bare metal, so more primer, more sanding.. you get the idea..

I put on some stonechip on the sills using a sealey stone chip gun.. Granville stonechip. Afterwards I had to redo the sill you see as I'd used a soft block when sanding the filler, so the block just followed the heat distortion I put in when welding. Basically the sill wasn't straight so I ground it back and re did the filler with a hard block, and stone chipped it a second time.


Hey, the car is still grey but loads of things have been done to it! It's some sort of magic trick!? It must be!??
Hey, the car is still grey but minutely shinier! Much work later the shell was ready for paint.

I painted it (the first time, more later..)


For the first car I've ever painted, I did pretty well. I was so cautious of getting a run though, too cautious. I didn't put enough paint on for wet flatting, and my fan settings were too narrow so I had a couple of dry spots, so my friend advised me to get more paint on it. It only took 6 hours to get it back to a state for more paint..

Doing bodywork literally eats time out of your life, it's insane. Everything takes so long, and you don't always have anything to show for all the work put in. Not initially anyway. I really didn't want to paint it again and mess something up, and have to flat the whole car again, so I got a guy from the yard I work at to lay on a top coat. We got loads and loads of Mars on there! It was bittersweet as I'd love to say I did the whole respray myself, but I'd rather have a nice job than an ok one and say I did it.. To do it all except laying on the top coat is not too bad going though I guess. I'm still learning, all the time. Anyhoo I wet flatted the whole car with 1500 and he buffed it. That was long too, but the result was quite nice.


Did loads of work on a slightly crumpled wing that was the replacement for my very crumpled wing. Had to build up the line that runs along the wing by shaping with filler. It's straighter than that now too. Again took ages. Notice any theme here? haha

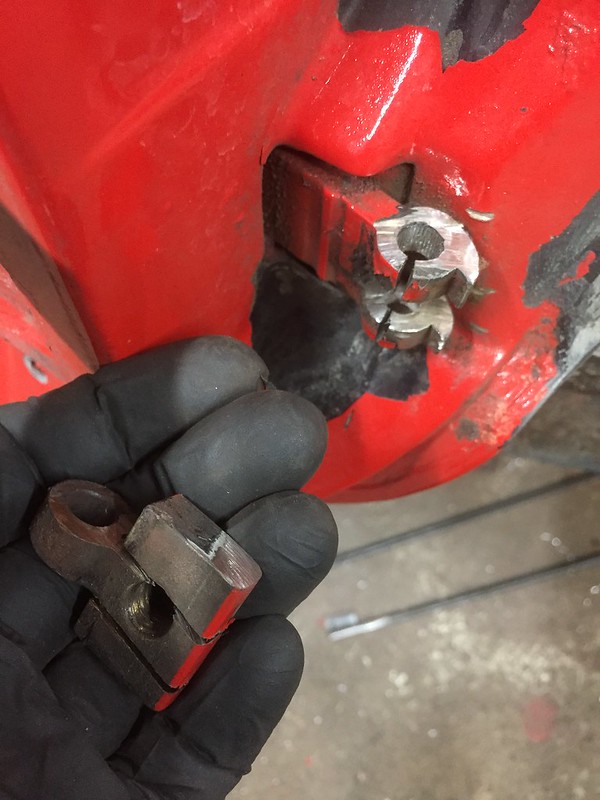
I replaced a door pin, this was the only way to get the old one out! I had to rebuild the parts of the hinge with weld and remove material in order to remove the sloppyness from wear and, ahem my angle grinder
Replacing rusty metal on the doors..


35 hours+ over last bank holiday weekend getting these panels reading for paint

One door ready for some paint..

Etch primer.

The first coat of high build 2k primer

So many little dents in this door. This is not the original door, it was a replacement that came with the car when I bought it. It came from a car that was beat around a little bit! So far I believe the only original panels to this car are one door, one wing and the tailgate! The others are illegal immigrants!

Finally got some mars red on some panels early this week. They are going hard in the sun here. A really nice finish one there, only light wet flatting needed I think. I can't bolt the wings down until the bonnet is on.

I was recommended a matt 2k paint to use for a satin finish on the black bits, but it came up too glossy so I dusted it with a light mist of paint to dull it a bit. They don't feel smooth, but they look just like I want them to.

Mirrors and wipers done too

Sealed in the rear lights using screenseal, which amazingly was still good in the tube from 4 years ago when I last did the lights! Oh and I polished the exhaust tip before I put it back on :) At least 5hp gained there! Note new headlining going in..

One of the doors got painted today and the paint reacted to whatever contaminant got on the door while it sat in my workshop for a couple of days, so tomorrow I'll need to strip the mars red off, prime it again, wet flat it and prep for paint. Got me a bit frustrated today for a short period but I've just got to get on with it. It can always be worse.
Going to pick up a new windscreen before work tomorrow (I broke the old one taking it out), and it has a boss so for the first time I can run my rear view mirror! A bit excited. Little things..
Much progress has been made.. I've been doing silly silly hours whilst still working my job in the hope it'll be done before Retrorides at Goodwood in 9 days. Perhaps I'm a bit mad, but I'm definitely motivated.
Guide coat and loads of sanding. Then I did a second coat of primer, then more sanding. Then you get to bare metal, so more primer, more sanding.. you get the idea..
I put on some stonechip on the sills using a sealey stone chip gun.. Granville stonechip. Afterwards I had to redo the sill you see as I'd used a soft block when sanding the filler, so the block just followed the heat distortion I put in when welding. Basically the sill wasn't straight so I ground it back and re did the filler with a hard block, and stone chipped it a second time.
Hey, the car is still grey but loads of things have been done to it! It's some sort of magic trick!? It must be!??
Hey, the car is still grey but minutely shinier! Much work later the shell was ready for paint.
I painted it (the first time, more later..)
For the first car I've ever painted, I did pretty well. I was so cautious of getting a run though, too cautious. I didn't put enough paint on for wet flatting, and my fan settings were too narrow so I had a couple of dry spots, so my friend advised me to get more paint on it. It only took 6 hours to get it back to a state for more paint..
Doing bodywork literally eats time out of your life, it's insane. Everything takes so long, and you don't always have anything to show for all the work put in. Not initially anyway. I really didn't want to paint it again and mess something up, and have to flat the whole car again, so I got a guy from the yard I work at to lay on a top coat. We got loads and loads of Mars on there! It was bittersweet as I'd love to say I did the whole respray myself, but I'd rather have a nice job than an ok one and say I did it.. To do it all except laying on the top coat is not too bad going though I guess. I'm still learning, all the time. Anyhoo I wet flatted the whole car with 1500 and he buffed it. That was long too, but the result was quite nice.
Did loads of work on a slightly crumpled wing that was the replacement for my very crumpled wing. Had to build up the line that runs along the wing by shaping with filler. It's straighter than that now too. Again took ages. Notice any theme here? haha
I replaced a door pin, this was the only way to get the old one out! I had to rebuild the parts of the hinge with weld and remove material in order to remove the sloppyness from wear and, ahem my angle grinder
Replacing rusty metal on the doors..
35 hours+ over last bank holiday weekend getting these panels reading for paint
One door ready for some paint..
Etch primer.
The first coat of high build 2k primer
So many little dents in this door. This is not the original door, it was a replacement that came with the car when I bought it. It came from a car that was beat around a little bit! So far I believe the only original panels to this car are one door, one wing and the tailgate! The others are illegal immigrants!
Finally got some mars red on some panels early this week. They are going hard in the sun here. A really nice finish one there, only light wet flatting needed I think. I can't bolt the wings down until the bonnet is on.
I was recommended a matt 2k paint to use for a satin finish on the black bits, but it came up too glossy so I dusted it with a light mist of paint to dull it a bit. They don't feel smooth, but they look just like I want them to.
Mirrors and wipers done too
Sealed in the rear lights using screenseal, which amazingly was still good in the tube from 4 years ago when I last did the lights! Oh and I polished the exhaust tip before I put it back on :) At least 5hp gained there! Note new headlining going in..
One of the doors got painted today and the paint reacted to whatever contaminant got on the door while it sat in my workshop for a couple of days, so tomorrow I'll need to strip the mars red off, prime it again, wet flat it and prep for paint. Got me a bit frustrated today for a short period but I've just got to get on with it. It can always be worse.
Going to pick up a new windscreen before work tomorrow (I broke the old one taking it out), and it has a boss so for the first time I can run my rear view mirror! A bit excited. Little things..
-
moser
- Posts: 118
- Joined: Tue May 05, 2009 10:36 am
- fill in the right answer: 10
- Location: Fareham, Hampshire
Re: HERMAN THE GERMAN! '91 Scala 20vt
Looking ace! Finish line is in sight!
91 Scirocco Scala - Too low for MOT ramps apparently
03 Seat Cordoba PD130 - Daily
52 Golf 1.6 - Mrs' shopping trolley
03 Seat Cordoba PD130 - Daily
52 Golf 1.6 - Mrs' shopping trolley
-
treefingers
- Posts: 400
- Joined: Wed Aug 14, 2013 1:04 pm
- fill in the right answer: 15
Re: HERMAN THE GERMAN! '91 Scala 20vt
Thanks! Yes I hope so!
Last night my bro Jim and my mate Ryan came to help and we got looaads done. I cut through a loom accidentally with a 4 1/2" grinder when doing floor work, and jim soldered it all back together for me :)
I'm very intimate with this door now.

Headlining is 75% finished!

Brand new windscreen, with green tint! (I had clear before)

Last night my bro Jim and my mate Ryan came to help and we got looaads done. I cut through a loom accidentally with a 4 1/2" grinder when doing floor work, and jim soldered it all back together for me :)
I'm very intimate with this door now.
Headlining is 75% finished!
Brand new windscreen, with green tint! (I had clear before)
-
treefingers
- Posts: 400
- Joined: Wed Aug 14, 2013 1:04 pm
- fill in the right answer: 15
Re: HERMAN THE GERMAN! '91 Scala 20vt
Got up early today to go and do a long day on the car, and my daily has a flat battery so I can't get to the workshop! Irony. With time to kill I thought I'd do some writing while I await a recovery van for a jump start..
So yesterday's progress..
The last bit of body work now, the tailgate. Yesss. Cut out the rusty bits..

Welded in some fresh metal.

Ready for a skim of filler


Only the fuel flap, one door and the tailgate to go now for the paintwork!
Ordered some Dinitrol cavity wax today for spraying inside the sills and generally getting around the back of the places I've welded. Got a Stormforce car cover too, really going to make the effort to keep the car in nice condition. Of course it'll still get thrashed.
Headlining pretty much there! Ryan came down again and we glued the remaining seams, got the rear windows in and the door seals. Need to recolour the sun visors and fit the light.

There had been a weird clicking sound from the engine for the last few years on the car and I could never work out what it was, although it did worry me that it was head related. Ryan instantly diagnosed it as being the alternator freewheel pulley, and luckily I had an extra alternator on the shelf! We only had to remove two engine mounts and jack up the engine to change it! Soo nice now the noise has gone though, one less thing to worry about!
Now where's that frickin breakdown van!! Time = Scirocco not being done!! Coommee onnnnnnnn
So yesterday's progress..
The last bit of body work now, the tailgate. Yesss. Cut out the rusty bits..
Welded in some fresh metal.
Ready for a skim of filler
Only the fuel flap, one door and the tailgate to go now for the paintwork!
Ordered some Dinitrol cavity wax today for spraying inside the sills and generally getting around the back of the places I've welded. Got a Stormforce car cover too, really going to make the effort to keep the car in nice condition. Of course it'll still get thrashed.
Headlining pretty much there! Ryan came down again and we glued the remaining seams, got the rear windows in and the door seals. Need to recolour the sun visors and fit the light.
There had been a weird clicking sound from the engine for the last few years on the car and I could never work out what it was, although it did worry me that it was head related. Ryan instantly diagnosed it as being the alternator freewheel pulley, and luckily I had an extra alternator on the shelf! We only had to remove two engine mounts and jack up the engine to change it! Soo nice now the noise has gone though, one less thing to worry about!
Now where's that frickin breakdown van!! Time = Scirocco not being done!! Coommee onnnnnnnn
-
treefingers
- Posts: 400
- Joined: Wed Aug 14, 2013 1:04 pm
- fill in the right answer: 15
Re: HERMAN THE GERMAN! '91 Scala 20vt
After a few years of hard cornering my home made raised top mounts were starting to crack at the top, too thin a metal there. I cut two circles of 3mm steel and welded them on top. They can take some proper forces now! Also treated them to some brand new Audi 80 bushes.


Painted the left side of the engine bay to complete the turret repair job I started a few moons ago

With all the panels painted, assembly was on the cards. Spent ages filing down washers to put behind the door hinges so that when the doors close they are absolutely straight. Took my time getting the door latch in the right place for a satisfying door close sound!

Lining up the wings and bonnet with the shell took a fair amount of panel gap jigglery! (That is the technical term)

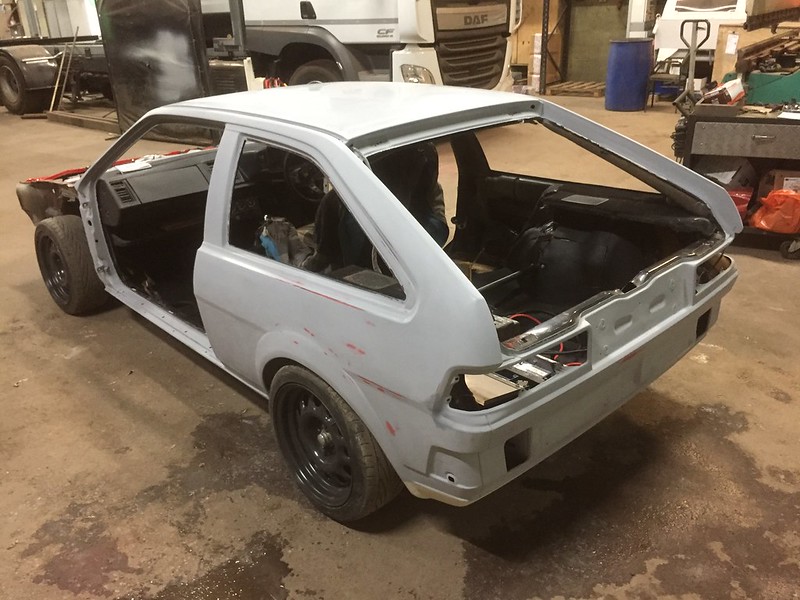
Car back together! Loads more to do later but with an MOT, alignment and a weekend at Goodwood the day after, there was only so much I could do. Skin of the teeth comes to mind though.

With new indicators too!

Passed it's MOT the following day. Alignment done too! Camber at -1 degrees, toe at 0 degrees.

Made it to Retro Rides at Goodwood, well chuffed. What a slog to get to this point! Worth it though.

Next to my mate Ryan's 200bhp+ Polo. He helped me out loads in getting the car finished so was good we could get out on track together.

I just love this picture. Managed about 6 laps of the track. Tires screaming. Loving it.


Painted the left side of the engine bay to complete the turret repair job I started a few moons ago
With all the panels painted, assembly was on the cards. Spent ages filing down washers to put behind the door hinges so that when the doors close they are absolutely straight. Took my time getting the door latch in the right place for a satisfying door close sound!
Lining up the wings and bonnet with the shell took a fair amount of panel gap jigglery! (That is the technical term)
Car back together! Loads more to do later but with an MOT, alignment and a weekend at Goodwood the day after, there was only so much I could do. Skin of the teeth comes to mind though.
With new indicators too!
Passed it's MOT the following day. Alignment done too! Camber at -1 degrees, toe at 0 degrees.
Made it to Retro Rides at Goodwood, well chuffed. What a slog to get to this point! Worth it though.
Next to my mate Ryan's 200bhp+ Polo. He helped me out loads in getting the car finished so was good we could get out on track together.
I just love this picture. Managed about 6 laps of the track. Tires screaming. Loving it.