
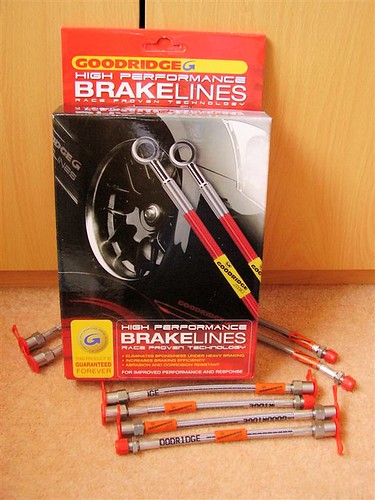
Cpt Custom wrote:Cheers ... I certainly hope they do. Just got these too ...geebeats wrote:nice its comeing on love the new shiney parts will look good when you have them all on the rocco.
I just hope I got the right ones! It says Golf GTi Mk 1 / Scirocco Rear Disc so they should do ... I hope!
Re: Project Poppy - 1987 MkII GT
Forum rules
Section for all vehicle and related projects. Please keep responses pertinent to thread.
Section for all vehicle and related projects. Please keep responses pertinent to thread.
Re: Project Poppy - 1987 MkII GT
Thats ok you are very welcome, iam sorry i do not know about the break lines i hope that they fit,or does anybody know if they do on here to help this good man out?
G Beats.Been into MK 2 V.W Sciroccos since 98.Now on my fourth MK 2 Scirocco. R.I.P two MK 2 Scala DX Engine's.Sold GT 2. No longer have a mk 2 v.w Scirocco as it was stolen back in February 2020 .Or another one know have a 1980s BMW.
-
mazellann
- Posts: 289
- Joined: Thu Mar 05, 2009 7:35 pm
- fill in the right answer: 15
- Location: Stockton on Tees
Re: Project Poppy - 1987 MkII GT
They are the brakelines if you do the rear disc conversion, but you can still use 4 of them if you still have drums!
-
Cpt Custom

- Posts: 761
- Joined: Mon Jul 19, 2010 1:46 pm
- fill in the right answer: 15
- Location: Northallerton
Re: Project Poppy - 1987 MkII GT
Thanks Tony ... I thought I'd got the right ones, but thanks for the reassurance. Like I said at Harewood I'm not mechanically minded at all, but am trying to learn as I go along.mazellann wrote:They are the brakelines if you do the rear disc conversion, but you can still use 4 of them if you still have drums!
I'm sure Dave who runs the garage where Poppy is being stored at the moment could get me all these parts, but I want to try and source as much as I can myself. It might save me some money as I go along and I'll certainly learn more about the car if I do these things myself.
By the way if you ever come across another BBS kit give me a shout as I really like that look. I reckon it's unlikely though as it sounds as though their like hen's teeth!
Look forward to chatting with you again at Durham next Saturday.

-
Cpt Custom
- Posts: 761
- Joined: Mon Jul 19, 2010 1:46 pm
- fill in the right answer: 15
- Location: Northallerton
Re: Project Poppy - 1987 MkII GT
Okay folks, a quick update on where I’m at with Poppy and what my thoughts are on taking her forward.
She’s now been in for a pre-MOT check. Stuck her in for this not so much because we think she’ll be back on the road soon, but to help ascertain the extent of what needs to be done just to make her safe and legal.
The main things she failed on are …
Nearside front Coil spring fractured; Offside front Coil spring fractured; Nearside rear Coil spring fractured; Both front Suspension arms corroded and seriously weakened; Offside front Brake pipe excessively corroded; Nearside front Brake pipe leaking; and the Offside rear (inner wheel arch) body or chassis has excessive corrosion, seriously affecting its strength within 30cm of the body mountings.
In addition the brake efficiency came below requirements and she needs numerous bulbs replacing.
Now that might sound pretty grim to some, but I don’t reckon it’s too bad – certainly a lot less than I was expecting. Plus the upgrades we were already planning to make to the braking system and suspension system will sort out a lot of those issues right away.
As for getting the chassis sorted, I’m going to strip out the interior over the next few days with a view to getting the welding done soon afterwards.
Oh, and I think we’ve now got most of the bits needed for the rear brake conversion …

Just need a few new bolts and handbrake cables.
We’ve also decided that while we could maybe get all the mechanical stuff sorted within the next few weeks there seems little point pushing things just to put her back on the road in time for the winter.
Instead we’re going to take things more slowly with a view to getting her on the road in time for the shows next year. That way I can probably do more of the work myself and maybe even get some things done that might be overlooked were we to put her back on the road too soon.
Will let you know how I get on stripping out the interior. Wish me luck … I might need it!
She’s now been in for a pre-MOT check. Stuck her in for this not so much because we think she’ll be back on the road soon, but to help ascertain the extent of what needs to be done just to make her safe and legal.
The main things she failed on are …
Nearside front Coil spring fractured; Offside front Coil spring fractured; Nearside rear Coil spring fractured; Both front Suspension arms corroded and seriously weakened; Offside front Brake pipe excessively corroded; Nearside front Brake pipe leaking; and the Offside rear (inner wheel arch) body or chassis has excessive corrosion, seriously affecting its strength within 30cm of the body mountings.
In addition the brake efficiency came below requirements and she needs numerous bulbs replacing.
Now that might sound pretty grim to some, but I don’t reckon it’s too bad – certainly a lot less than I was expecting. Plus the upgrades we were already planning to make to the braking system and suspension system will sort out a lot of those issues right away.
As for getting the chassis sorted, I’m going to strip out the interior over the next few days with a view to getting the welding done soon afterwards.
Oh, and I think we’ve now got most of the bits needed for the rear brake conversion …
Just need a few new bolts and handbrake cables.
We’ve also decided that while we could maybe get all the mechanical stuff sorted within the next few weeks there seems little point pushing things just to put her back on the road in time for the winter.
Instead we’re going to take things more slowly with a view to getting her on the road in time for the shows next year. That way I can probably do more of the work myself and maybe even get some things done that might be overlooked were we to put her back on the road too soon.
Will let you know how I get on stripping out the interior. Wish me luck … I might need it!
Last edited by Cpt Custom on Sat Dec 11, 2010 10:39 pm, edited 1 time in total.
-
the edmundator
- Posts: 2928
- Joined: Wed Apr 01, 2009 7:34 pm
- fill in the right answer: 10
- Location: BEDFORD
- Contact:
Re: Project Poppy - 1987 MkII GT
You can be guaranteed that this is due to crud collecting behind the fuel filler neck, trapping moisture and rusting through into the inner wheelarch where the bracket keeps the filler-neck in place. Given this, it's very likely that the rust has gone the other direction too, into the filler neck. If this hasn't been replaced recently, you need to remove it, check it thoroughly for any corrosion and replace it if necessary. Otherwise you'll end up with the traditional running problems associated with a fuel system full of small bits of rust.Cpt Custom wrote:the Offside rear (inner wheel arch) body or chassis has excessive corrosion, seriously affecting its strength within 30cm of the body mountings.
Register Member 829
--
1980 (1976) Mk1 Junior Cup Replica
1987 MK2 GTX
--
1980 (1976) Mk1 Junior Cup Replica
1987 MK2 GTX
-
Cpt Custom
- Posts: 761
- Joined: Mon Jul 19, 2010 1:46 pm
- fill in the right answer: 15
- Location: Northallerton
Re: Project Poppy - 1987 MkII GT
Thanks for flagging that up .... I hadn't made the connection. I'll talk to the garage where she is at the moment about this and see if between us we can check it out.the edmundator wrote:You can be guaranteed that this is due to crud collecting behind the fuel filler neck, trapping moisture and rusting through into the inner wheelarch where the bracket keeps the filler-neck in place. Given this, it's very likely that the rust has gone the other direction too, into the filler neck. If this hasn't been replaced recently, you need to remove it, check it thoroughly for any corrosion and replace it if necessary. Otherwise you'll end up with the traditional running problems associated with a fuel system full of small bits of rust.Cpt Custom wrote:the Offside rear (inner wheel arch) body or chassis has excessive corrosion, seriously affecting its strength within 30cm of the body mountings.
Don't suppose you know how difficult this would be for a noob like me to tackle?
-
the edmundator
- Posts: 2928
- Joined: Wed Apr 01, 2009 7:34 pm
- fill in the right answer: 10
- Location: BEDFORD
- Contact:
Re: Project Poppy - 1987 MkII GT
It's a big boys' Meccano job (i.e. nuts & bolts, nothing scary to go wrong really). Easier if the fuel tank is nearly empty though, otherwise care needed to avoid spillage.
Register Member 829
--
1980 (1976) Mk1 Junior Cup Replica
1987 MK2 GTX
--
1980 (1976) Mk1 Junior Cup Replica
1987 MK2 GTX
-
Funky Diver

- Posts: 1175
- Joined: Fri Apr 17, 2009 10:26 pm
- fill in the right answer: 10
- Location: Darlington
- Contact:
Re: Project Poppy - 1987 MkII GT
Although it isn't too difficult a job to empty said tank.
Piece of pipe on leading into a Jerry Can off the pump and turn the car over... voila!
Piece of pipe on leading into a Jerry Can off the pump and turn the car over... voila!

Re: Project Poppy - 1987 MkII GT
I'll be tackling the fuel filler neck myself within a couple of weeks. Already bought a Mk1 Golf filler neck from GSF, and warned my dad that his garage will be needed for the day. If I remember, I will take a few pics along the way and let you know how it went. If you don't hear anything... best not ask!!
Good luck with the jobs, doesn't sound too scary on the whole (easy for me to say, scared of finding how rotten ours is under the arches etc...).
Good luck with the jobs, doesn't sound too scary on the whole (easy for me to say, scared of finding how rotten ours is under the arches etc...).
Re: Project Poppy - 1987 MkII GT
Hi yes this very true about the fuel kneck i have checked and done ours on Scarlet very recantly even know she is fine and only done 44,000 from new, i have hammer ratted her, then rust sealed her up all around the full fillter at the top see pic on here under projects. all so is worth cleaning out ever now and again or worth checking this is were all the shit and mud gets stuck even better to put a set of mud flaps on at the back or all the way around , stops some of the mud and shit getting up in there.
G Beats.Been into MK 2 V.W Sciroccos since 98.Now on my fourth MK 2 Scirocco. R.I.P two MK 2 Scala DX Engine's.Sold GT 2. No longer have a mk 2 v.w Scirocco as it was stolen back in February 2020 .Or another one know have a 1980s BMW.
-
Cpt Custom
- Posts: 761
- Joined: Mon Jul 19, 2010 1:46 pm
- fill in the right answer: 15
- Location: Northallerton
Re: Project Poppy - 1987 MkII GT
Thanks guys for the tips on what to do about the fuel tank. 
Good luck Dutch!

Good luck Dutch!
-
Cpt Custom
- Posts: 761
- Joined: Mon Jul 19, 2010 1:46 pm
- fill in the right answer: 15
- Location: Northallerton
Re: Project Poppy - 1987 MkII GT
After a few weeks sourcing parts and life just getting in the way, as it does, I’m pleased to say I finally got a few hours today to start working on Poppy.
As she needs some welding done underneath I thought I’d start by removing the rear seats and all the trim. As I’m not mechanically minded at all it turned out to be a nice way of starting … just a matter of nuts, bolts and screws.
And here she is laid bare for all to see …

After that I thought I’d start trying to remove some of the body kit … deep joy.
I thought battling with the adhesive would be the difficult bit, but it turned out to be some of those damned little screws. The ones around the arches and on the inside of the door edges came away fairly easily. However, the ones underneath the chassis proved too good for me today … hard as I tried I just couldn’t get the little buggers to move. So, if anyone has any ideas how I can get them out please let me know. I’ve tried WD40 to no avail and I can’t really try applying heat or I’ll melt the body kit!
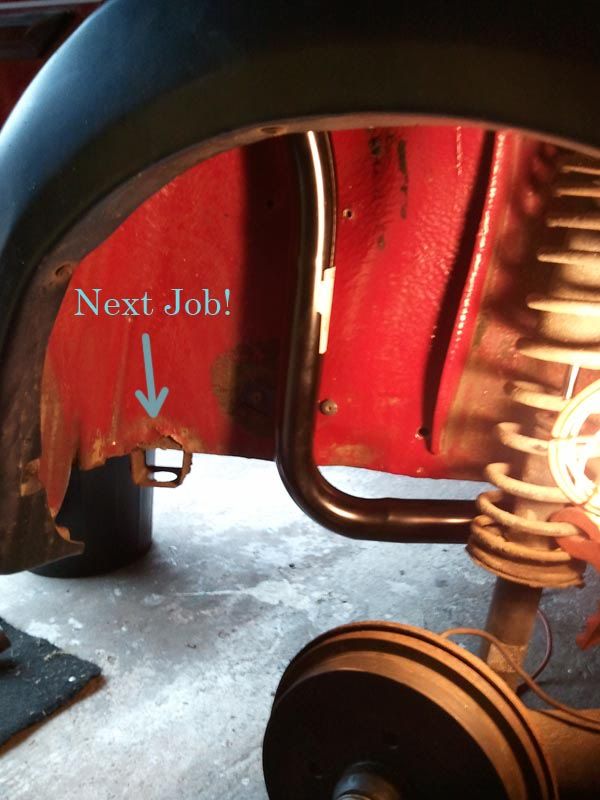
At least I got the offside arch section off. Looks like I might need to replace the arch as its shot somewhat on the outer edge. Here she is before I removed it …

And here’s what was hiding underneath …


Looks even worse when viewed from the inside …

Tomorrow, I hope to get the rest of the kit off. And remember, if you’ve got any tips on how to get those stubborn screws to move or even general suggestions on beating the adhesive do get in touch.
As she needs some welding done underneath I thought I’d start by removing the rear seats and all the trim. As I’m not mechanically minded at all it turned out to be a nice way of starting … just a matter of nuts, bolts and screws.
And here she is laid bare for all to see …
After that I thought I’d start trying to remove some of the body kit … deep joy.
I thought battling with the adhesive would be the difficult bit, but it turned out to be some of those damned little screws. The ones around the arches and on the inside of the door edges came away fairly easily. However, the ones underneath the chassis proved too good for me today … hard as I tried I just couldn’t get the little buggers to move. So, if anyone has any ideas how I can get them out please let me know. I’ve tried WD40 to no avail and I can’t really try applying heat or I’ll melt the body kit!
At least I got the offside arch section off. Looks like I might need to replace the arch as its shot somewhat on the outer edge. Here she is before I removed it …
And here’s what was hiding underneath …
Looks even worse when viewed from the inside …
Tomorrow, I hope to get the rest of the kit off. And remember, if you’ve got any tips on how to get those stubborn screws to move or even general suggestions on beating the adhesive do get in touch.
-
Funky Diver
- Posts: 1175
- Joined: Fri Apr 17, 2009 10:26 pm
- fill in the right answer: 10
- Location: Darlington
- Contact:
Re: Project Poppy - 1987 MkII GT
Screws... I believe David Ike had the definitive answer. Personally I use a set of pliers to get them started, then screw driver to finish off (or continue with the pliers until you can finger screw them out if the little cross is knackled)
Re: Project Poppy - 1987 MkII GT
Ok, as promised, some pics of new filler neck... not sure if it helps but anyway...
Removed the corrugated rubber and rusty original neck (complete with holes):
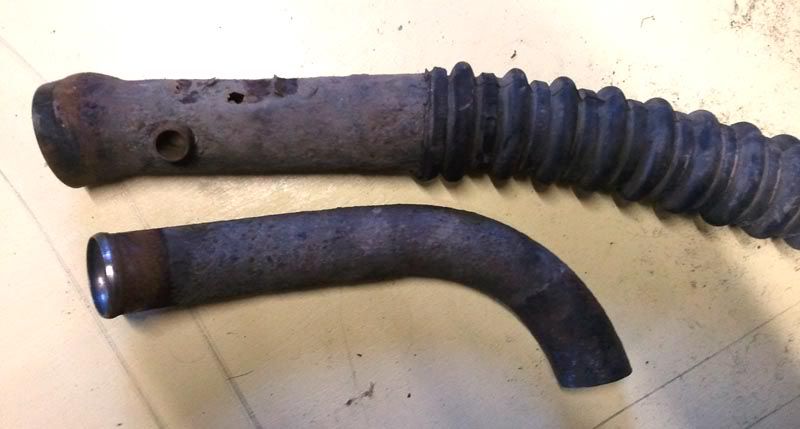
That was the easy bit. Trolley jack and screwdriver pretty much it.
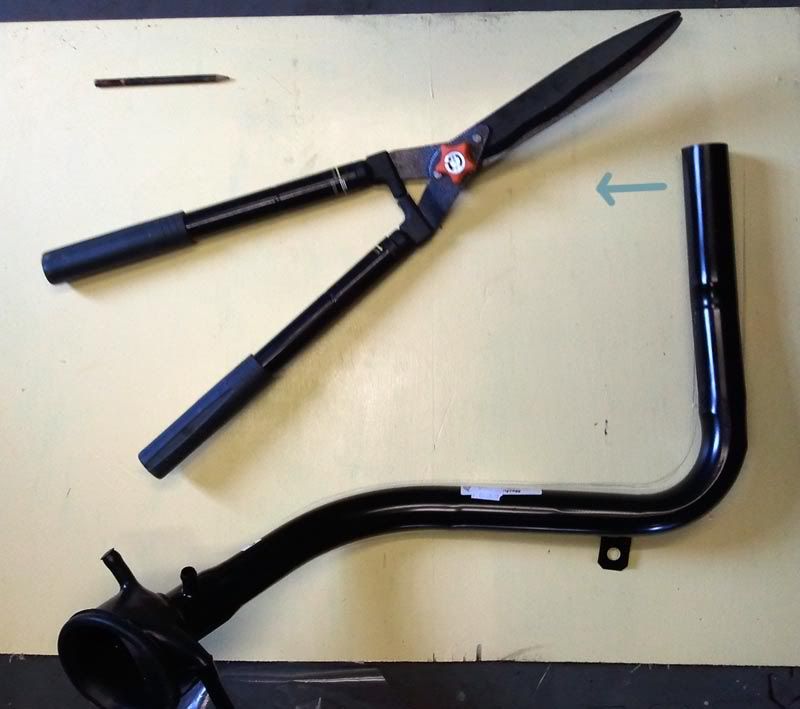
Next was to cut down the Mk1 Golf steel filler neck from GSF. Also easy. Then after careful consideration, bent the mounting bracket upwards by hand, and also decided to bend the neck a little more to help with aligning the top part of the neck in the rubber housing. I used a vice and garden shears handle! (to get more leaverage).
All went on a treat:
BUT, disappointingly, when I went to fill her up, it splashed back all over my shoes
SO... perhaps I shouldn't have bent it more than it was, or maybe the BMW filler neck is a better option!?
Oh well.
Removed the corrugated rubber and rusty original neck (complete with holes):
That was the easy bit. Trolley jack and screwdriver pretty much it.
Next was to cut down the Mk1 Golf steel filler neck from GSF. Also easy. Then after careful consideration, bent the mounting bracket upwards by hand, and also decided to bend the neck a little more to help with aligning the top part of the neck in the rubber housing. I used a vice and garden shears handle! (to get more leaverage).
All went on a treat:
BUT, disappointingly, when I went to fill her up, it splashed back all over my shoes
SO... perhaps I shouldn't have bent it more than it was, or maybe the BMW filler neck is a better option!?
Oh well.
-
Funky Diver
- Posts: 1175
- Joined: Fri Apr 17, 2009 10:26 pm
- fill in the right answer: 10
- Location: Darlington
- Contact:
Re: Project Poppy - 1987 MkII GT
Did you refit the breather pipe? If you filled it , maybe that was the cause of your irksome splashback?