Re: Project Poppy - 1987 MkII GT
Forum rules
Section for all vehicle and related projects. Please keep responses pertinent to thread.
- Cpt Custom
- Posts: 761
- Joined: Mon Jul 19, 2010 1:46 pm
- fill in the right answer: 15
- Location: Northallerton
Re: Project Poppy - 1987 Mk2 GT
Finally got around to taking out the rear screen this afternoon. I was a little anxious given that the windscreen cracked on me last weekend, but this time we took a slightly different approach and I’m pleased to say it came out intact!
This time using a single blunt screwdriver we worked on the inside of the tailgate and just coaxed a small section of the seal out at a time. Last time around I tried to wedge several screwdrivers in at various intervals, but this time like I say we were working with just one.
And the secret here was to not to leave the screwdriver wedged in position, but instead to just use it to fold the seal back in on itself so that it sat snugly against the edge of the tailgate.
The tricky bit is to get that first piece tucked in, but once you have it started you just keep carefully inching your way around the frame. As you do this the seal itself will start to raise the glass slightly out of the frame on the other side. You can keep doing this all the way around or, like we did, just do up one side and along about ¾ of the top edge at which point you should be able to coax the screen out.
Hopefully, the photo below will be clear enough to let you see what I mean by tucking the seal in on itself …
And then in no time at the entire screen was out …
And just in case you thought it didn’t come out in one piece here’s the proof …
Just remember the technique we employed here was all about letting the seal prise itself out.
A big thank you to Andy for suggesting this approach and doing most of the coaxing.
And that was that really for today apart from getting a loan of a couple of trolley jacks and an engine stand from a friendly garage. All set for tomorrow’s mini meet when ianaudia4, mazzellan and stu.gtx are going to help me finally get this out …
1987 Alpine White Mk2 GT Lily
- Cpt Custom
- Posts: 761
- Joined: Mon Jul 19, 2010 1:46 pm
- fill in the right answer: 15
- Location: Northallerton
Re: Project Poppy - 1987 Mk2 GT
Well today was the big day, the latest North East mini meet and the day Poppy’s engine finally came out.
Ian (ianaudia4), Tony (mazzellan) and Stu (stu.gtx) had all volunteered to come down to the workshop and come down they duly did. Although had they known how long the dastardly deed was going to actually take, thanks to an engine mount that did not want to come out, they might have not been so keen!
I’d already felt guilty that they’d come all that way to help me and yet with my lack of mechanical knowledge I wasn’t going to be very hands on. So when the problems kicked in and it took much longer than expected it really made me appreciate their help even more. I could never, in a month of proverbial Sundays, have gotten to the point we’re now at without the fantastic help and support of the aforementioned “three wise men”.
Things started off well enough though at a brisk pace and they soon had a lot of the ancilliary parts stripped off …
Here’s the boys hard at work with me lurking with the camera
Shortly after this we ran into problems as the bolt that goes through the engine mount on the driver’s side wouldn’t come out as it had become seized and the knackered bush was also making matters more complicated.
In the end drastic measures were called for and we had to hacksaw through the engine mount itself so as to be able to free the engine and thus allow us to finally hoist the engine out.
After much effort on the part of the boys though it did indeed finally come out and the bay is now almost ready for being blasted. There are just a few bits still to remove …
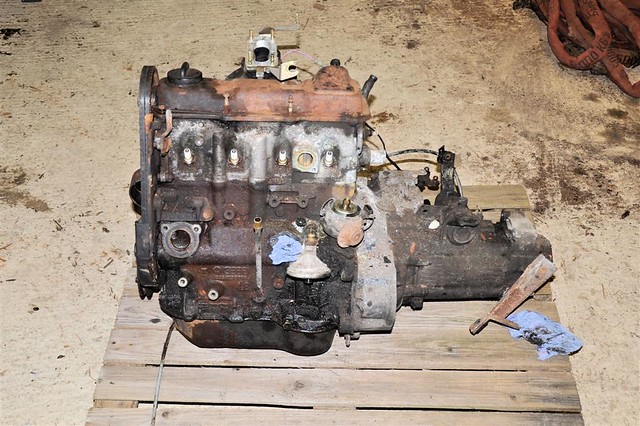
And so the engine was left for the night resting on an old pallet awaiting the next stage …
And finally, the shot Stu said I just had to take …
1987 Alpine White Mk2 GT Lily
-
- Posts: 737
- Joined: Sat Dec 04, 2010 9:23 pm
- fill in the right answer: 10
- Location: West of Glasgow
Re: Project Poppy - 1987 Mk2 GT
Well done.
I had the same problem and the same remedy when taking out my 1.8 engine.
I think it had been there since the year dot, but I didn't need to be too careful as mine was for the scrapyard.
Names for faces, I have spoken to Ian but it would be nice to put a face to the name.
Is this the first 1Man power car ever built ???????
Well done to the rescue squad you all deserve a pint.
A heart broken GLI - R.I.P. A loveable GT. A practical Polo now deceased.
- Cpt Custom
- Posts: 761
- Joined: Mon Jul 19, 2010 1:46 pm
- fill in the right answer: 15
- Location: Northallerton
Re: Project Poppy - 1987 Mk2 GT
Can't you tell, he's the young, good looking one!Old Mac Rocco wrote:Well done.
Names for faces, I have spoken to Ian but it would be nice to put a face to the name ...
1987 Alpine White Mk2 GT Lily
Re: Project Poppy - 1987 Mk2 GT
And finally, the shot Stu said I just had to take …
You know it just had to be done.
It did take longer than expected but it was good crack and we got there in the end. Just a shame I didn't remember to bring my knackered engine mount removal tool.
-
- Posts: 166
- Joined: Fri Aug 28, 2009 3:41 pm
- fill in the right answer: 10
- Location: Gateshead, Tyne & Wear
Re: Project Poppy - 1987 Mk2 GT
Nice one boys, well done.
1985 MK2 Flash Silver GTX 1.8 8v
2002 Passat 1.9 TDI 130BHP
- Funky Diver
- Posts: 1175
- Joined: Fri Apr 17, 2009 10:26 pm
- fill in the right answer: 10
- Location: Darlington
- Contact:
- Cpt Custom
- Posts: 761
- Joined: Mon Jul 19, 2010 1:46 pm
- fill in the right answer: 15
- Location: Northallerton
Re: Project Poppy - 1987 Mk2 GT
I don't think Stu was concentrating hard enough because he's the only one who didn't have his tongue sticking out!
Of course he might have been distracted by the Wicker Man that was being erected outside ...
1987 Alpine White Mk2 GT Lily
-
- Posts: 737
- Joined: Sat Dec 04, 2010 9:23 pm
- fill in the right answer: 10
- Location: West of Glasgow
Re: Project Poppy - 1987 Mk2 GT
After my problem with one core plug it may well be worth adding it onto your list of "Things to check" while the engine is out and you have easy access.
http://www.eurocarparts.com/core-plug
Less than a tenner DELIVERED for peace of mind. Well worth it.
http://www.eurocarparts.com/core-plug
Less than a tenner DELIVERED for peace of mind. Well worth it.
A heart broken GLI - R.I.P. A loveable GT. A practical Polo now deceased.
- Cpt Custom
- Posts: 761
- Joined: Mon Jul 19, 2010 1:46 pm
- fill in the right answer: 15
- Location: Northallerton
Re: Project Poppy - 1987 Mk2 GT
Managed to get the servo unit off yesterday along with all the gubbins including the bell cranks plus the push and pull rods. Had real problems with taking the right bell crank off as two of the pins were seized and refused to come out even after the retaining clips had been removed.
Eventually we got the larger of the two, which goes through the centre of the bellcrank to come out, but the other we had to remove still attached to the push rod. I’ll need to try soaking it even further with WD40 and hope that loosens it up.
Got stuck though with removing the long bracket arm that runs between the two bell cranks. I don't think it's got a name so we'll call it the pesky bracket …
The arrangement of fixed bolts both coming off and into the bracket seem to make it impossible to remove without first removing the steering column and pedal bracket from the other side. Any advice or thoughts on this aspect of the task much appreciated.
Like I say, the bolt arrangement is a pain. There are two that come through the bulkhead that imply you need to bring the bracket forward to remove it …
But then there are two fixed onto the bracket itself that project down underneath the bodywork …
These imply you need to move the bracket upwards for removal, but you can’t do that because of the two bolts I mentioned previously …
Things didn’t go much better this afternoon. I thought I’d give myself a break and try something more straightforward, like removing the driveshafts. I mean with everything disconnected from the inside all that remained for me to do was remove the driveshaft nut and then I should have been able to remove the unit.
I did read first though that Mr Haynes said “the nut is tightened to a high torque and a socket extension may be required”. Socket extension …. I through everything at it and it just would not budge and that was after leaving it to soak overnight with some anti seize oil.
So yet again I’m stuck. Not really sure what to try next? Maybe I need an air gun or something similar … suggestions anyone?
At least I managed to cut out the seized bolt on the engine mount, so I achieved something!
1987 Alpine White Mk2 GT Lily
- Funky Diver
- Posts: 1175
- Joined: Fri Apr 17, 2009 10:26 pm
- fill in the right answer: 10
- Location: Darlington
- Contact:
Re: Project Poppy - 1987 Mk2 GT
You have to take the steering column bracket / pedal box off first Paul, the two bolts sticking through the bulkhead are attached to that. It is a pain, but it will come out.
- Cpt Custom
- Posts: 761
- Joined: Mon Jul 19, 2010 1:46 pm
- fill in the right answer: 15
- Location: Northallerton
Re: Project Poppy - 1987 Mk2 GT
I was hoping nobody would say that Rich!Funky Diver wrote:You have to take the steering column bracket / pedal box off first Paul ...
1987 Alpine White Mk2 GT Lily
- The Autoad
- Posts: 732
- Joined: Sat Feb 28, 2009 5:57 pm
- fill in the right answer: 10
- Location: Nottingham
- Contact:
Re: Project Poppy - 1987 Mk2 GT
Paul, you will need to drill out the two uppermost bolts that hold the steering column to the bracket at the top of the bulkhead. There is then a 13mm nut further down the steering column. With those two removed you can pivot the column backwards and downwards, this will remove the offending studs in order to remove pesky bracket.
Refitting is, as the legend goes, reversal of removal. You can use new bolts (and if required, nuts for piece of mind) to attach the steering column to the upper bracket as the holes are threaded (aim to keep the threads when you drill the originals out!)
Your friendly neighbourhood Scirocco restorer for hire
- Cpt Custom
- Posts: 761
- Joined: Mon Jul 19, 2010 1:46 pm
- fill in the right answer: 15
- Location: Northallerton
Re: Project Poppy - 1987 Mk2 GT
Ant is these two that you're suggesting I drill out?The Autoad wrote:Paul, you will need to drill out the two uppermost bolts ...
And at the risk of sounding like a complete numpty what exactly is involved in drilling them out?
1987 Alpine White Mk2 GT Lily
- Funky Diver
- Posts: 1175
- Joined: Fri Apr 17, 2009 10:26 pm
- fill in the right answer: 10
- Location: Darlington
- Contact:
Re: Project Poppy - 1987 Mk2 GT
It's the ones on the steering column Paul, attached to the bracket nearest where the steering wheel attaches, NOT at the bulkhead.
I personally cut a slot in them with my dremel and screwdrivered them out.