
HERMAN THE GERMAN! '91 Scala 20vt
Forum rules
Section for all vehicle and related projects. Please keep responses pertinent to thread.
Section for all vehicle and related projects. Please keep responses pertinent to thread.
-
SumDarkPlace
- Posts: 39
- Joined: Wed Jul 15, 2015 11:53 am
- fill in the right answer: 15
- Location: Warrington
-
james butler

- Posts: 2966
- Joined: Fri Apr 24, 2009 1:54 pm
- fill in the right answer: 10
- Location: birmingham
Re: HERMAN THE GERMAN! '91 Scala 20vt
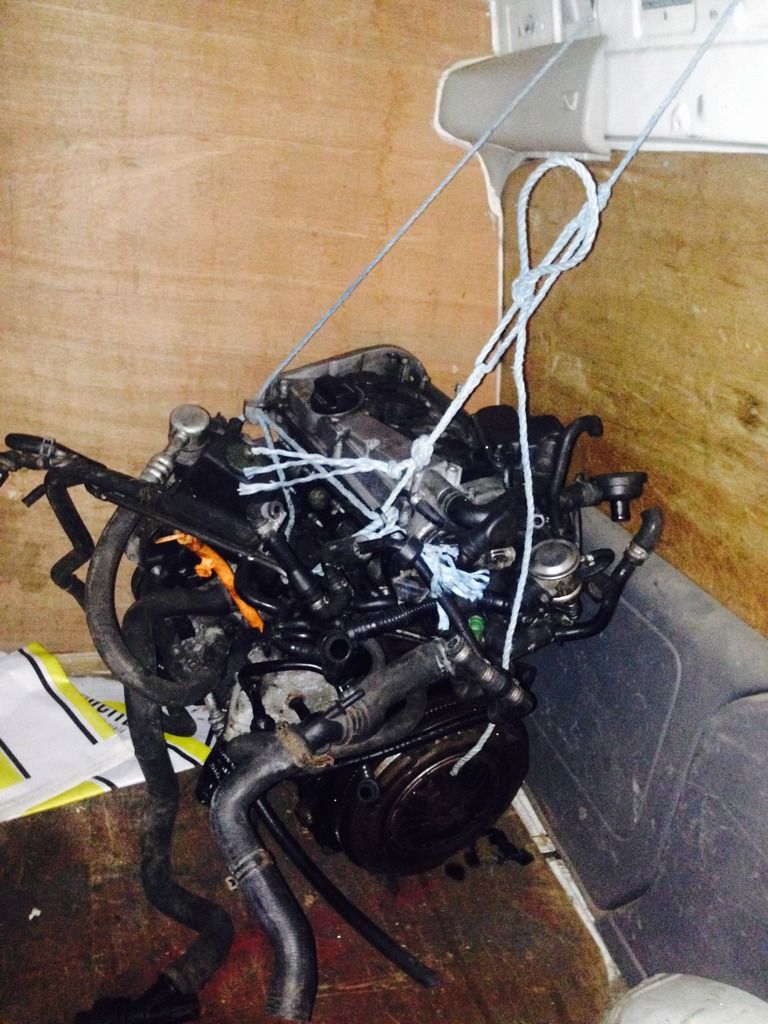
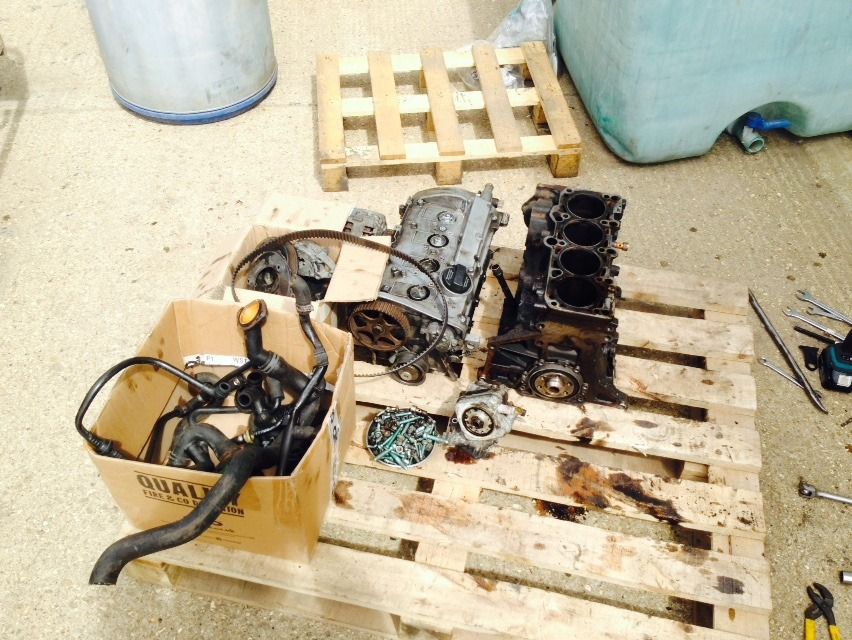
that audi block you have goes to show how these engines dont wear in properly till 100000miles!
testament to when looked after how well they can last!
testament to when looked after how well they can last!
I dont mind project cars but I HATE SANDING!!!
-
treefingers
- Posts: 400
- Joined: Wed Aug 14, 2013 1:04 pm
- fill in the right answer: 15
Re: HERMAN THE GERMAN! '91 Scala 20vt
yeah this one should last a long time if I get the build right!james butler wrote:that audi block you have goes to show how these engines dont wear in properly till 100000miles!
testament to when looked after how well they can last!
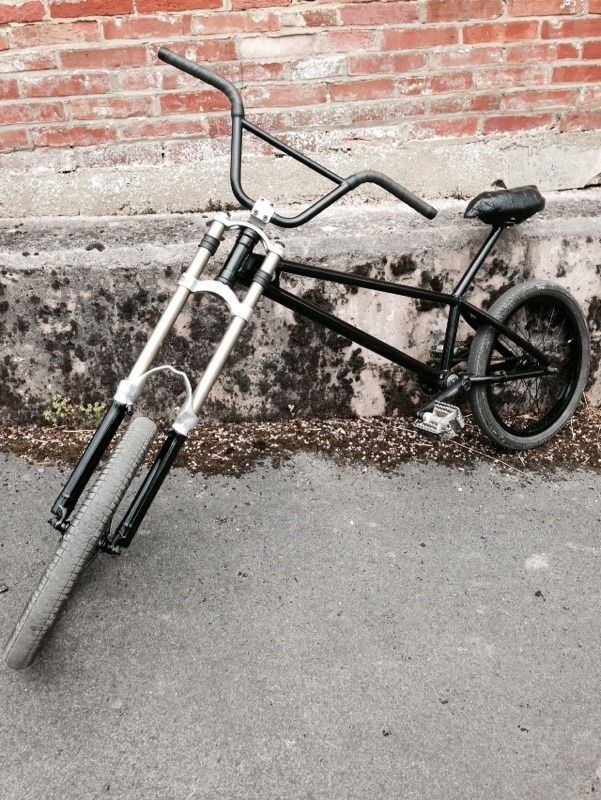
Here's the chopper we made to ride at Bugjam. Part BMX, part downhill bike, part scrap-bin!
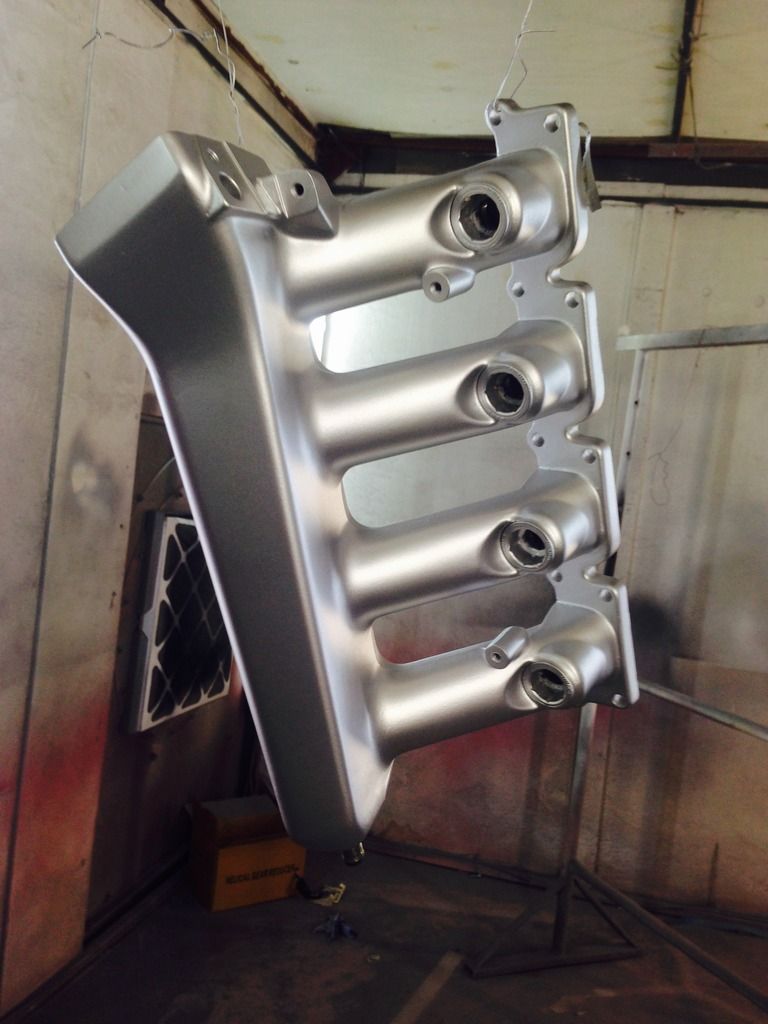
Back to the car! More POR15 goodness
More parts for the build.. the wallet has taken another spunking this month.
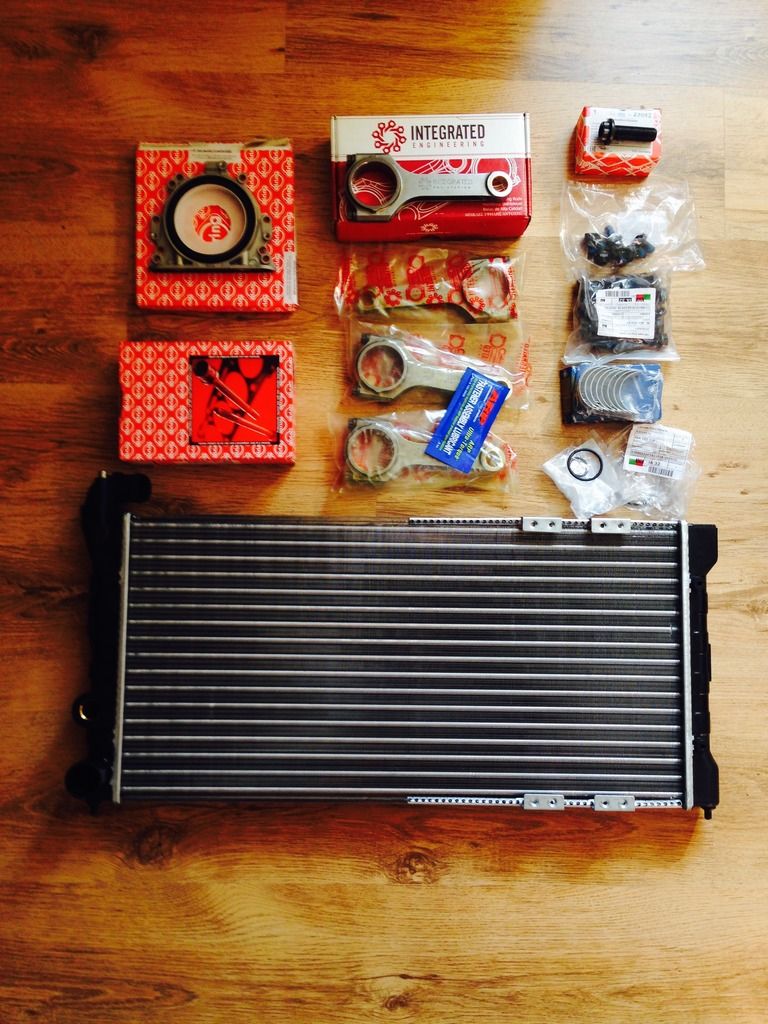
More seals, stretch bolts, bearing shells and a Corrado VR6 radiator for some proper temperature control. Oh and these..
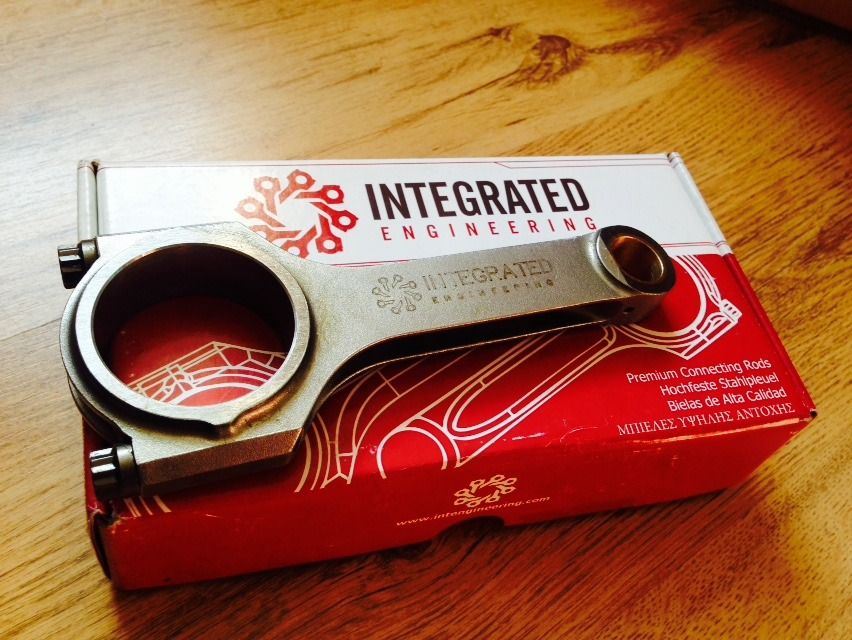
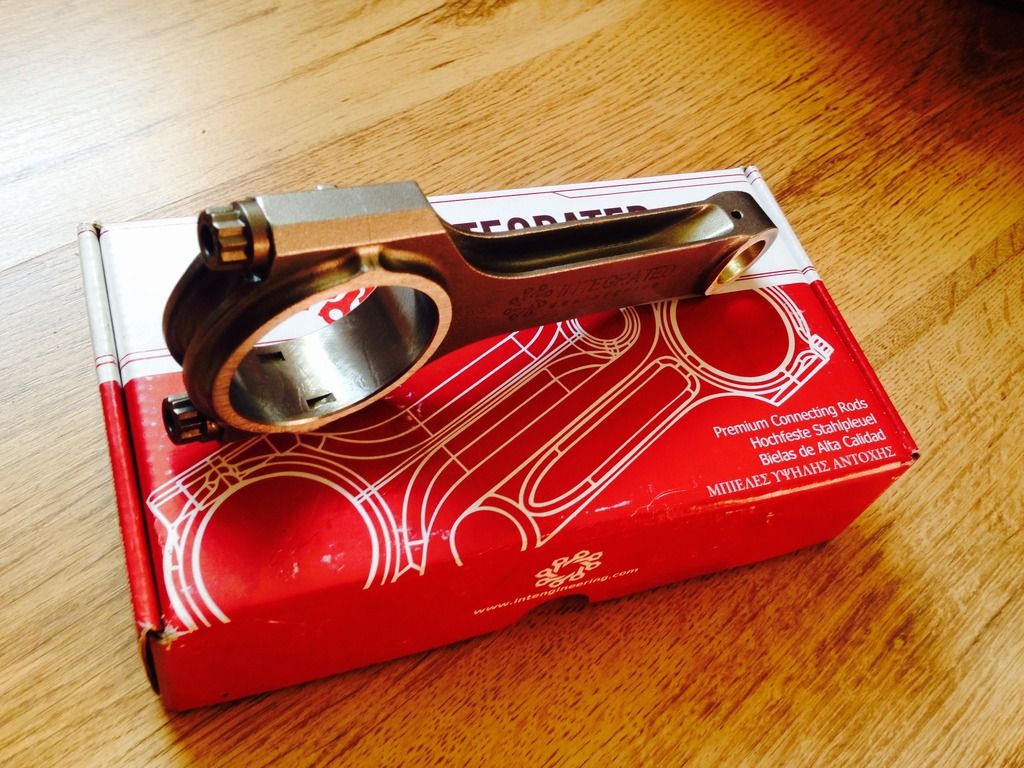
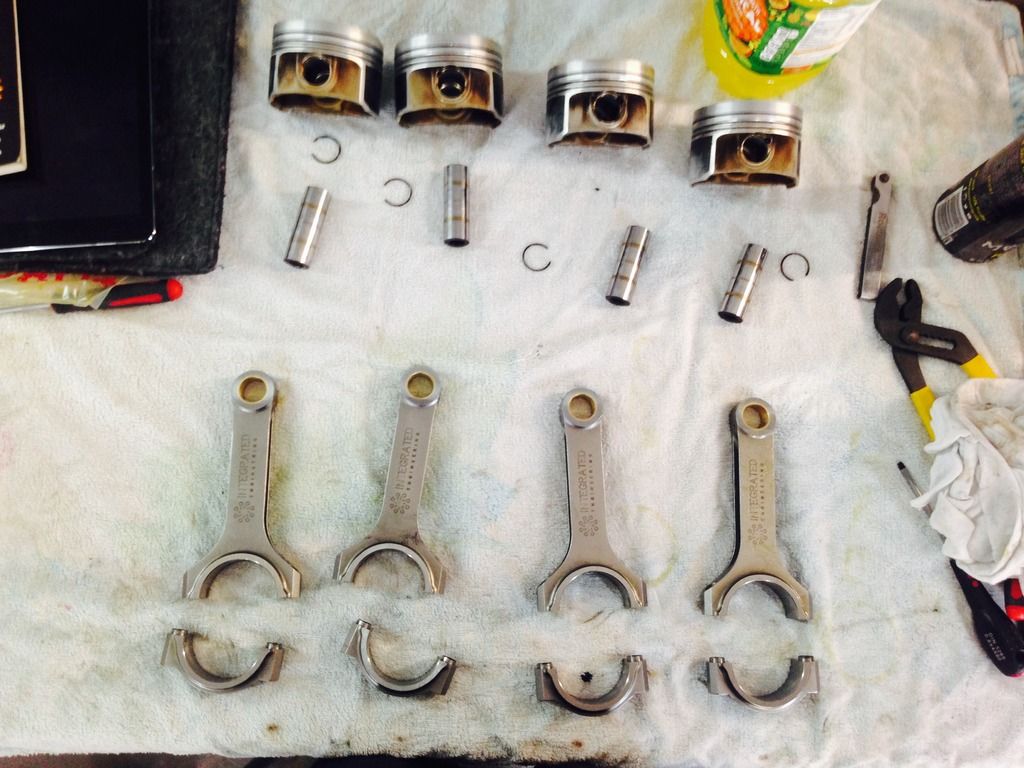
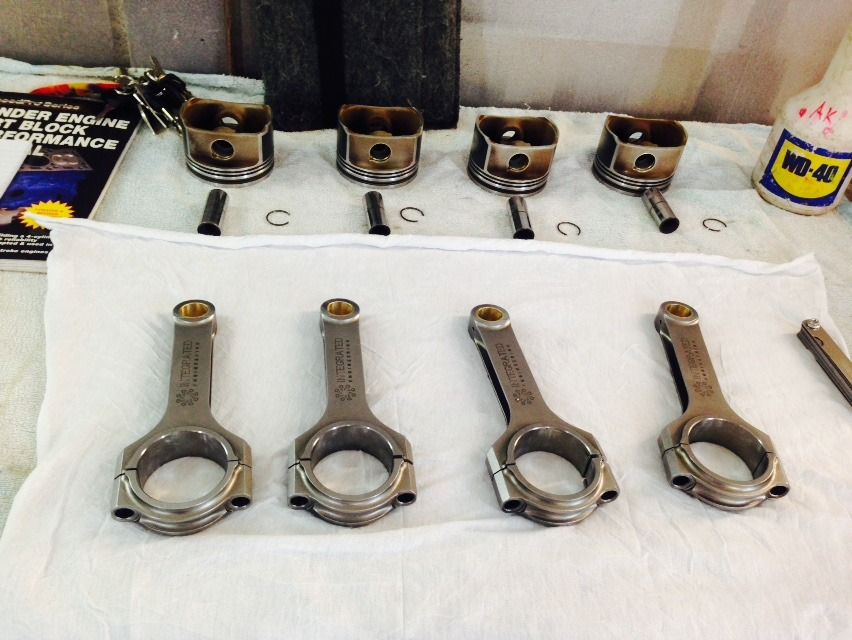
Integrated Engineering connecting rods with ARP bolts. Rated for use at 8500rpm and 700hp. Not that I'll ever need to reach these limits but it's good to know that I'll be able to thrash this engine and it'll take it!
-
treefingers
- Posts: 400
- Joined: Wed Aug 14, 2013 1:04 pm
- fill in the right answer: 15
Re: HERMAN THE GERMAN! '91 Scala 20vt
Got the week off work to get the engine together. Pic heavy..
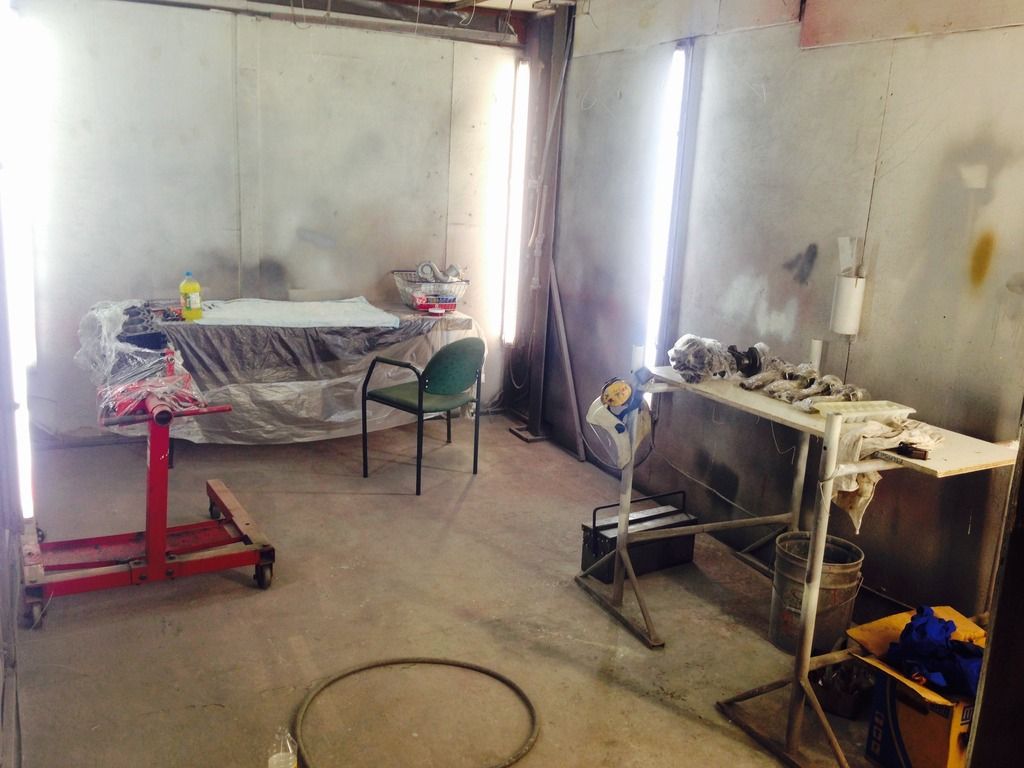
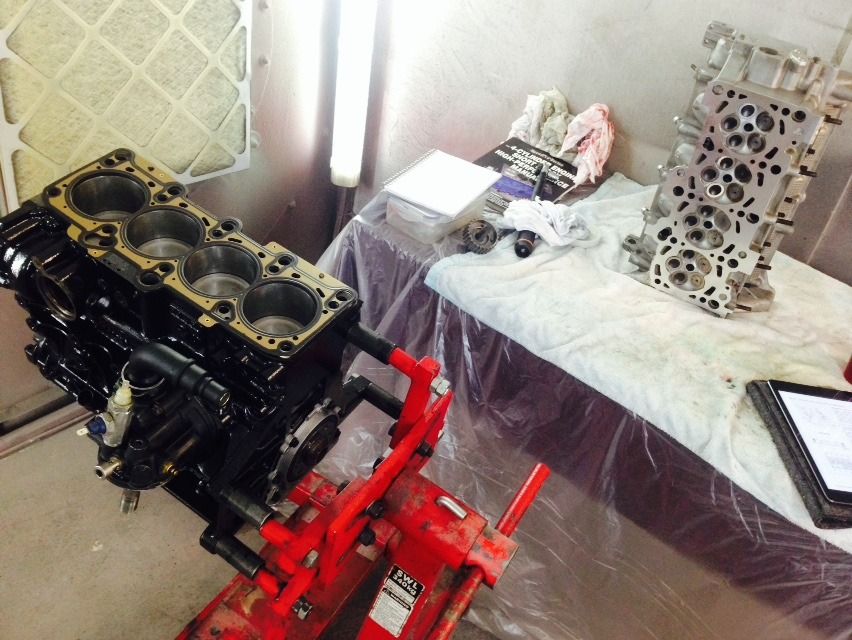
Managed to blag the spray booth to do my building. About the only place I could think of that wasn't peppered in swarf. Spent most of Monday cleaning it and cleaning my tools! Complete with assembly and cleaning areas. :)
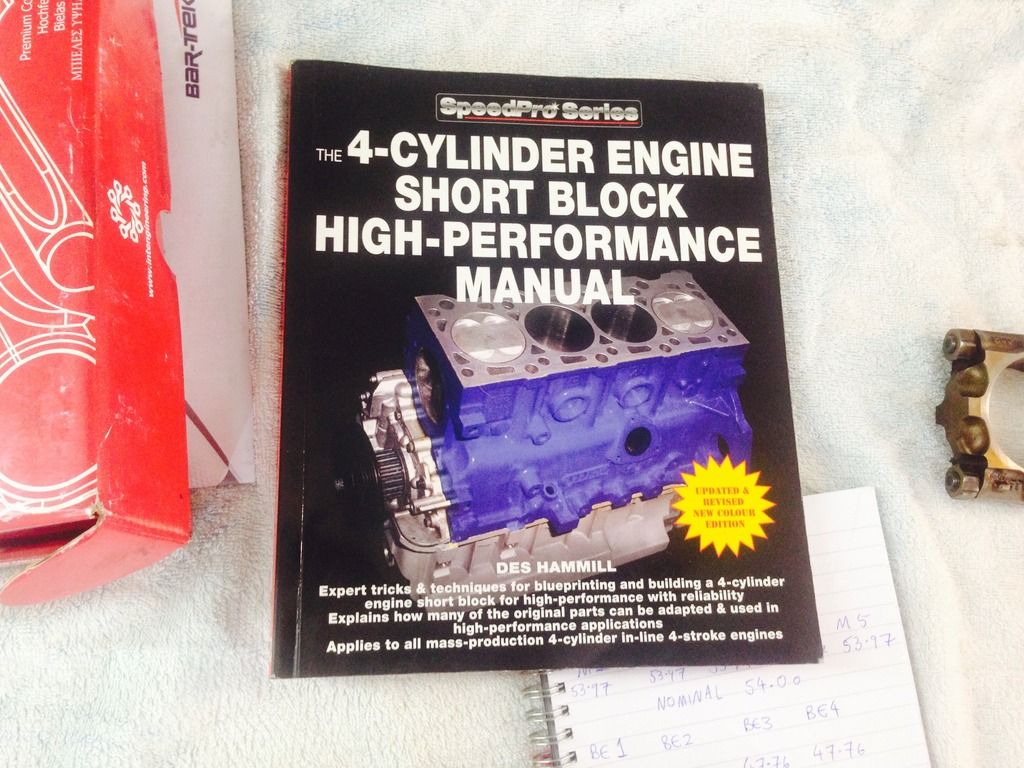
Here is the book I was referencing to accompany the Bentley manual on the iPad (so handy)
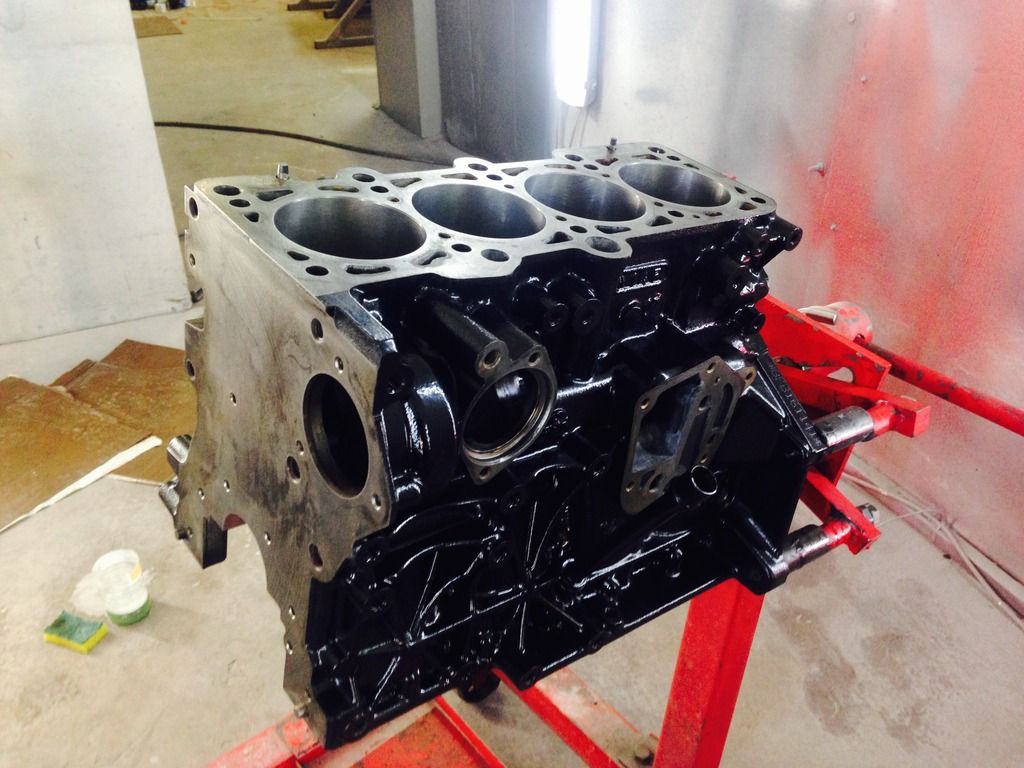
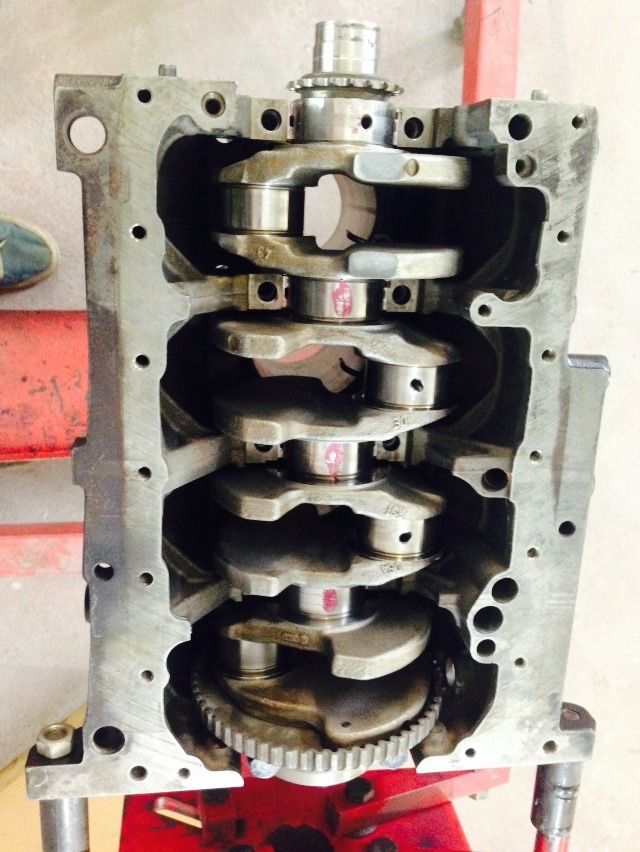
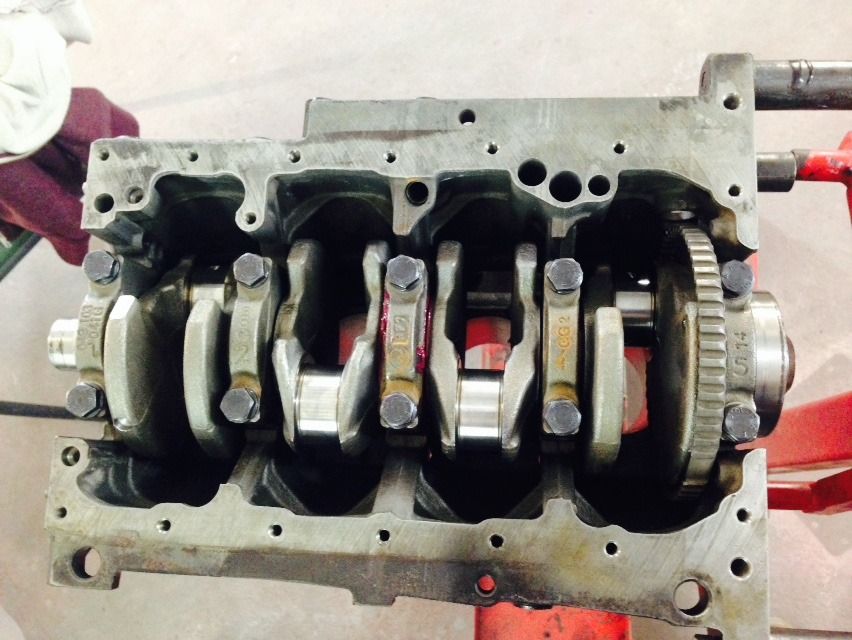
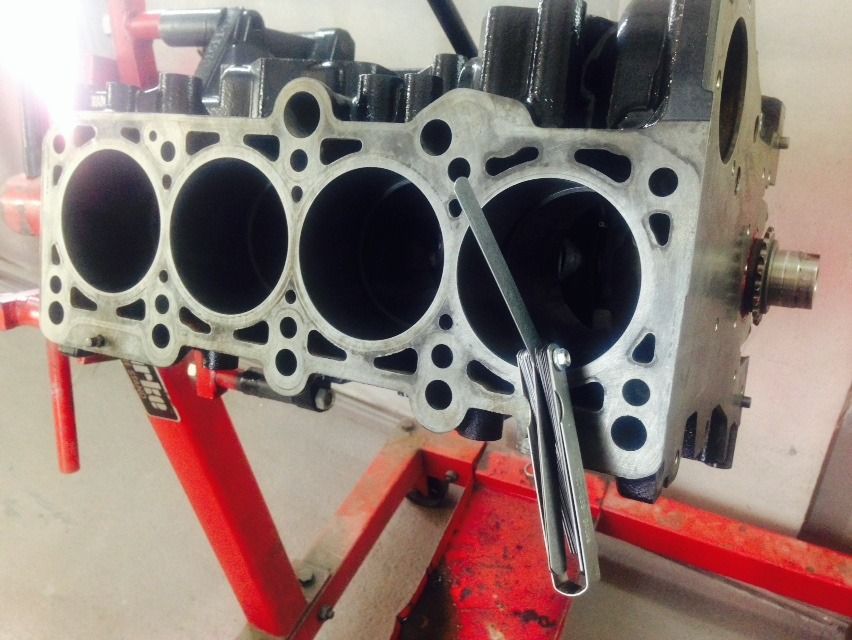
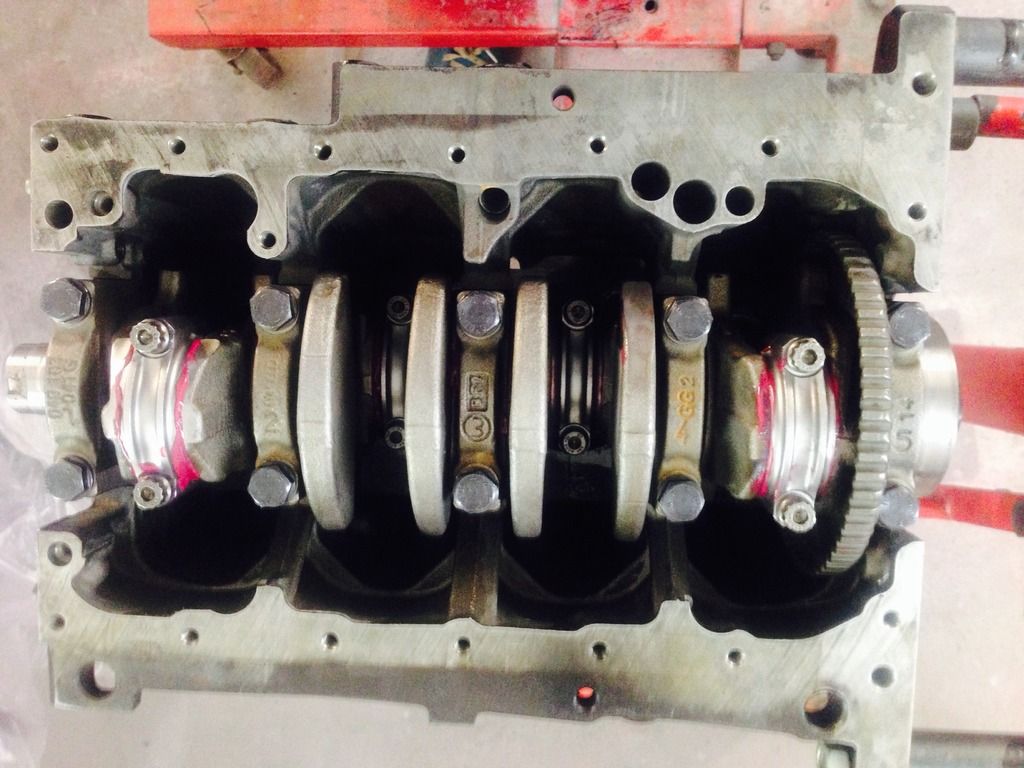
One block ready to build up!
New crank shells installed

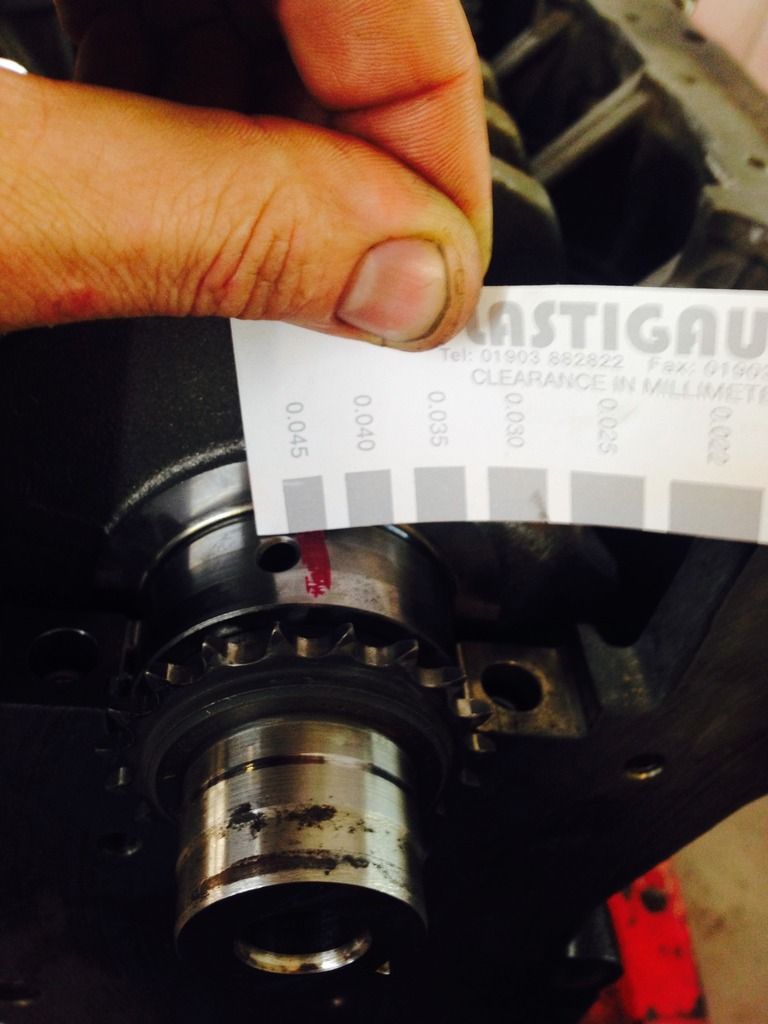
Measured every crank journal with micrometers, all the same and bang on. Then installed the crank and plastigauged the mains
All clearances were within spec and all the same which was good
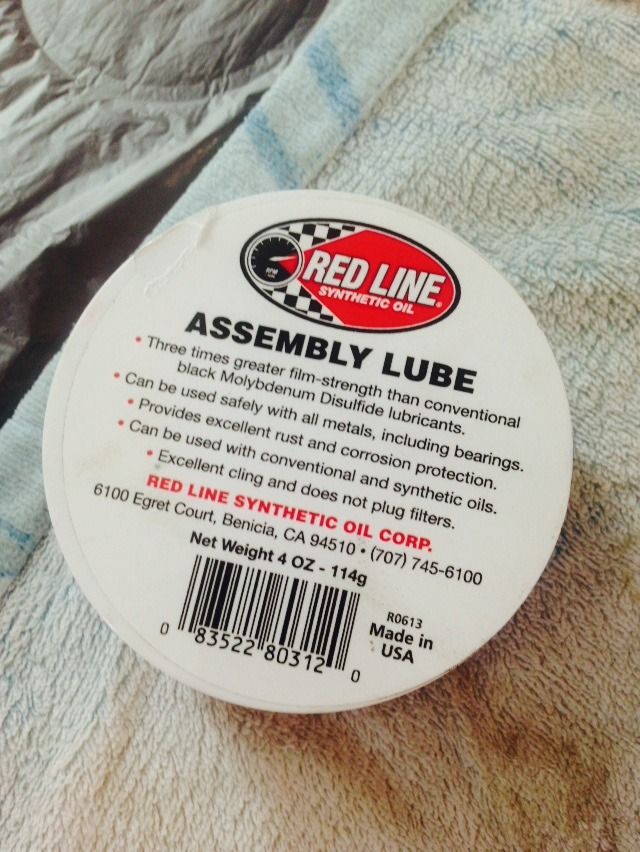
Then used this assembly lube and torqued the mains, new bolts were used.
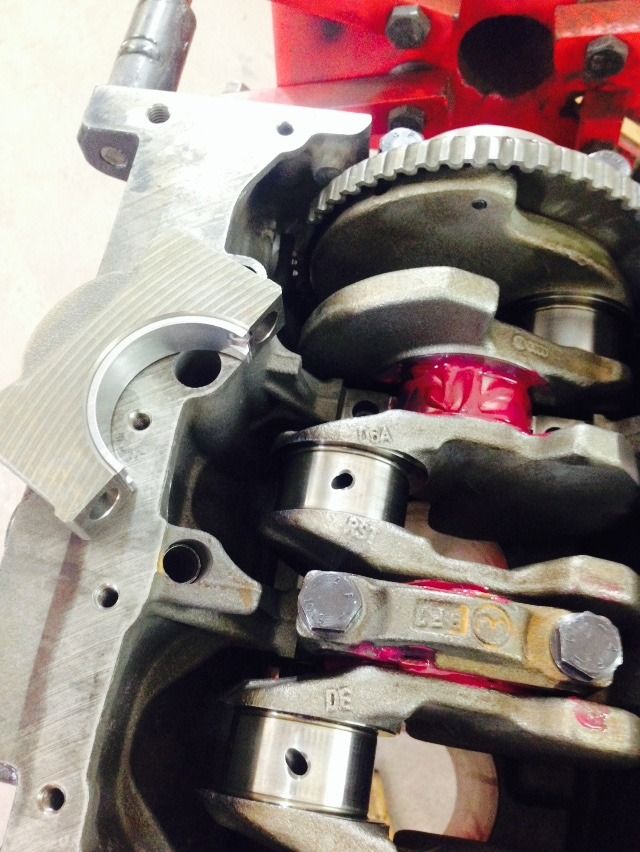
Crank in!
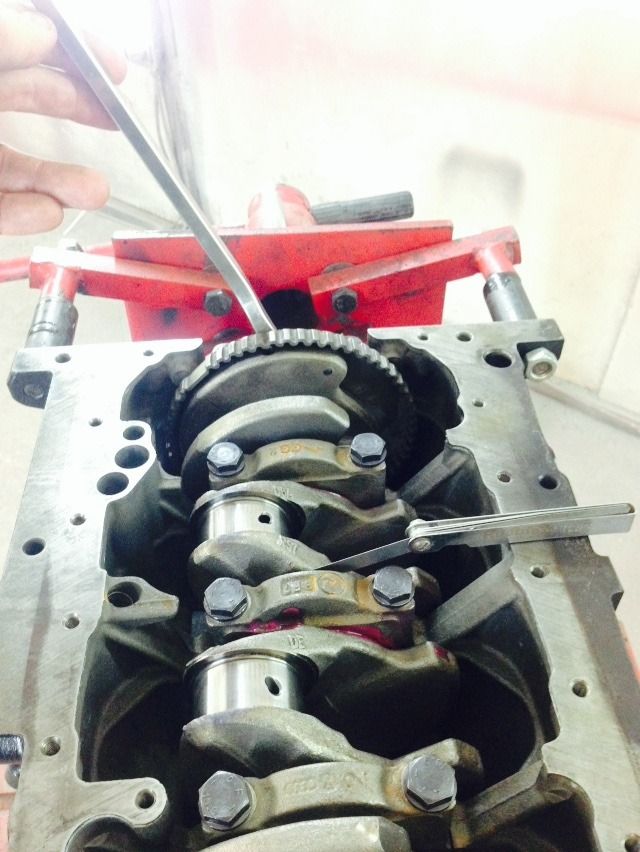
Measured the end float (yes I know the feelers are on the wrong side in this pic :p)
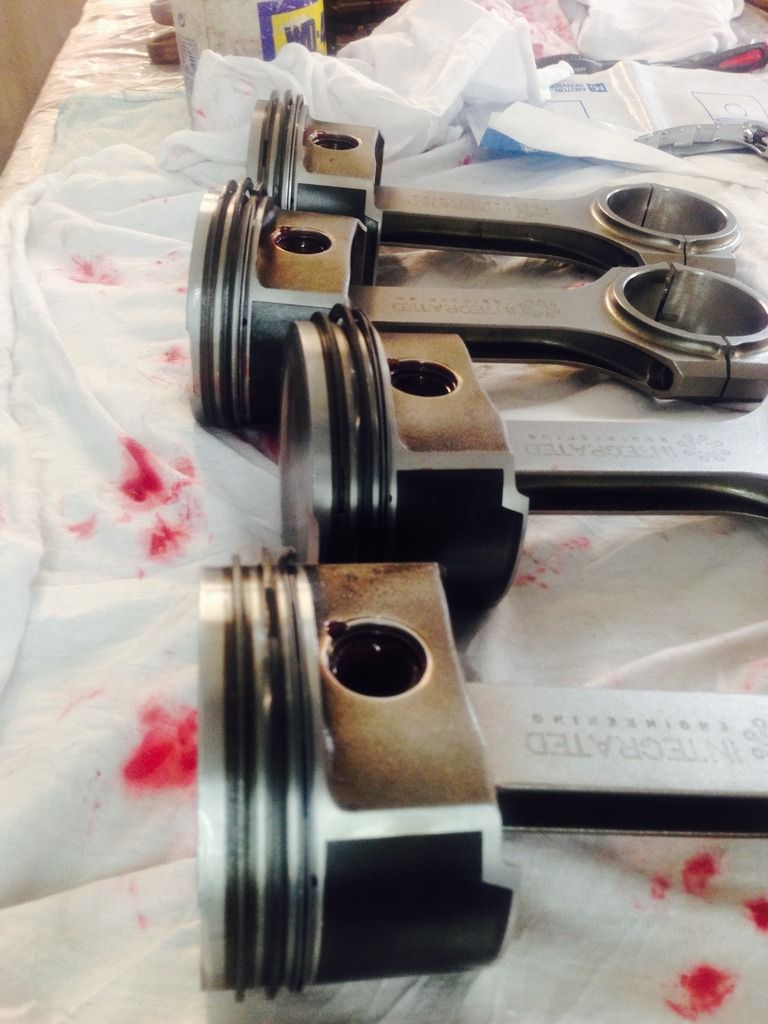
Next I disassembled the AUQ (or what I thought was AUQ - more on that in a minute!) pistons
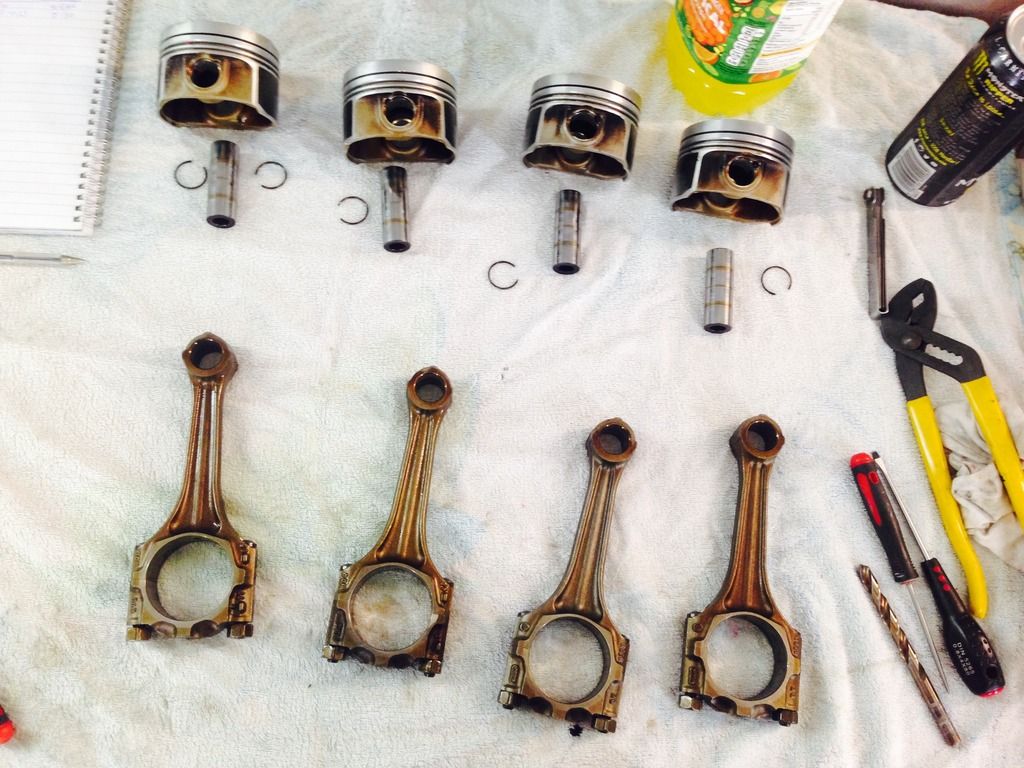
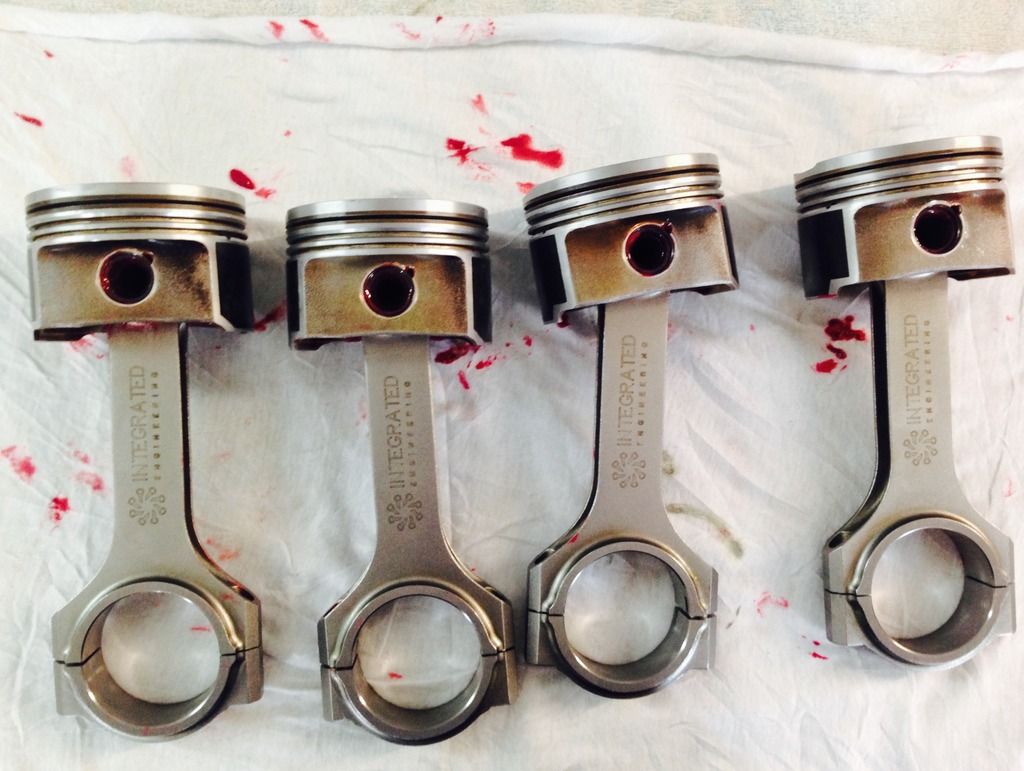
I was so ready to install the rods..
Then I found out that the wrist pins didn't fit the rods!!! Massive arse!! It turns out the AUQ engine I'd originally bought had been put onto a different block! On 1.8t's the code is stamped onto the head, I just assumed the block was from the same code. There was no way in hell I was sending the rods back to Germany! Some new pistons were to be sourced. VW parts were utterly useless and so a phone call to Mr Knox was made and within two hours I had sourced and collected a complete AUM to strip for the pistons! Other parts will come in handy too so it's not a bad thing! This is now my 5th 1.8t block since starting this project..
Today the AUM ended up looking more like this:
And I spent an hour cleaning the pistons to get back to this stage, 23 hours later!
That's better!
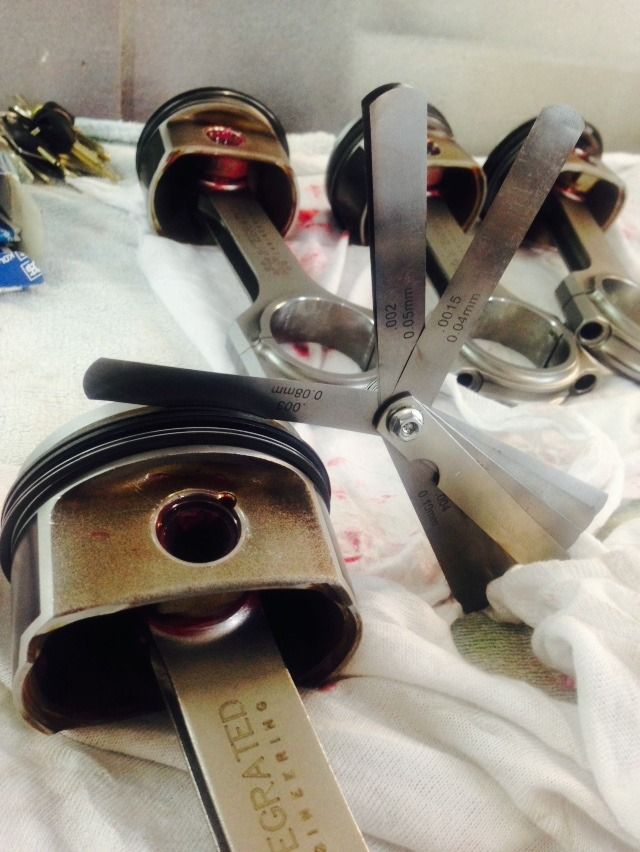
Every ring gap was checked. All bang in the middle of spec.
Rings installed and side gaps checked. Top gap was in spec but strangely I couldn't get a 0.04mm gauge into the 2nd and 3rd grooves. Checked the old rings and result was the same so I carried on.. strange though.
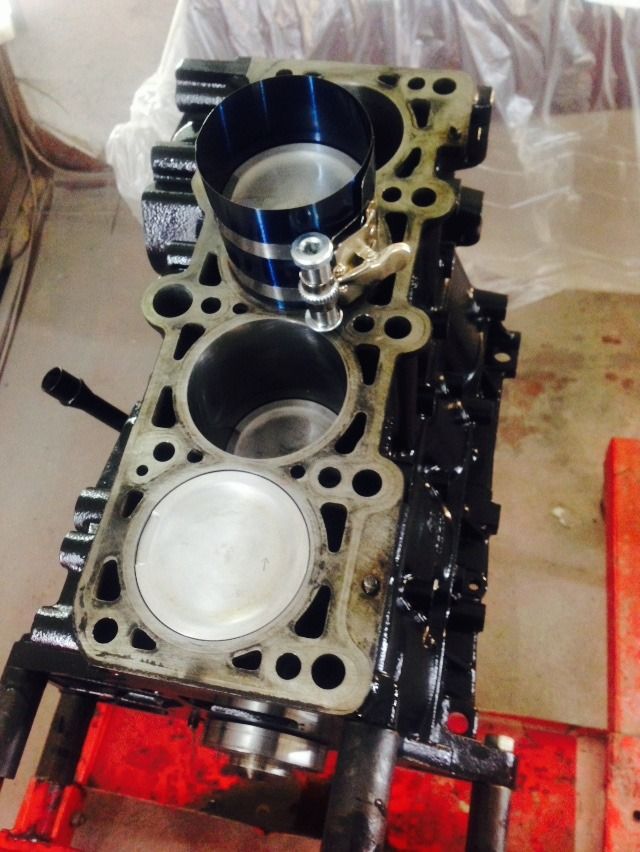
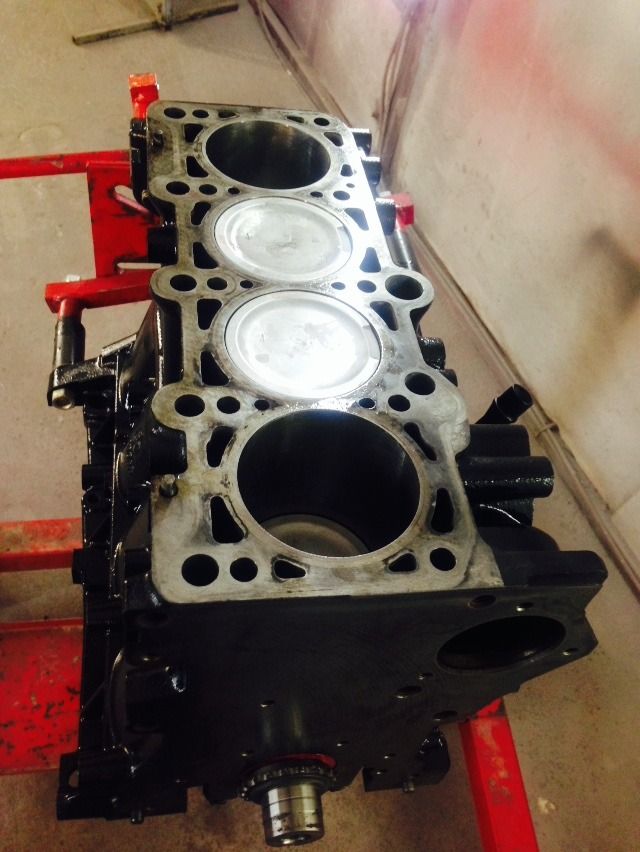
Pistons lubed up with ATF (textbook recommended it as it's thin enough to allow proper ring seating) and installed, then more plastigauge. All clearances were good! Needed two of us to get the pistons in though as the oil ring kept popping out of the ring compressor.

And here's where I finished today. Rods torqued up with the ARP fasteners. Rotating assembly pretty much there. Took ages as I had to check everything!! Aside from the two side ring gaps every clearance is in spec for a brand new engine :)
Managed to blag the spray booth to do my building. About the only place I could think of that wasn't peppered in swarf. Spent most of Monday cleaning it and cleaning my tools! Complete with assembly and cleaning areas. :)
Here is the book I was referencing to accompany the Bentley manual on the iPad (so handy)
One block ready to build up!
New crank shells installed
Measured every crank journal with micrometers, all the same and bang on. Then installed the crank and plastigauged the mains
All clearances were within spec and all the same which was good
Then used this assembly lube and torqued the mains, new bolts were used.
Crank in!
Measured the end float (yes I know the feelers are on the wrong side in this pic :p)
Next I disassembled the AUQ (or what I thought was AUQ - more on that in a minute!) pistons
I was so ready to install the rods..
Then I found out that the wrist pins didn't fit the rods!!! Massive arse!! It turns out the AUQ engine I'd originally bought had been put onto a different block! On 1.8t's the code is stamped onto the head, I just assumed the block was from the same code. There was no way in hell I was sending the rods back to Germany! Some new pistons were to be sourced. VW parts were utterly useless and so a phone call to Mr Knox was made and within two hours I had sourced and collected a complete AUM to strip for the pistons! Other parts will come in handy too so it's not a bad thing! This is now my 5th 1.8t block since starting this project..
Today the AUM ended up looking more like this:
And I spent an hour cleaning the pistons to get back to this stage, 23 hours later!
That's better!
Every ring gap was checked. All bang in the middle of spec.
Rings installed and side gaps checked. Top gap was in spec but strangely I couldn't get a 0.04mm gauge into the 2nd and 3rd grooves. Checked the old rings and result was the same so I carried on.. strange though.
Pistons lubed up with ATF (textbook recommended it as it's thin enough to allow proper ring seating) and installed, then more plastigauge. All clearances were good! Needed two of us to get the pistons in though as the oil ring kept popping out of the ring compressor.
And here's where I finished today. Rods torqued up with the ARP fasteners. Rotating assembly pretty much there. Took ages as I had to check everything!! Aside from the two side ring gaps every clearance is in spec for a brand new engine :)
-
duggers
- Posts: 162
- Joined: Fri Apr 10, 2009 5:54 pm
- fill in the right answer: 10
- Location: Milton Keynes
Re: HERMAN THE GERMAN! '91 Scala 20vt
Engine building porn, plastiguage, build up lube, uprated rods oh my......oops I've had a bit of a moment.
Haven't done a build for ages. There's a certain satisfaction as you go through a thorough measured build and end up with something you know is just right. Nice work sir.
Haven't done a build for ages. There's a certain satisfaction as you go through a thorough measured build and end up with something you know is just right. Nice work sir.
Apparently the dreadful paint on my Rocco is PATINA....
Membership # 432
Membership # 432
-
james butler
- Posts: 2966
- Joined: Fri Apr 24, 2009 1:54 pm
- fill in the right answer: 10
- Location: birmingham
Re: HERMAN THE GERMAN! '91 Scala 20vt
this may be a daft question and i don't doubt that you know what you are doing, but can you use old pistons from another engine like that?
i thought pistons and rings wear to a block?
i thought pistons and rings wear to a block?
I dont mind project cars but I HATE SANDING!!!
-
treefingers
- Posts: 400
- Joined: Wed Aug 14, 2013 1:04 pm
- fill in the right answer: 15
Re: HERMAN THE GERMAN! '91 Scala 20vt
Yes you can, the only part of a piston that wears against the cylinder is the piston skirt. The new pistons had less wear than the originals plus my bores were honed. Pistons are ok providing they are within spec, I'd never use old rings though.james butler wrote:this may be a daft question and i don't doubt that you know what you are doing, but can you use old pistons from another engine like that?
i thought pistons and rings wear to a block?
-
treefingers
- Posts: 400
- Joined: Wed Aug 14, 2013 1:04 pm
- fill in the right answer: 15
Re: HERMAN THE GERMAN! '91 Scala 20vt
Yes - it's nice being able to measure and verify every step! It takes patience and cleanliness!duggers wrote:Engine building porn, plastiguage, build up lube, uprated rods oh my......oops I've had a bit of a moment.
Haven't done a build for ages. There's a certain satisfaction as you go through a thorough measured build and end up with something you know is just right. Nice work sir.
-
treefingers
- Posts: 400
- Joined: Wed Aug 14, 2013 1:04 pm
- fill in the right answer: 15
Re: HERMAN THE GERMAN! '91 Scala 20vt
Week over and it's just about ready to drop in... here's how I got there!
Elring head gasket and skimmed head. New rear main oil seal.. tricky to install without smooshing the lip.
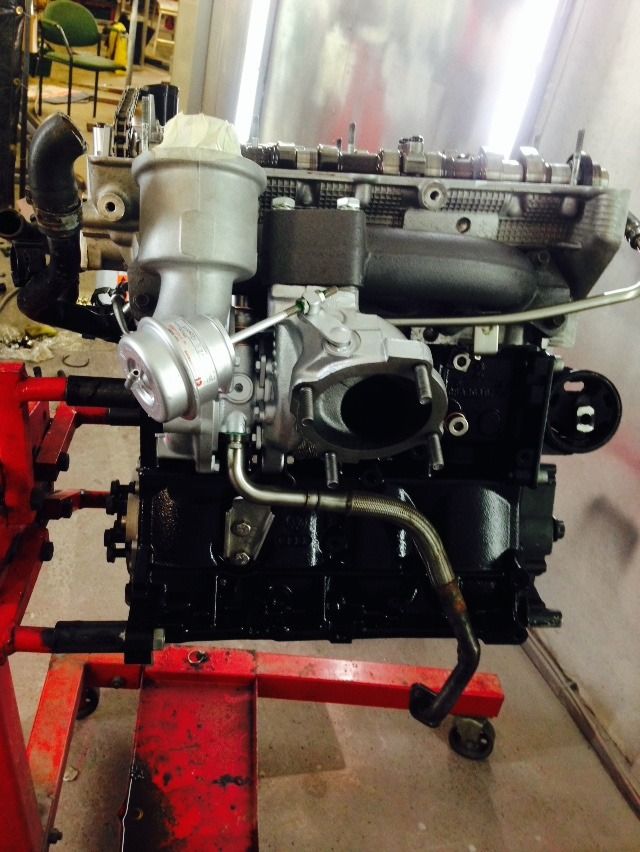
Head torqued down and manifolds on with fresh gaskets
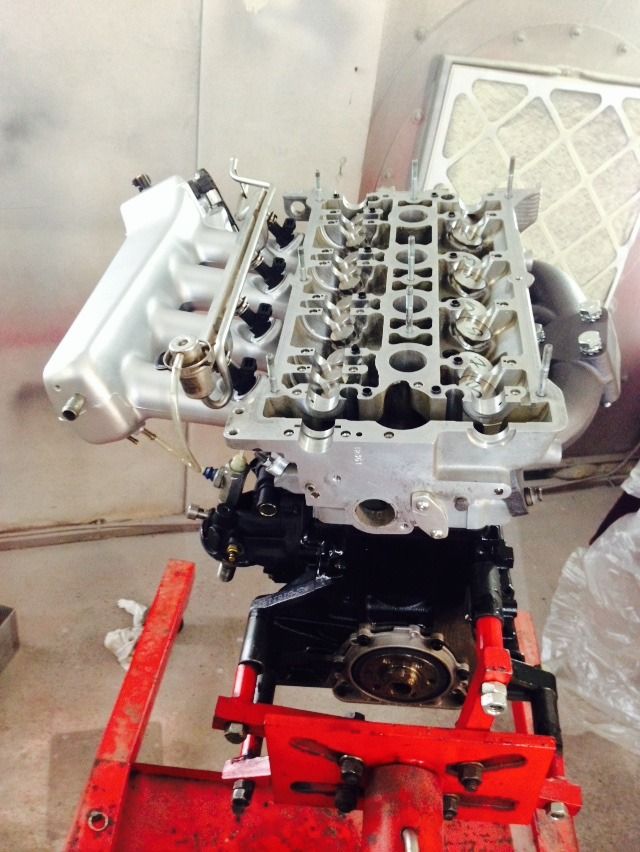
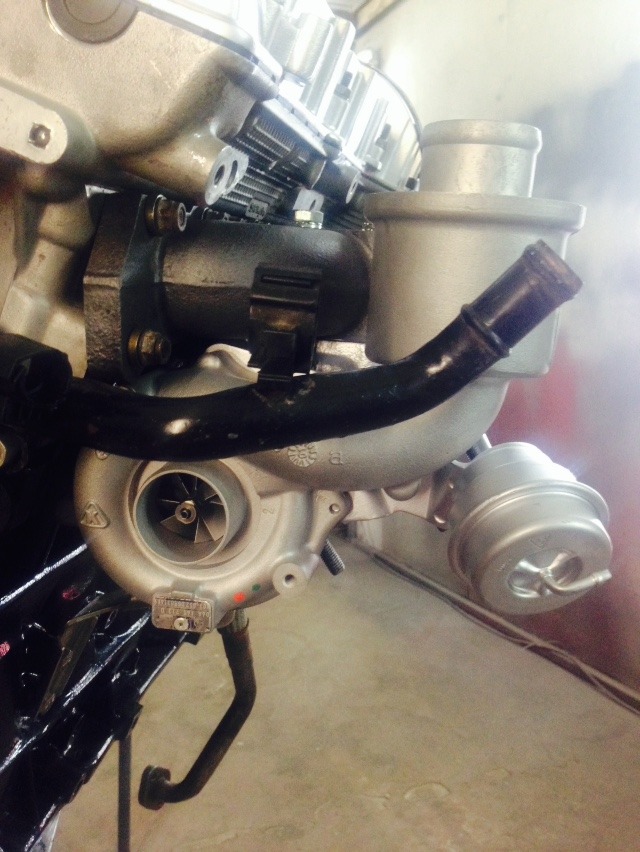
KO3s turbo mounted and turbo lines in with new copper washers
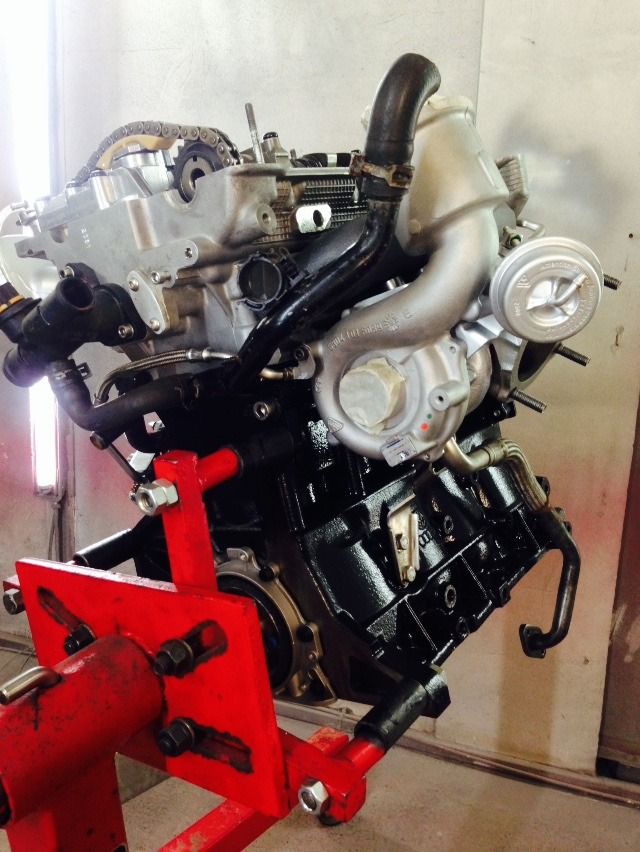
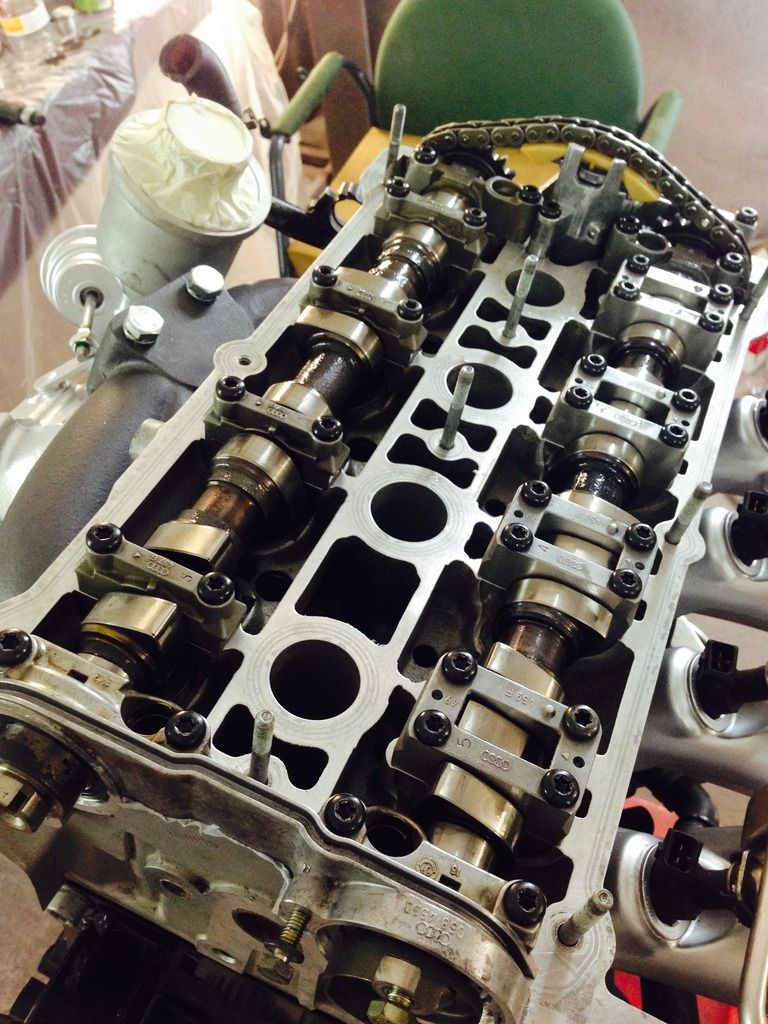
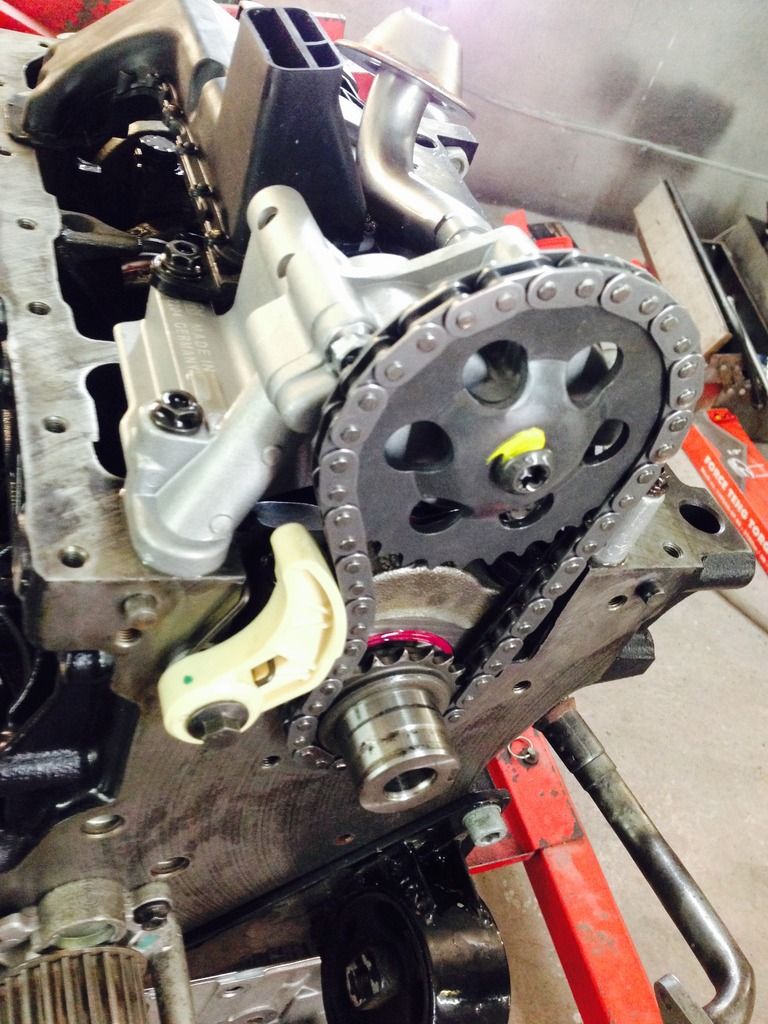
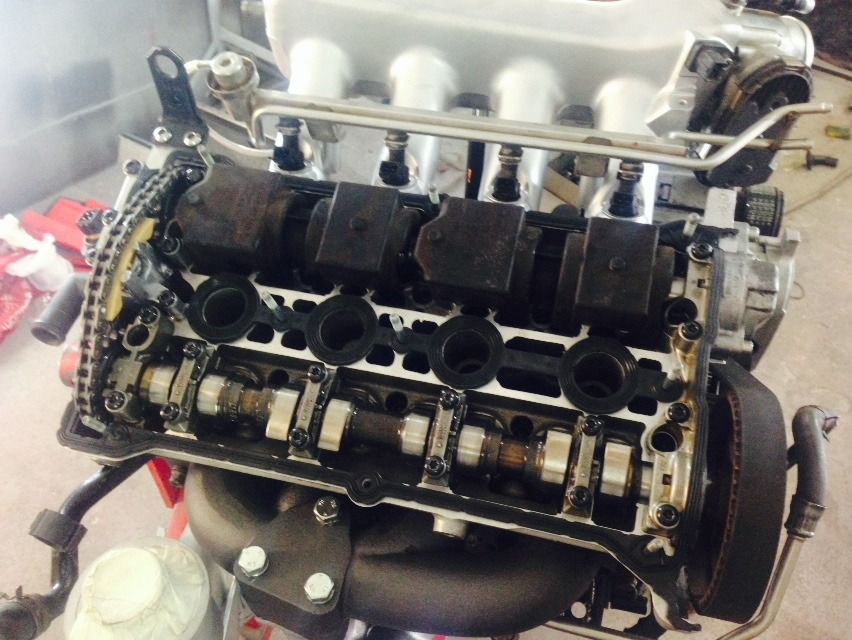
Cams in. 16 notches in the chain between the two cam markings. Took two installs to get these right, the first time they wouldn't turn a full cycle on the camshaft pulley. Removal of lobe affecting lifters and a good squirt of oil sorted it. The tensioner is from a 20v NA engine as the same part is about £40 cheaper than the 20v T version! Febi of course..
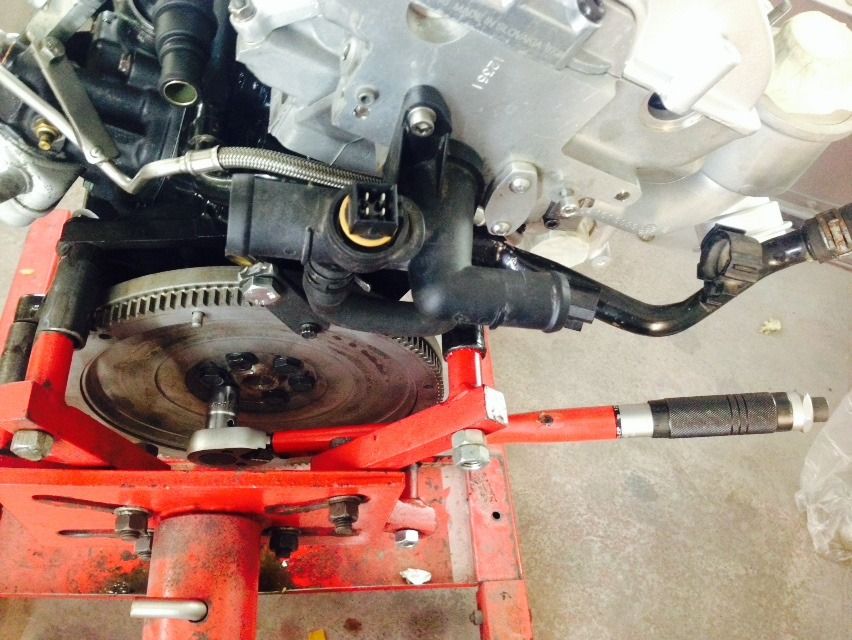
Lightened flywheel in, bolts got threadlock to seal up those crankshaft threads. Torque spec was 30nm, 60nm and a 1/4 turn. F-k me that took some doing!!
Most importantly these two sump bolts are once again accessible thanks to the removal of all that metal!

New Febi oil pump, tensioner and chain. Primed with oil.
With the flywheel on I could install my locking tool and torque up the crankshaft pulley. 90nm and a 1/4 turn, this was insane to tighten!! I was hanging right on the end of my long breaker bar and the whole engine wanted to twist on the stand!! Timed up using the original tensioner stripped of all it's gubbins. New water pump o-ring. Every o-ring and gasket was replaced.

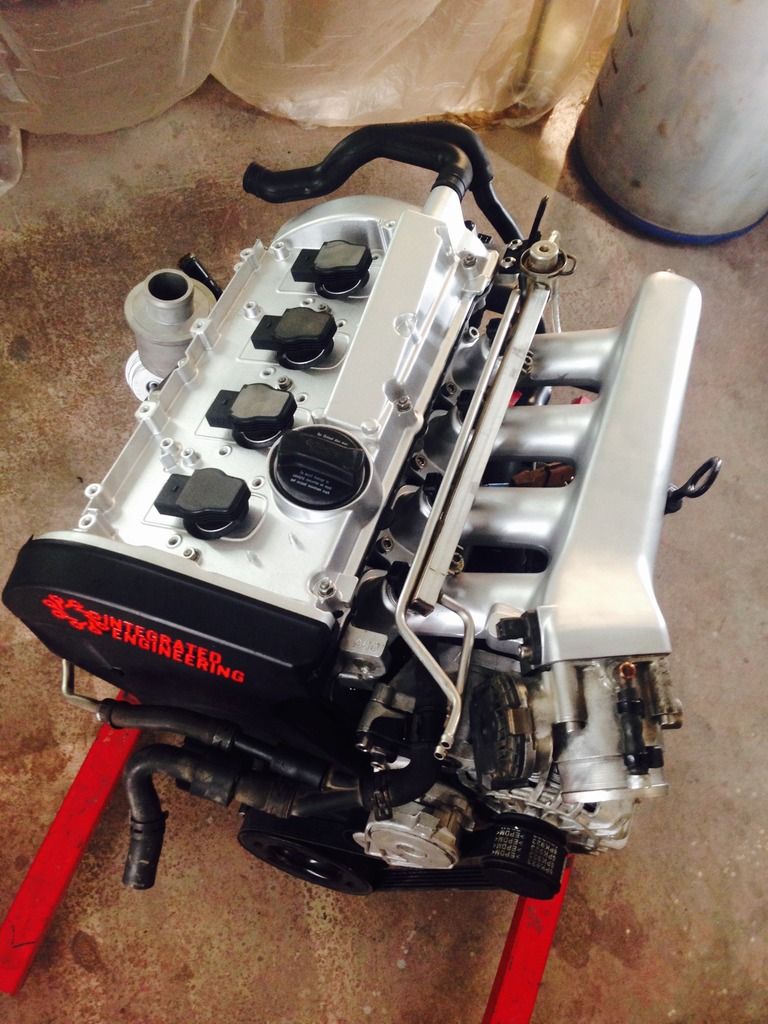
New Elring valve cover gasket. Still need to find a place for the coolant reservoir, would be handy to put it at the pulley end as this is the original position.
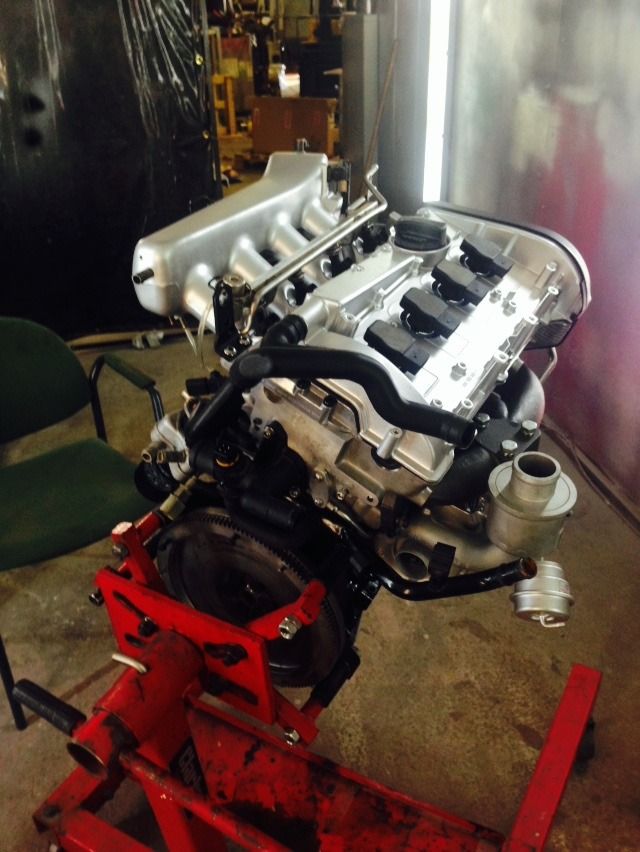
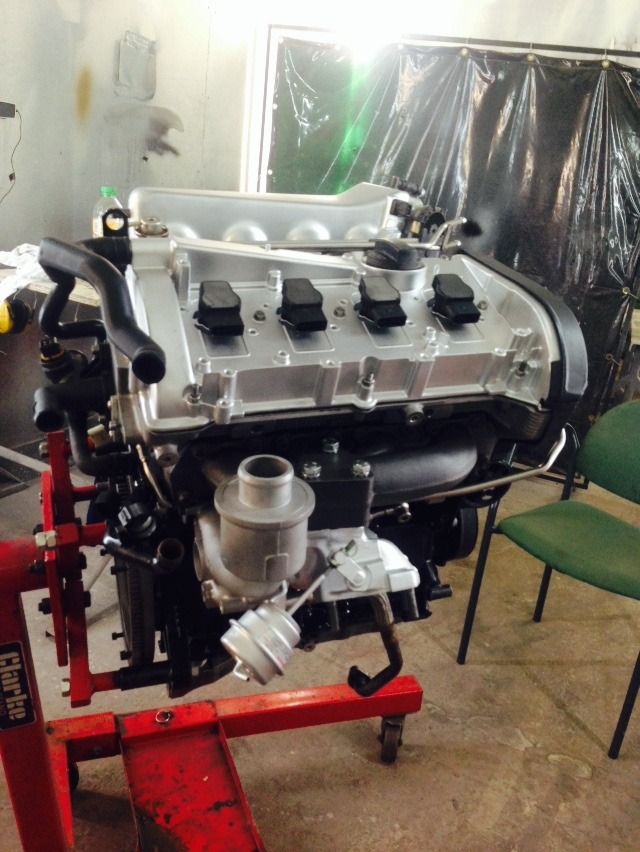
Engine build complete!
Elring head gasket and skimmed head. New rear main oil seal.. tricky to install without smooshing the lip.
Head torqued down and manifolds on with fresh gaskets
KO3s turbo mounted and turbo lines in with new copper washers
Cams in. 16 notches in the chain between the two cam markings. Took two installs to get these right, the first time they wouldn't turn a full cycle on the camshaft pulley. Removal of lobe affecting lifters and a good squirt of oil sorted it. The tensioner is from a 20v NA engine as the same part is about £40 cheaper than the 20v T version! Febi of course..
Lightened flywheel in, bolts got threadlock to seal up those crankshaft threads. Torque spec was 30nm, 60nm and a 1/4 turn. F-k me that took some doing!!
Most importantly these two sump bolts are once again accessible thanks to the removal of all that metal!
New Febi oil pump, tensioner and chain. Primed with oil.
With the flywheel on I could install my locking tool and torque up the crankshaft pulley. 90nm and a 1/4 turn, this was insane to tighten!! I was hanging right on the end of my long breaker bar and the whole engine wanted to twist on the stand!! Timed up using the original tensioner stripped of all it's gubbins. New water pump o-ring. Every o-ring and gasket was replaced.
New Elring valve cover gasket. Still need to find a place for the coolant reservoir, would be handy to put it at the pulley end as this is the original position.
Engine build complete!
-
steve bain
- Posts: 630
- Joined: Wed Apr 15, 2009 11:01 am

-
james butler
- Posts: 2966
- Joined: Fri Apr 24, 2009 1:54 pm
- fill in the right answer: 10
- Location: birmingham
Re: HERMAN THE GERMAN! '91 Scala 20vt
very nice work!
I dont mind project cars but I HATE SANDING!!!
-
mark1gls
- Posts: 3954
- Joined: Thu Apr 02, 2009 9:28 pm
- fill in the right answer: 10
- Location: Somerset
Re: HERMAN THE GERMAN! '91 Scala 20vt
You've done a fantastic job there, great attention to detail.
Mk1 78 Scirocco GLS 1.6 FR, weekend toy.
Mk1 88 Golf GTi cabriolet 1.8 DX. Daily drive.
Membership No. 323
Mk1 88 Golf GTi cabriolet 1.8 DX. Daily drive.
Membership No. 323
-
treefingers
- Posts: 400
- Joined: Wed Aug 14, 2013 1:04 pm
- fill in the right answer: 15
Re: HERMAN THE GERMAN! '91 Scala 20vt
thanks!
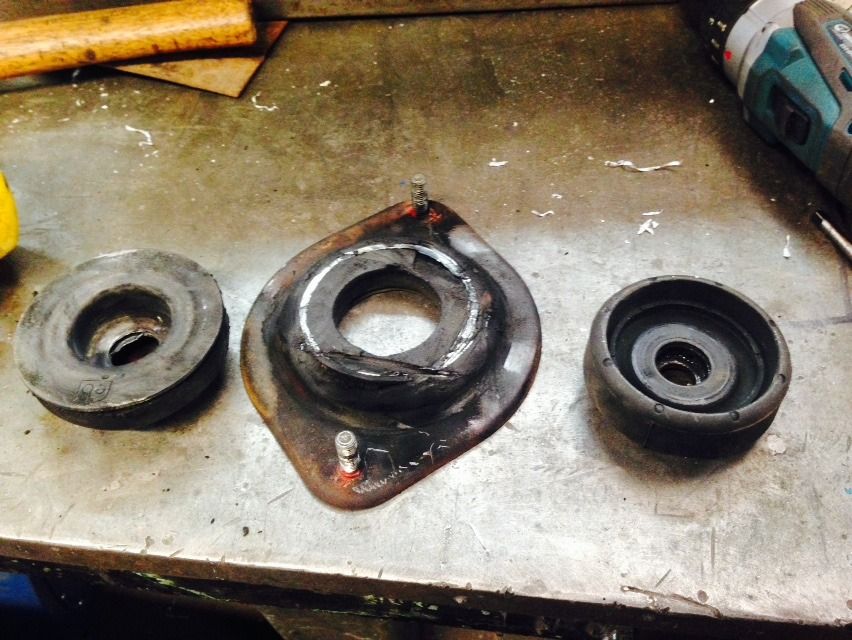
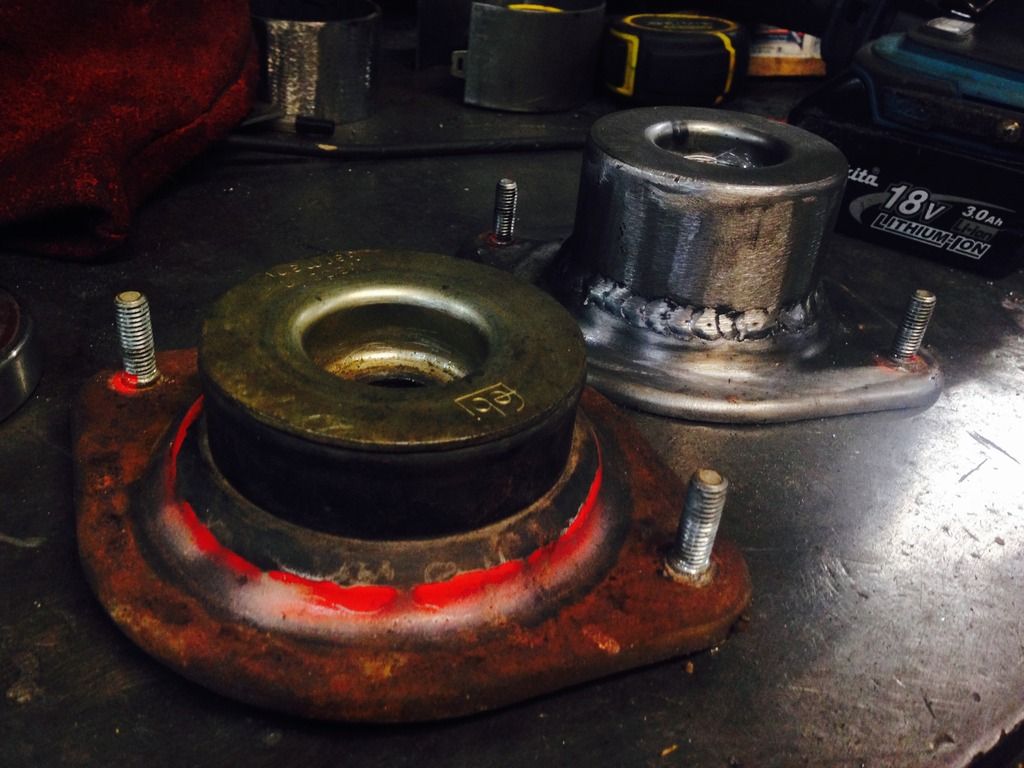
Ive wanted to make some raised top mounts for a while, but been a little stumped on how to achieve it. I finally got one made tonight. It's made from a standard febi topmount that has been cup up and the rubber removed. I wanted more suspension travel with a stock mount so Ive gone for Audi 80 rubbers. I had to get inside the closed engine bay with a tape measure to check how much higher I could go! First time I got a bit stuck, couldn't get the bonnet back open..
So here's the standard mount cut up and the Audi rubber
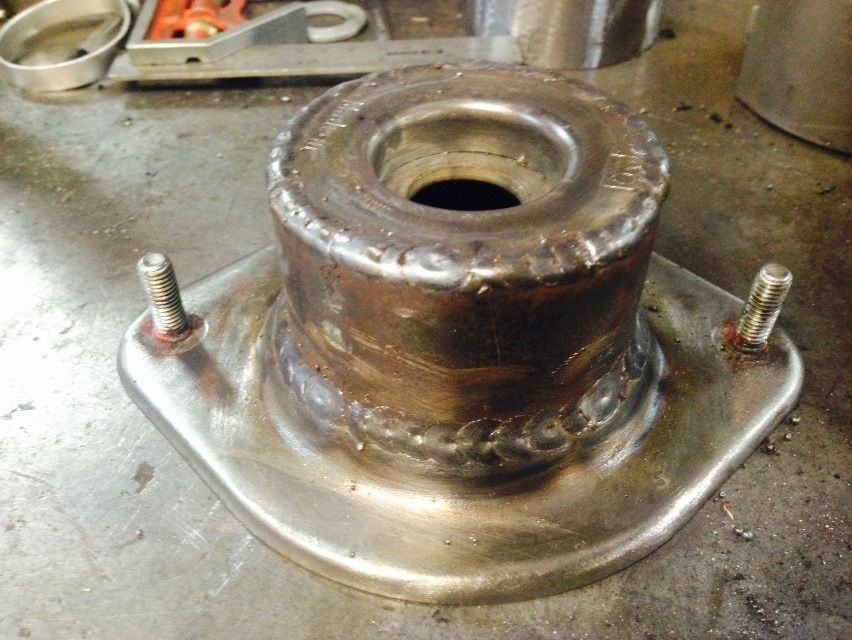
Took me ages to find some tube that was near enough in size. Bought some slightly smaller tube that I opened up by wedging some old bearings in there

Added in an extra piece of metal to get the correct diameter for the rubber

and fully welded and tidied up. I ended up shortening the top cup a little so that the rubber is supported In the middle and at the top edges. The bush is a nice tight press fit.
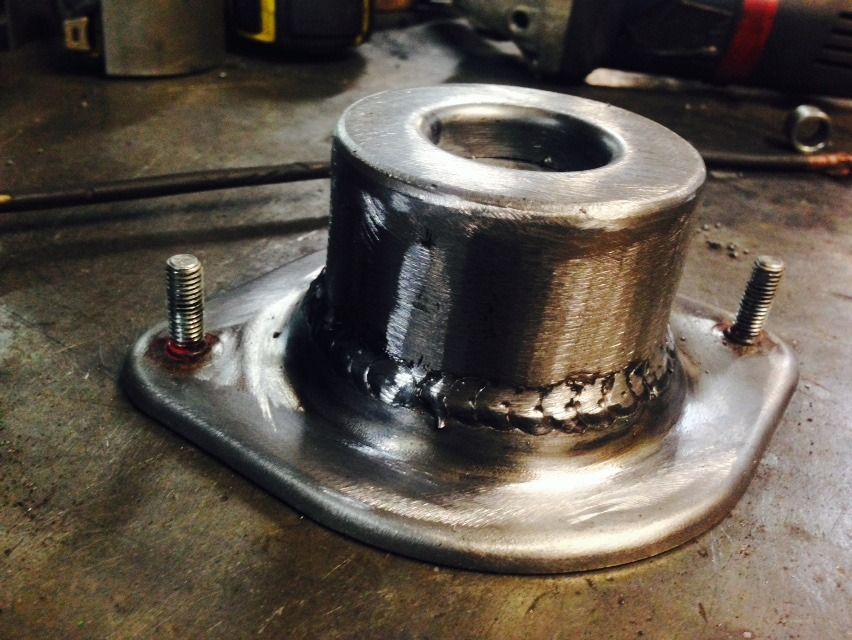
Just gotta make one more now, and give them a lick of paint. By my calculations I've got an inch more travel on the front before my suspension bottoms out. A fair bit of work for one inch but worth it none the less.
Ive wanted to make some raised top mounts for a while, but been a little stumped on how to achieve it. I finally got one made tonight. It's made from a standard febi topmount that has been cup up and the rubber removed. I wanted more suspension travel with a stock mount so Ive gone for Audi 80 rubbers. I had to get inside the closed engine bay with a tape measure to check how much higher I could go! First time I got a bit stuck, couldn't get the bonnet back open..
So here's the standard mount cut up and the Audi rubber
Took me ages to find some tube that was near enough in size. Bought some slightly smaller tube that I opened up by wedging some old bearings in there
Added in an extra piece of metal to get the correct diameter for the rubber
and fully welded and tidied up. I ended up shortening the top cup a little so that the rubber is supported In the middle and at the top edges. The bush is a nice tight press fit.
Just gotta make one more now, and give them a lick of paint. By my calculations I've got an inch more travel on the front before my suspension bottoms out. A fair bit of work for one inch but worth it none the less.
-
steve bain
- Posts: 630
- Joined: Wed Apr 15, 2009 11:01 am
-
treefingers
- Posts: 400
- Joined: Wed Aug 14, 2013 1:04 pm
- fill in the right answer: 15
Re: HERMAN THE GERMAN! '91 Scala 20vt
already made some stub axle relocators for the rear :)
made the second top mount tonight, finished it, then had to cut it up as I'd forgotten to take 5mm off the height to account for the smaller top cup... doh! Choppy chop weldy weld...
made the second top mount tonight, finished it, then had to cut it up as I'd forgotten to take 5mm off the height to account for the smaller top cup... doh! Choppy chop weldy weld...