
I've just popped a post in the wanted section but I wanted now to ask about the job as and when I aquire the filler neck.
What else will I need for the Job? I understand there is a bit more to the job than removing and fitting as bolts perhaps can be corroded so badly.
Could someone fill me in and or link me to parts required so I can get them all ordered.
Thanks
Filler neck and fit
Forum rules
Hints, tips and guides for repair and modification - the FAQ section on the main website is worth checking first for information relating to common faults and technical help. Useful posts and guides will be added to the FAQ http://www.sciroccoregister.co.uk/scirocco-faq
Hints, tips and guides for repair and modification - the FAQ section on the main website is worth checking first for information relating to common faults and technical help. Useful posts and guides will be added to the FAQ http://www.sciroccoregister.co.uk/scirocco-faq
-
james butler

- Posts: 2966
- Joined: Fri Apr 24, 2009 1:54 pm
- fill in the right answer: 10
- Location: birmingham
Re: Filler neck and fit
the rubber pipe linking the filler neck to the tank can be very brittle and may break up when you remove it so you may want to source a new one as well as all the pipe clips, as you rightly pointed out they will be corroded.
replacement is pretty straight forward but you will need to run the tank down to the red and park with the bonnet facing slightly down hill otherwise the fuel will spill out when you take the filler neck off.
just jack the rear drivers side up and remove the wheel then youve got full access (dont forget the axle stands saftey first) undo the pipe conncting to the tank at the bottom of the filler neck and then remove the breather attached to the top of the filler neck just behind the rubber boot behind the filler flap.
2 bolts secure the pipe to the body so once theyre removed you can take the filler neck out.
nows a good time to check for rot in the wheel arch behind the filler neck, if there isnt any GREAT get it undersealed. if not you may want to do some corrective maintence to fix the rust before it innevitably gets worse.
refitting is the same as removal
oh yeah if you can use mikalor clamps on the filler neck rubber pipe 1- theyre more robust and last longer 2- they look awsome
http://www.ebay.co.uk/bhp/mikalor-clamp
their a bit size sensitve so get some the right size
I dont mind project cars but I HATE SANDING!!!
Re: Filler neck and fit
james butler wrote:the rubber pipe linking the filler neck to the tank can be very brittle and may break up when you remove it so you may want to source a new one as well as all the pipe clips, as you rightly pointed out they will be corroded.
replacement is pretty straight forward but you will need to run the tank down to the red and park with the bonnet facing slightly down hill otherwise the fuel will spill out when you take the filler neck off.
just jack the rear drivers side up and remove the wheel then youve got full access (dont forget the axle stands saftey first) undo the pipe conncting to the tank at the bottom of the filler neck and then remove the breather attached to the top of the filler neck just behind the rubber boot behind the filler flap.
Thanks for this detail, I imagined the job requires low fuel...how ironic that I had just filled it up and found the leak.
james butler wrote:2 bolts secure the pipe to the body so once theyre removed you can take the filler neck out.
nows a good time to check for rot in the wheel arch behind the filler neck, if there isnt any GREAT get it undersealed. if not you may want to do some corrective maintence to fix the rust before it innevitably gets worse.
Sure, I'll give it a good going over when I get the time this week. Are the bolts or anything securing the thing going to fall apart and or disintegrate?
I've just ordered the recommended joining rubber pipe from the filler. I'm not sure of the diameter, does anyone know what clips I could order? I may have to get them myself if not from local motor factor.james butler wrote:oh yeah if you can use mikalor clamps on the filler neck rubber pipe 1- theyre more robust and last longer 2- they look awsome
http://www.ebay.co.uk/bhp/mikalor-clamp
their a bit size sensitve so get some the right size
Cheers
-
james butler
- Posts: 2966
- Joined: Fri Apr 24, 2009 1:54 pm
- fill in the right answer: 10
- Location: birmingham
Re: Filler neck and fit
i would have thought the bolts "should" be ok but only when you take it off will you be able to tell.
the internal diameter of the pipe should if i remember correctly be 40mm diameter so at a guess the external will be around 48mm but i would wait till the pipe turns up and measure it.
the internal diameter of the pipe should if i remember correctly be 40mm diameter so at a guess the external will be around 48mm but i would wait till the pipe turns up and measure it.
I dont mind project cars but I HATE SANDING!!!
Re: Filler neck and fit
I had a good look yesterday and spent 1hr 30 wire brushing tons of crap out of the rear end…coated with AF50 for now, I will come back to this with my can of waxoil.james butler wrote:i would have thought the bolts "should" be ok but only when you take it off will you be able to tell.
the internal diameter of the pipe should if i remember correctly be 40mm diameter so at a guess the external will be around 48mm but i would wait till the pipe turns up and measure it.
I discovered the pipe being connected to body is the worst part. The midpoint of the pipe is bolted to the car but that is rotting badly. It looks like the reason for the hole at the top is that there was a bracket joined to the car here? Anyway, that is rotted and the metal has gone with it, producing the holes.
You are indeed right, low down the pipe clips will need to be roughly 50mm and the breather at the top 25mm.
Very kindly a forum member is sending me a filler neck for a reasonable price asap. I will report back when I have fitted it. Thanks for all the help.
-
DannyH
- Posts: 604
- Joined: Wed Apr 01, 2009 11:21 am
- fill in the right answer: 10
- Location: Todmorden
-
james butler
- Posts: 2966
- Joined: Fri Apr 24, 2009 1:54 pm
- fill in the right answer: 10
- Location: birmingham
Re: Filler neck and fit
yeah you can make up a new bracket pretty easy and find a way of attaching it between body of car and the filler pipe.
this is the Achilles heel of all sciroccos. is your pipe rotten? if it is you may find dirt and rust has got into your fuel tank, its not the end of the world (unless you have fuel injection) as you can put a magnet on the bottom of the tank to trap the rust in one spot away from the pick up pipe and the dirt should get trapped by the fuel filter (make sure you change it every 6 months for a couple o years) and will be removed when its serviced.
sounds like your well on your way but make sure you pay special attention to that arch as they're known for rotting out there if not treated properly.
i had to weld mine and i treated it with 3 coats of hammerite, a coat of stone chip followed by 2 coats of underseal brushed on thickly.
I dont mind project cars but I HATE SANDING!!!
Re: Filler neck and fit
The pipe for the most part is good, the top section is the worst, it looks like crap collected there and rotted the pipe.james butler wrote:yeah you can make up a new bracket pretty easy and find a way of attaching it between body of car and the filler pipe.
this is the Achilles heel of all sciroccos. is your pipe rotten? if it is you may find dirt and rust has got into your fuel tank, its not the end of the world (unless you have fuel injection) as you can put a magnet on the bottom of the tank to trap the rust in one spot away from the pick up pipe and the dirt should get trapped by the fuel filter (make sure you change it every 6 months for a couple o years) and will be removed when its serviced.
Until this replacement filler neck arrives, what should I use to cover the hole? It's very brittle up there so any time I touch the area it's going to break bits of I think. The car is fuel injection, so what do you suggest? Am I going to have to take the tank off and have it stripped?
I have put a powerful magnet on the base. Isn't rust no longer magnetic though?
The arch is generally good, from what I can see and the crap I've taken away, it's faired pretty well. Perhaps when I get another sunny day, i'll get under and protect the area.james butler wrote:sounds like your well on your way but make sure you pay special attention to that arch as they're known for rotting out there if not treated properly.
i had to weld mine and i treated it with 3 coats of hammerite, a coat of stone chip followed by 2 coats of underseal brushed on thickly.
-
mark1gls
- Posts: 3954
- Joined: Thu Apr 02, 2009 9:28 pm
- fill in the right answer: 10
- Location: Somerset
Re: Filler neck and fit
You can look inside the fuel tank and check for rust and dirt.
(If you click on the pictures it will make them bigger)
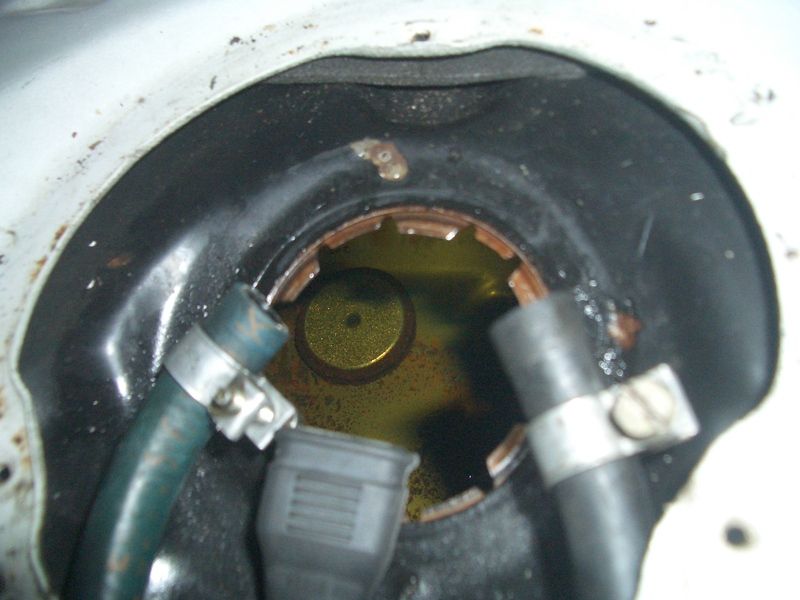
Remove the back seat base and you will see a black round cover plate held on with 3 screws, remove it and you will see the fuel sender like this.
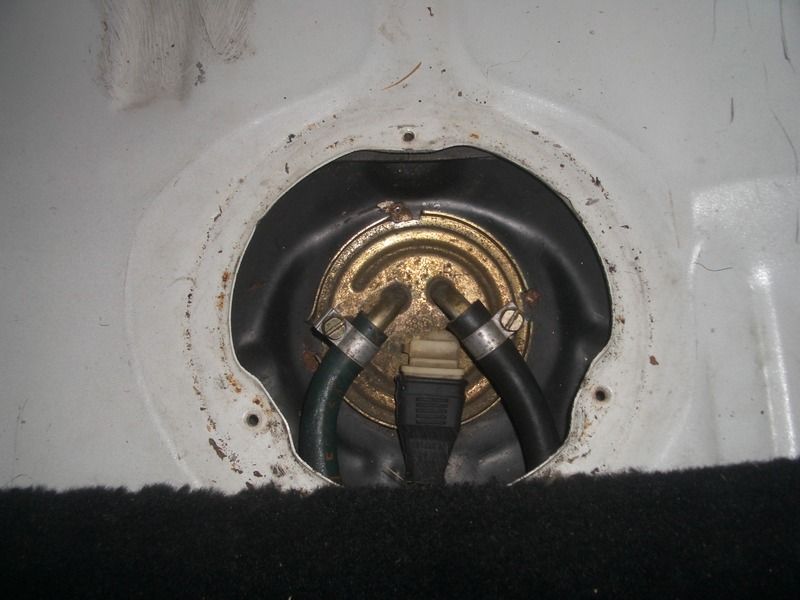
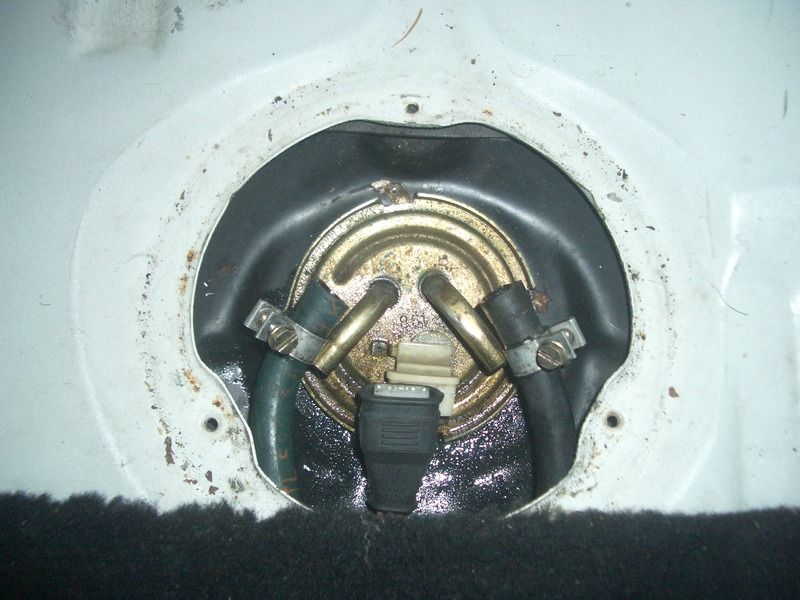
Remove the fuel filler cap to get rid of any build of pressure and replace cap, then unplug electrical connection and loosen fuel hose clips, have a cloth handy when you remove the fuel pipes as a little petrol will come out of the pipes, don't lose the fuel pipes down the hole and remember/ photo which hose when to which metal pipe.
I use a T bar placed on the cut out edge of the sender and tap it with a hammer to remove the sender, it's a bayonet type fitting.
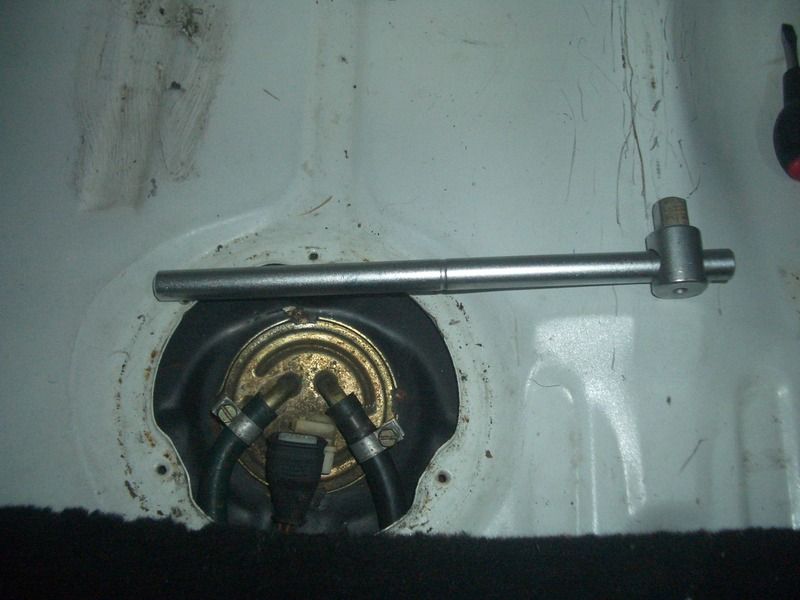
You only need to move it this far to remove the sender.
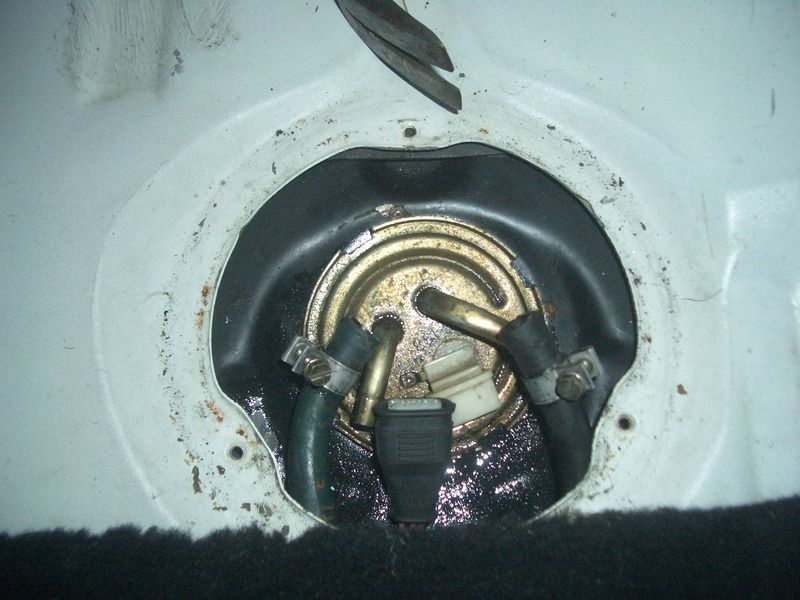
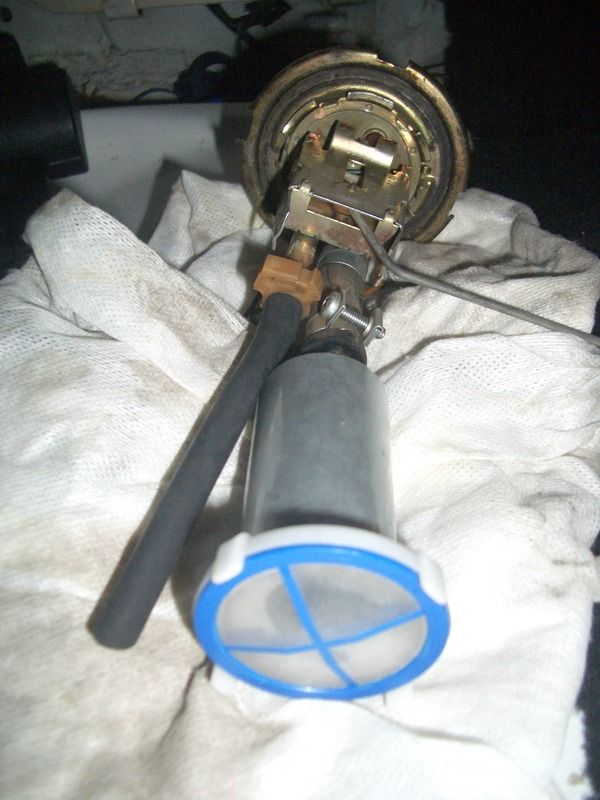
You need to carefully get the sender and lift pump out of the tank as the float is angled so go carefully and it will all fit out of small hole.
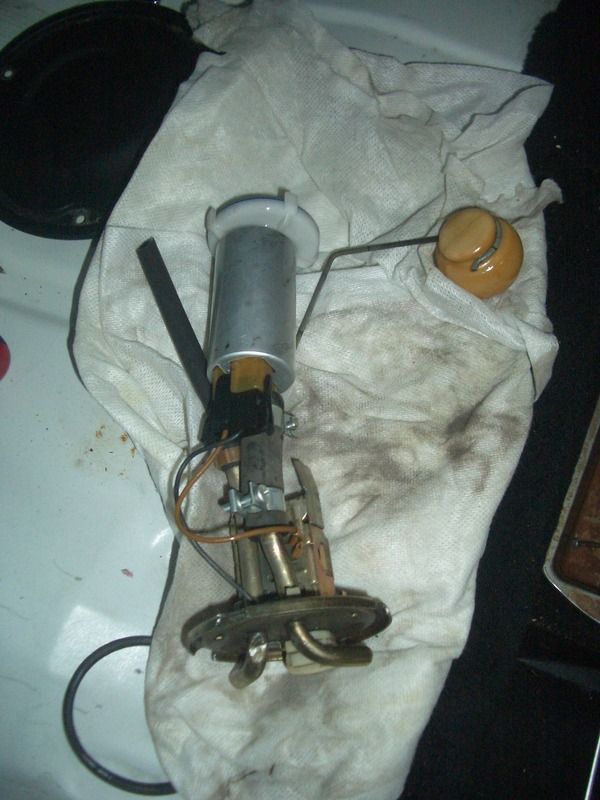
Make sure the plastic filter on the end of the lift is there and clean any bits stuck to it.
Shine a torch in the tank and look for any bits and fish around in the tank with a magnet to get rid of any rusty bits, clean the magnet off then leave it in tank, make sure it's away from the float as you don't want the metal arm to stick to the magnet as the fuel gauge won't work.
My magnet left in the tank.
Clean up the rubber tank seal and you may need a little grease on it so it sticks to the sender and fit it all back in the tank and check the seal is in the right place before tapping the sender back home, connected fuel hoses and electrical connection and job done.
(If you click on the pictures it will make them bigger)
Remove the back seat base and you will see a black round cover plate held on with 3 screws, remove it and you will see the fuel sender like this.
Remove the fuel filler cap to get rid of any build of pressure and replace cap, then unplug electrical connection and loosen fuel hose clips, have a cloth handy when you remove the fuel pipes as a little petrol will come out of the pipes, don't lose the fuel pipes down the hole and remember/ photo which hose when to which metal pipe.
I use a T bar placed on the cut out edge of the sender and tap it with a hammer to remove the sender, it's a bayonet type fitting.
You only need to move it this far to remove the sender.
You need to carefully get the sender and lift pump out of the tank as the float is angled so go carefully and it will all fit out of small hole.
Make sure the plastic filter on the end of the lift is there and clean any bits stuck to it.
Shine a torch in the tank and look for any bits and fish around in the tank with a magnet to get rid of any rusty bits, clean the magnet off then leave it in tank, make sure it's away from the float as you don't want the metal arm to stick to the magnet as the fuel gauge won't work.
My magnet left in the tank.
Clean up the rubber tank seal and you may need a little grease on it so it sticks to the sender and fit it all back in the tank and check the seal is in the right place before tapping the sender back home, connected fuel hoses and electrical connection and job done.
Mk1 78 Scirocco GLS 1.6 FR, weekend toy.
Mk1 88 Golf GTi cabriolet 1.8 DX. Daily drive.
Membership No. 323
Mk1 88 Golf GTi cabriolet 1.8 DX. Daily drive.
Membership No. 323
Re: Filler neck and fit
That's really useful Mark, thanks for the write up.mark1gls wrote:You can look inside the fuel tank and check for rust and dirt.
Re: Filler neck and fit
Mark...I'm with the car now. You say, tap the sender but I can't seem to move it at all. Any details?
-
james butler
- Posts: 2966
- Joined: Fri Apr 24, 2009 1:54 pm
- fill in the right answer: 10
- Location: birmingham
Re: Filler neck and fit
they are pretty tight and require a fair bit o force to get it going.
are you tapping it the right way?
i used 2 flat headed screwdrivers cross crossed so they lock against each other as you try and turn the sender.
are you tapping it the right way?
i used 2 flat headed screwdrivers cross crossed so they lock against each other as you try and turn the sender.
I dont mind project cars but I HATE SANDING!!!
Re: Filler neck and fit
Jobs done now, thanks for the reply. I did have to strike it harder, I was just weary that I was striking metal and there's fuel vapours around.
The new pipe went on ok and I sprayed the areas with waxoil as I cleaned it up. It's looks a lot tidier under there now.
The new pipe went on ok and I sprayed the areas with waxoil as I cleaned it up. It's looks a lot tidier under there now.
-
mark1gls
- Posts: 3954
- Joined: Thu Apr 02, 2009 9:28 pm
- fill in the right answer: 10
- Location: Somerset
Re: Filler neck and fit
Good news, you managed to get it out, be glad you don't have a later carb car as they have a plastic top on the fuel sender and you can't go bashing that with a hammer!
How was the inside of the fuel tank?
Make sure you do change the fuel filter on a regular basis I change mine very 2 years/ 20,000 miles as they are cheaper to replace than repairing the fuel injection system and injectors are getting expensive now.
How was the inside of the fuel tank?
Make sure you do change the fuel filter on a regular basis I change mine very 2 years/ 20,000 miles as they are cheaper to replace than repairing the fuel injection system and injectors are getting expensive now.
Mk1 78 Scirocco GLS 1.6 FR, weekend toy.
Mk1 88 Golf GTi cabriolet 1.8 DX. Daily drive.
Membership No. 323
Mk1 88 Golf GTi cabriolet 1.8 DX. Daily drive.
Membership No. 323